This document discusses the topic within the context of two operating systems (OS) or platforms – the Windows OS and 3DEXPERIENCE platform On Cloud, and the SOLIDWORKS 3D CAD software.
Members of an engineering department use SOLIDWORKS to create content. The additional information that they create for their content can be Windows file properties or SOLIDWORKS file properties.
Members of a company use the 3DEXPERIENCE platform On Cloud apps to create content. The additional information that they create for their content are 3DEXPERIENCE platform attributes.
Attributes are the common language for all platform members, regardless of department. Therefore, defining attributes is one of the first tasks that a platform administrator performs when configuring their platform for first use.
To ensure that the additional information is accurate in both systems, a mapping between the two systems is a requirement.
Understanding Attributes
In PDM systems, attributes are referred to as variables. In the 3DEXPERIENCE platform, attributes are a set of properties that identify a product lifecycle management (PLM) object, such as name, revision, description, the weight of a part, and the material it is made from, which are used to locate data.
Types of Attributes
- Default Attributes: Basic properties similar to Windows file properties.
- Custom Attributes: Flexible, user-defined properties akin to SOLIDWORKS file properties, supporting various CAD content and enhancing cross-departmental collaboration.
Attributes are accessible in the MySession and Information Side Panels. Benefits include:
- Enhanced search using 6W tags.
- Centralized, cloud-based data storage in Collaborative Spaces.
NOTE: Administrators can create attributes, while SOLIDWORKS file properties (custom and configuration) can be mapped to the platform, supporting parts, assemblies, and drawings.
Mapping Workflow:
- Add Attributes
- Create SOLIDWORKS File Properties as Attributes
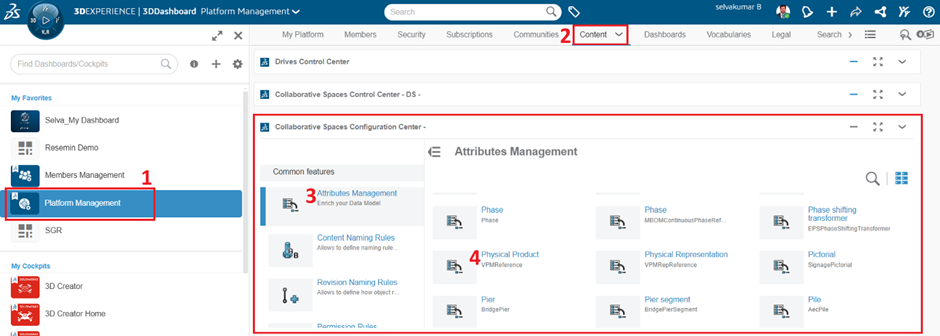
Platform Management > Content > Collaborative Spaces Configuration Center > Attributes Management > Physical Products
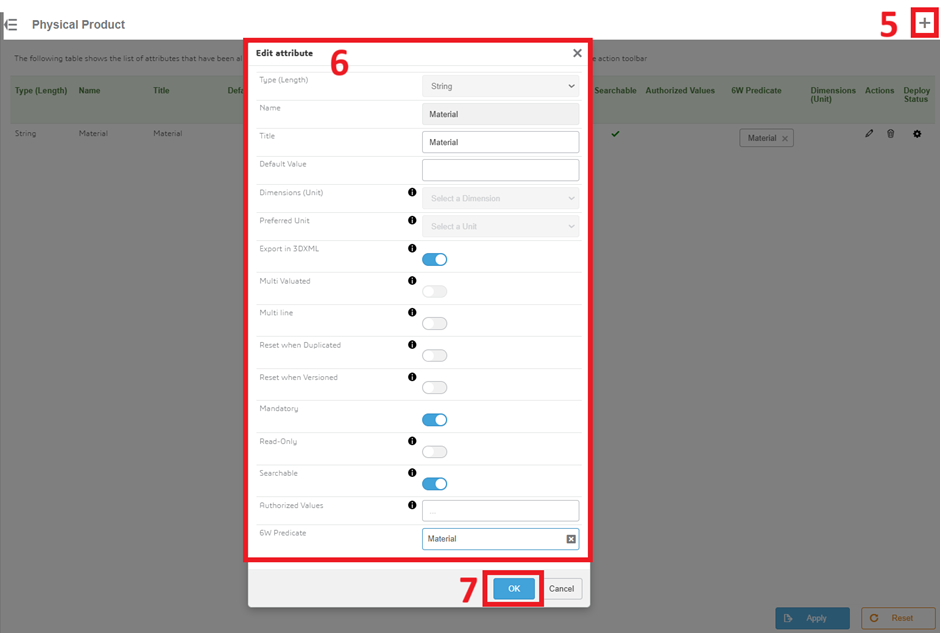
Click + Icon to create new attribute, Fill the attributes details in the edit attribute window and then click OK.
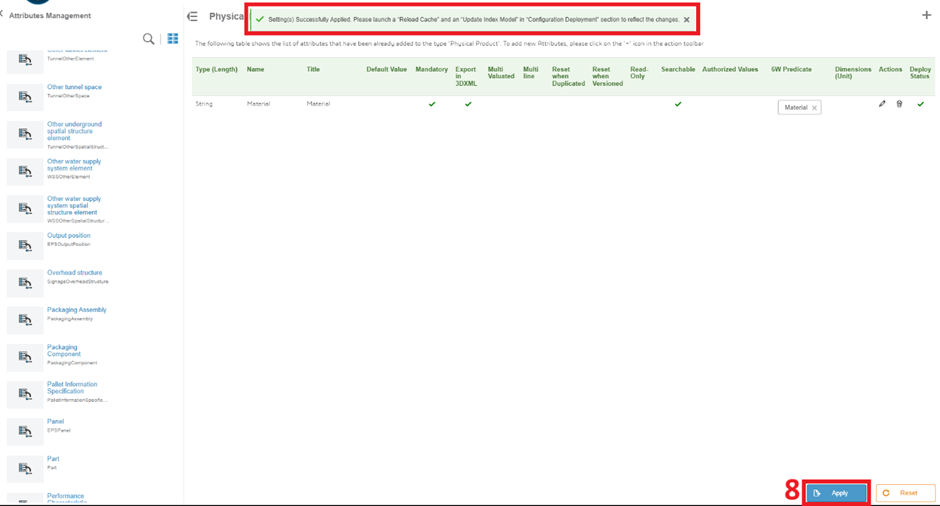
Once you add the attribute it will shows in the list. The Reset function deletes attributes that are not yet deployed.
Before proceeding, verify that all attributes are deployed and display green check marks. After clicking Apply to deploy your attributes, the following notification appears.
- Reload Server Cache and Update Index Model
You must perform these two tasks to finalize the deployment of your attributes. The numbers in the following images depict the steps that you must follow to complete these tasks.
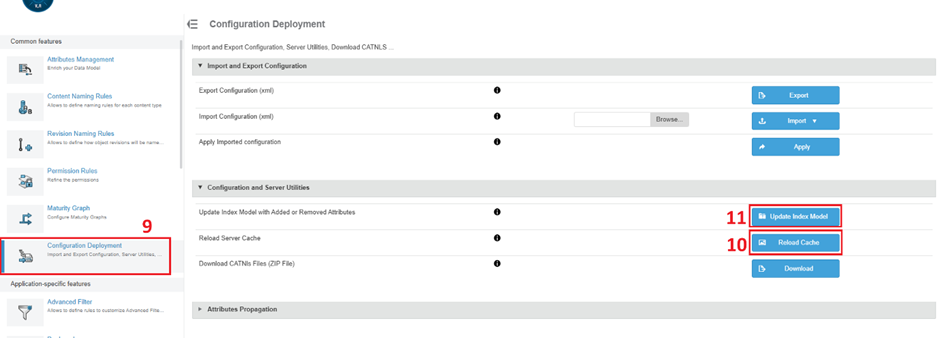
Platform Management > Content > Collaborative Spaces Configuration Center > Configuration Deployment > Configuration and Server Utilities
You must reload the server cache so that apps can make use of the new attributes. When you click Reload Cache, the following notification appears.

You must update the index model so that you can search for the new attributes. When you click Update Index Model, the following notification appears.

It takes a few minutes to complete both operations, depending on the amount of content in your platform and the number of attributes created. A notification does not appear when these operations are complete. You can consider these operations complete when you see the attributes in your content and see search results.
- 3DEXPERIENCE integration
Launch SOLIDWORKS Connected > Options > System Options > 3DEXPERIENCE Integration > Update SOLIDWORKS files for compatibility with the 3DEXPERIENCE platform.
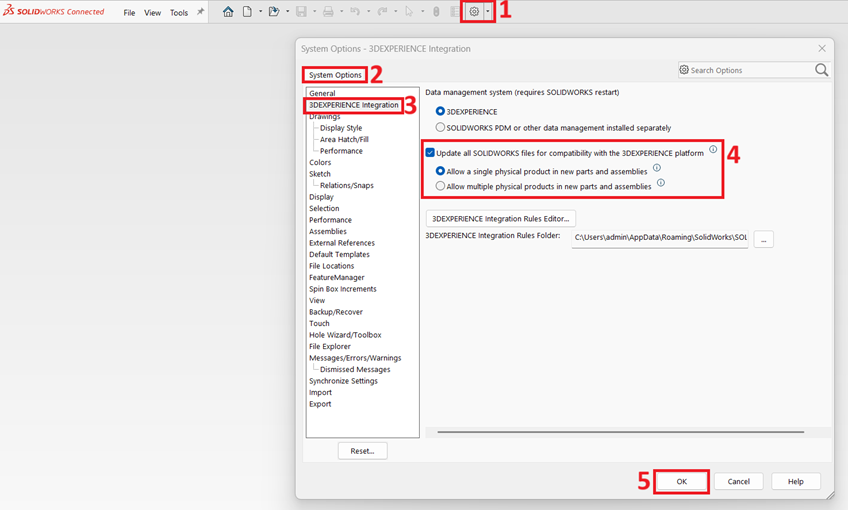
Note: Once setting up the option need to restart the SOLIDWORKS Application.
- Configure Attribute Mapping
Platform Management > Content > Collaborative Spaces Configuration Center > CAD Collaboration > Connectors > SOLIDWORKS
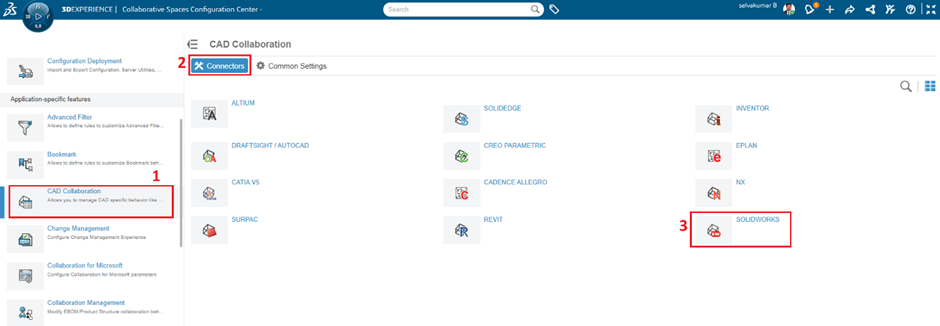
The numbers in the following images depict the steps that you must follow to configure attribute mapping.


Repeat steps 3-7 for all content types and SOLIDWORKS file properties that you want to configure.
When you map attributes bidirectionally or 3DEXPERIENCE platform > SOLIDWORKS, those attributes become available in the PLM Attributes list for selection as Configuration Properties

When complete, click Apply.
Once complete, you can delete, reset and recreate any attribute mappings, at any time, without affecting the attributes themselves.
- Attribute Mapping in Use
After creating and deploying attributes and configuring the attribute mapping, you can invite uses to your platform and they can start creating content.
If you configure attribute mapping after creating content, then platform members must establish a new connection to the 3DEXPERIENCE platform on their client computers to use the mapping.

Conclusion:
Attributes are the linchpin for unlocking the 3DEXPERIENCE platform’s potential. Whether leveraging defaults or customizing, effective attribute management streamlines data processes, fostering collaboration across the design ecosystem.
Attributes are not only used in the technical form but can also be used by the sales department or any non-engineering or non-CAD department. This makes it very important that they are generic and understandable.
This step-by-step process and recommendations outlined above should serve as a helpful guide to get Administrators going with attributes.