

Creating a new cable and cable manufacturer in Solidworks electrical and customizing the cable according to our specification.
Creating a cable involves following these steps: Once you’ve created the cable, you can then add it to a harness.
You can use cables to connect components. There will be default library for few manufacturer cables. To add a few cable we need follow the below mentioned steps.
How to create Electrical Cable
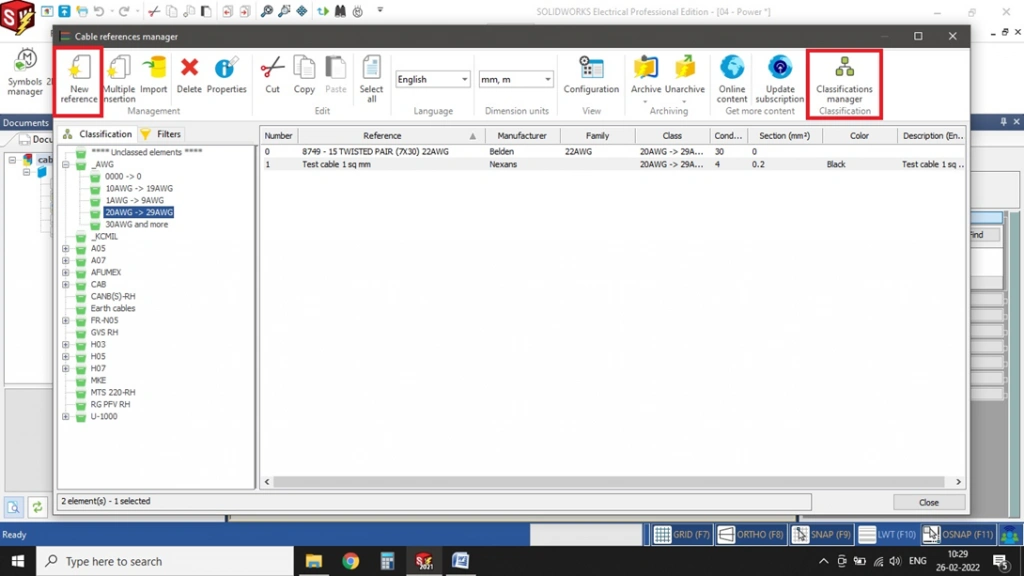
- In library there will be an option cable reference manager
- Selecting the Cable Reference Manager opens a new table.

Electrical cable reference manager
Solidworks Electrical will launch the Cable Reference Manager, where you can create a new reference and assign it to a classification (standard). The classification manager is like a folder in which it can filtered with different standards.
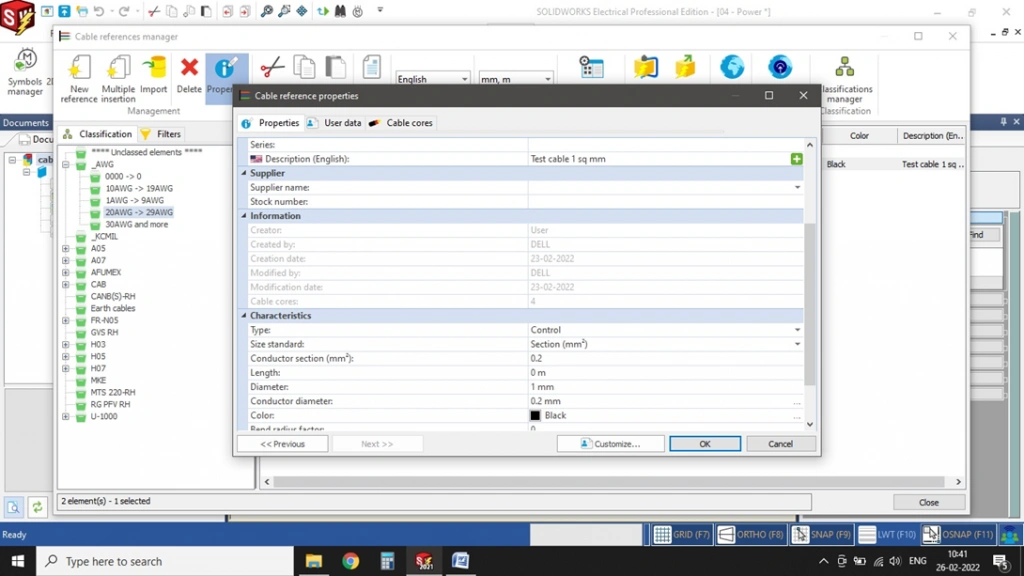
Creation of new cable properties
Once new reference is pressed. The software will open the Cable Reference Properties tab. The property tab requires you to define your cable specifications, including diameter (dia), cross-sectional area (Sq.mm), color, number of cores, and core diameter.
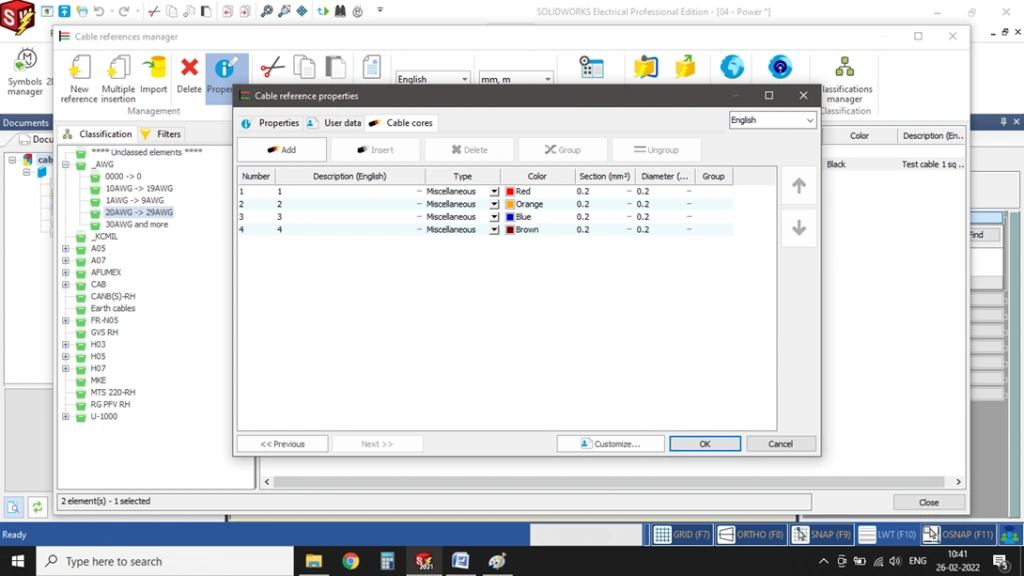
Cable core properties
- Cable core properties will be present in the same tab as the 3 rd option at the top.
- There we have to add the number of cores we need inside the cable.
- You must also specify the diameter of each core and designate its type (power, neutral, or miscellaneous).
- And colours of the cores also given in this tab.
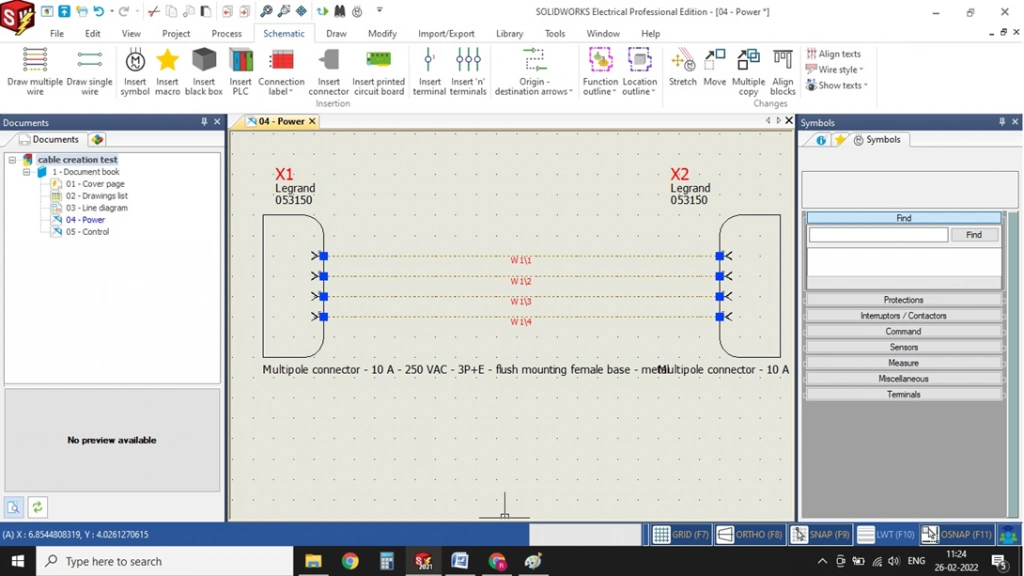
Assigning cable between components
- After creating the new cable, place it and assign it to the components that require it.
- Perform these steps on the schematic page.
- Once you place the components and draw the wires, you can then create the cable.
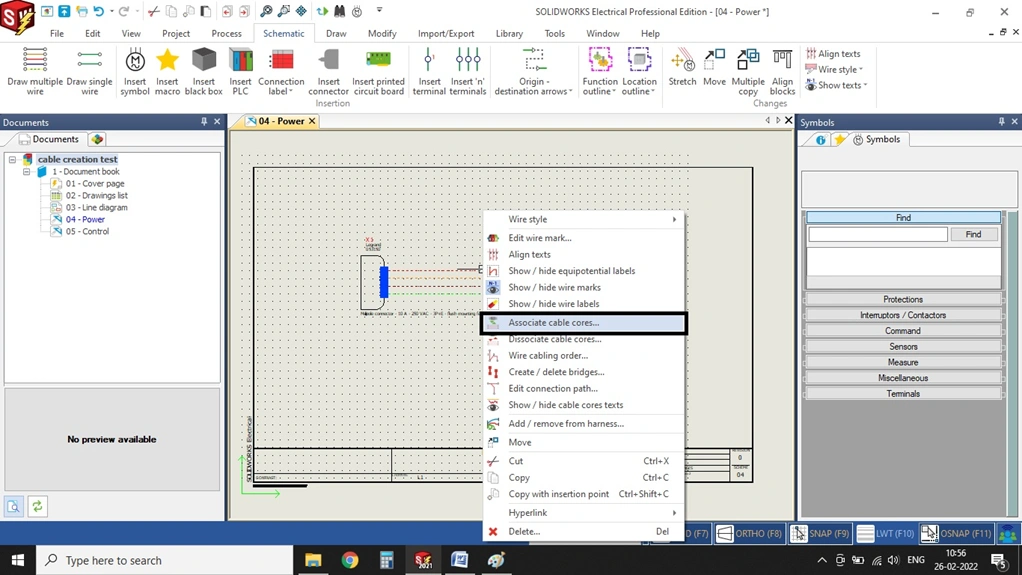
Associated cable cores
- Once you’ve completed the previous steps.
- In associated cable cores tab we have to add the cable using new cable option.
- And then we have to select the cable we have created in the library manager.
- And we have to select the four cores and we have to select four wires at the bottom.
And after selecting all these we have associate it using associate cable cores option present at the top and also higlighted at the bottom image.
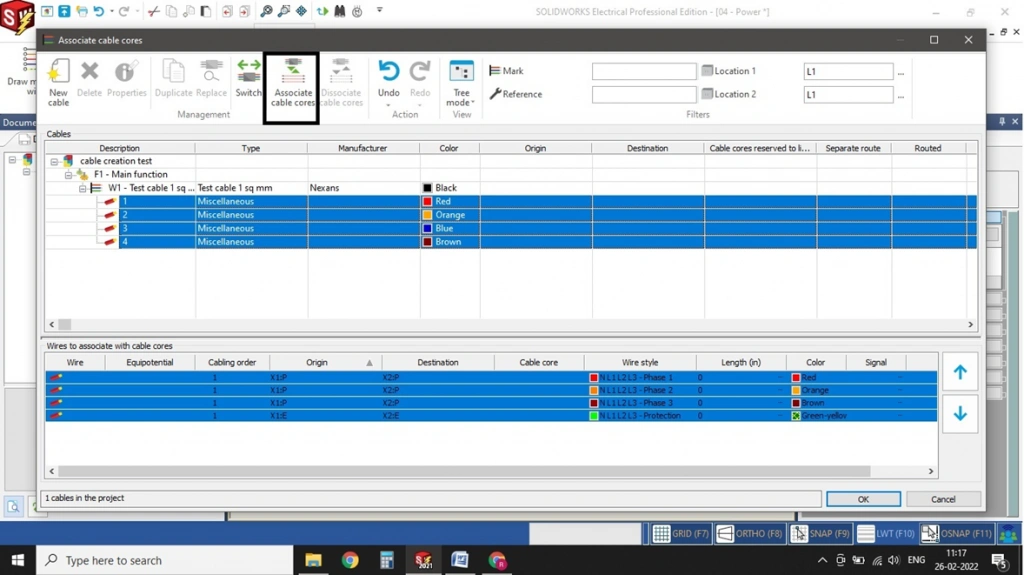
Associating the cable turns it green and updates the origin and destination.
Associating the cable adds it to the wires and displays the cable mark between the components
I do consider all thhe concepts you have presented on your post.
They’re very convincing and cann certainly work. Still, the posts arre
too short for novices. Could you please extend them a little from next time?
Thanks for tthe post. https://Bandur-Art.Blogspot.com/2024/08/the-ultimate-guide-to-no-mans-sky-mods.html
I don’t think the title of your article matches the content lol. Just kidding, mainly because I had some doubts after reading the article.
I don’t think the title of your article matches the content lol. Just kidding, mainly because I had some doubts after reading the article.
I don’t think the title of your article matches the content lol. Just kidding, mainly because I had some doubts after reading the article. https://accounts.binance.com/register?ref=P9L9FQKY
Thank you for your sharing. I am worried that I lack creative ideas. It is your article that makes me full of hope. Thank you. But, I have a question, can you help me? https://www.binance.com/pt-BR/join?ref=YY80CKRN
Your article helped me a lot, is there any more related content? Thanks!
Your article helped me a lot, is there any more related content? Thanks!
Thanks for sharing. I read many of your blog posts, cool, your blog is very good.
Your article helped me a lot, is there any more related content? Thanks!
Thank you for your sharing. I am worried that I lack creative ideas. It is your article that makes me full of hope. Thank you. But, I have a question, can you help me?
Can you be more specific about the content of your article? After reading it, I still have some doubts. Hope you can help me.
I don’t think the title of your article matches the content lol. Just kidding, mainly because I had some doubts after reading the article.
Can you be more specific about the content of your article? After reading it, I still have some doubts. Hope you can help me.
I don’t think the title of your article matches the content lol. Just kidding, mainly because I had some doubts after reading the article.
Your article helped me a lot, is there any more related content? Thanks!
kamagra 100mg prix: Kamagra Oral Jelly pas cher – Acheter Kamagra site fiable
Acheter Cialis 20 mg pas cher: Tadalafil 20 mg prix sans ordonnance – Cialis en ligne tadalmed.shop
Cialis generique prix: Tadalafil sans ordonnance en ligne – Cialis generique prix tadalmed.shop
acheter kamagra site fiable: kamagra oral jelly – achat kamagra
Tadalafil sans ordonnance en ligne: Tadalafil achat en ligne – Cialis en ligne tadalmed.shop
pharmacie en ligne pas cher: Pharmacies en ligne certifiees – pharmacie en ligne france pas cher pharmafst.com
kamagra oral jelly: Kamagra Oral Jelly pas cher – Kamagra Oral Jelly pas cher
cialis sans ordonnance: Achat Cialis en ligne fiable – Cialis sans ordonnance 24h tadalmed.shop
pharmacie en ligne pas cher: Pharmacies en ligne certifiees – Pharmacie Internationale en ligne pharmafst.com
pharmacie en ligne france pas cher: Medicaments en ligne livres en 24h – pharmacie en ligne france livraison internationale pharmafst.com
pharmacie en ligne france livraison internationale: Medicaments en ligne livres en 24h – pharmacie en ligne avec ordonnance pharmafst.com
pharmacie en ligne sans ordonnance: Pharmacie en ligne France – п»їpharmacie en ligne france pharmafst.com
Pharmacie en ligne livraison Europe: Meilleure pharmacie en ligne – pharmacie en ligne france fiable pharmafst.com
acheter kamagra site fiable: Achetez vos kamagra medicaments – acheter kamagra site fiable
Achetez vos kamagra medicaments: kamagra gel – kamagra en ligne
pharmacie en ligne france livraison internationale: Livraison rapide – pharmacie en ligne pas cher pharmafst.com
Tadalafil 20 mg prix en pharmacie: Acheter Viagra Cialis sans ordonnance – Pharmacie en ligne Cialis sans ordonnance tadalmed.shop
pharmacie en ligne sans ordonnance: pharmacie en ligne pas cher – acheter mГ©dicament en ligne sans ordonnance pharmafst.com
kamagra oral jelly: kamagra 100mg prix – acheter kamagra site fiable
pharmacie en ligne fiable: trouver un mГ©dicament en pharmacie – vente de mГ©dicament en ligne pharmafst.com
vente de mГ©dicament en ligne: Pharmacies en ligne certifiees – Pharmacie en ligne livraison Europe pharmafst.com
Kamagra Oral Jelly pas cher: Achetez vos kamagra medicaments – kamagra pas cher
mexico pharmacy order online: mexico drug stores pharmacies – mexico drug stores pharmacies
Rx Express Mexico: mexico pharmacy order online – mexico drug stores pharmacies
Medicine From India: indian pharmacy – Medicine From India
medicine courier from India to USA: world pharmacy india – indian pharmacy online
medicine courier from India to USA: medicine courier from India to USA – MedicineFromIndia
buying prescription drugs in mexico online: mexican rx online – buying from online mexican pharmacy
medicine courier from India to USA indian pharmacy online shopping indian pharmacy online
canadian pharmacy online ship to usa: Canadian pharmacy shipping to USA – the canadian drugstore
mexico pharmacy order online: pharmacies in mexico that ship to usa – mexican online pharmacy
medicine courier from India to USA Medicine From India indian pharmacy online
medicine courier from India to USA: indian pharmacy online shopping – indian pharmacy
canadian pharmacy near me Generic drugs from Canada medication canadian pharmacy
canadian mail order pharmacy: Express Rx Canada – canada pharmacy online
RxExpressMexico: mexico drug stores pharmacies – Rx Express Mexico
mexico drug stores pharmacies mexico pharmacy order online mexico pharmacy order online
canadian pharmacy world: reliable canadian pharmacy – canadian pharmacy meds
Your point of view caught my eye and was very interesting. Thanks. I have a question for you.
pin up casino: pin up casino – pin-up casino giris
вавада казино: vavada casino – вавада казино
vavada вход: vavada вход – вавада
купить аккаунт магазин аккаунтов
маркетплейс аккаунтов https://marketplace-akkauntov-top.ru/
пин ап казино: пин ап казино официальный сайт – пин ап казино
маркетплейс аккаунтов перепродажа аккаунтов
pin up azerbaycan: pinup az – pin up
услуги по продаже аккаунтов аккаунт для рекламы
pin up azerbaycan: pinup az – pin up
биржа аккаунтов маркетплейс для реселлеров
платформа для покупки аккаунтов продать аккаунт
вавада казино: vavada вход – vavada
вавада казино: vavada casino – вавада зеркало
vavada вход: вавада – вавада официальный сайт
Sell Account Buy Account
Online Account Store Account Acquisition
Buy and Sell Accounts Account market
Gaming account marketplace Buy accounts
вавада казино: vavada – vavada
pin up вход: пин ап зеркало – пин ап вход
пинап казино: пин ап казино – pin up вход
Account Sale Account market
Online Account Store Account Market
Account Market https://buyagedaccounts001.com
пин ап зеркало: пин ап казино – пин ап казино
Find Accounts for Sale Social media account marketplace
пин ап вход: пин ап казино – пин ап казино
Account Selling Service Account Trading Service
Database of Accounts for Sale Website for Selling Accounts
pin up: pin up az – pinup az
вавада зеркало: vavada – вавада казино
пин ап казино официальный сайт: пин ап казино официальный сайт – пин ап вход
account marketplace account trading service
sell pre-made account account buying platform
account market account buying platform
вавада зеркало: вавада официальный сайт – vavada casino
database of accounts for sale buyaccountsdiscount.com
pin up az: pin up azerbaycan – pin-up
pin up casino: pin up azerbaycan – pin up
account market ready-made accounts for sale
buy accounts accounts marketplace
account trading platform buy account
пинап казино: пин ап зеркало – пин ап казино
buy and sell accounts sell pre-made account
buy pre-made account account catalog
secure account sales website for buying accounts
sell account account market
sell pre-made account guaranteed accounts
buy and sell accounts sell pre-made account
profitable account sales account buying service
pin up azerbaycan: pin up – pin-up casino giris
buy account accounts marketplace
sell account account catalog
пин ап вход: пинап казино – пин ап казино официальный сайт
pin up casino: pin up azerbaycan – pin up az
account sale account buying platform
account buying platform find accounts for sale
account trading service account exchange
вавада казино: vavada вход – vavada
account acquisition account buying service
pinup az: pin-up – pin-up
buy account buy accounts
social media account marketplace website for selling accounts
account marketplace purchase ready-made accounts
gaming account marketplace account trading service
accounts market online account store
account marketplace account sale
account sale sell account
trusted Viagra suppliers: generic sildenafil 100mg – no doctor visit required
guaranteed accounts https://accounts-offer.org/
accounts marketplace https://accounts-marketplace.xyz
secure checkout ED drugs: buy generic Cialis online – Cialis without prescription
account acquisition https://buy-best-accounts.org
account selling platform accounts market
Can you be more specific about the content of your article? After reading it, I still have some doubts. Hope you can help me.
purchase Modafinil without prescription: verified Modafinil vendors – Modafinil for sale
profitable account sales https://accounts-marketplace.live
account sale https://social-accounts-marketplace.xyz
safe online pharmacy: same-day Viagra shipping – buy generic Viagra online
account trading platform buy-accounts.space
online Cialis pharmacy: reliable online pharmacy Cialis – FDA approved generic Cialis
database of accounts for sale https://buy-accounts-shop.pro
purchase Modafinil without prescription: purchase Modafinil without prescription – Modafinil for sale
account buying service https://buy-accounts.live
Thanks for sharing. I read many of your blog posts, cool, your blog is very good.
buy pre-made account https://accounts-marketplace.online/
account purchase https://social-accounts-marketplace.live
modafinil 2025: modafinil pharmacy – purchase Modafinil without prescription
https://maxviagramd.shop/# generic sildenafil 100mg
best price Cialis tablets: affordable ED medication – cheap Cialis online
legal Modafinil purchase: legal Modafinil purchase – safe modafinil purchase
https://maxviagramd.com/# best price for Viagra
modafinil legality: legal Modafinil purchase – doctor-reviewed advice
modafinil legality: legal Modafinil purchase – purchase Modafinil without prescription
modafinil pharmacy: purchase Modafinil without prescription – doctor-reviewed advice
https://modafinilmd.store/# Modafinil for sale
safe online pharmacy: buy generic Viagra online – no doctor visit required
best price for Viagra: secure checkout Viagra – generic sildenafil 100mg
ready-made accounts for sale https://accounts-marketplace-best.pro/
https://zipgenericmd.shop/# best price Cialis tablets
купить аккаунт https://akkaunty-na-prodazhu.pro
generic sildenafil 100mg: fast Viagra delivery – order Viagra discreetly
маркетплейс аккаунтов купить аккаунт
магазин аккаунтов kupit-akkaunt.xyz
Your point of view caught my eye and was very interesting. Thanks. I have a question for you.
PredniHealth: PredniHealth – buy prednisone online without a script
prednisone in india: prednisone 54 – prednisone 60 mg daily
покупка аккаунтов https://akkaunt-magazin.online/
маркетплейс аккаунтов https://akkaunty-market.live/
amoxicillin 875 mg tablet: amoxicillin discount coupon – Amo Health Care
маркетплейс аккаунтов https://kupit-akkaunty-market.xyz
cost cheap clomid no prescription: Clom Health – how to get cheap clomid without a prescription
маркетплейс аккаунтов akkaunty-optom.live
площадка для продажи аккаунтов https://online-akkaunty-magazin.xyz/
продажа аккаунтов https://akkaunty-dlya-prodazhi.pro
купить аккаунт kupit-akkaunt.online
buy a facebook account buy facebook ads accounts
buy facebook account https://buy-ad-accounts.click
facebook ad account buy buy facebook accounts cheap
Thanks for sharing. I read many of your blog posts, cool, your blog is very good. https://accounts.binance.com/sl/register?ref=OMM3XK51
cheap facebook advertising account https://buy-ads-account.click/
facebook ad accounts for sale https://ad-account-buy.top/
facebook account buy https://buy-ads-account.work/
buy facebook ad account buy fb ad account
Эта статья сочетает в себе как полезные, так и интересные сведения, которые обогатят ваше понимание насущных тем. Мы предлагаем практические советы и рекомендации, которые легко внедрить в повседневную жизнь. Узнайте, как улучшить свои навыки и обогатить свой опыт с помощью простых, но эффективных решений.
Исследовать вопрос подробнее – https://medalkoblog.ru/
buy facebook ads manager https://buy-ad-account.click
cialis savings card: how long does cialis stay in your system – cialis by mail
where can i buy cialis on line: Tadal Access – cialis when to take
buy aged facebook ads accounts https://ad-accounts-for-sale.work
google ads accounts google ads accounts
buy aged google ads account https://buy-ads-accounts.click
max dosage of cialis: best place to buy generic cialis online – cialis manufacturer coupon lilly
facebook account buy https://buy-accounts.click
buy google ads https://ads-account-for-sale.top
buy google ad threshold account https://ads-account-buy.work
Your point of view caught my eye and was very interesting. Thanks. I have a question for you.
buy google ad account https://buy-ads-invoice-account.top
buy google adwords account buy google ads agency account
buy google ad threshold account https://buy-ads-agency-account.top
buy verified google ads accounts https://sell-ads-account.click/
buy google ads threshold account buy google ads threshold accounts
buy facebook business manager accounts https://buy-business-manager.org
buy google ads agency account https://buy-verified-ads-account.work
buy verified business manager facebook buy-bm-account.org
buy verified facebook https://buy-verified-business-manager-account.org/
facebook bm buy https://buy-verified-business-manager.org
buy verified facebook business manager account buy-business-manager-acc.org
buy facebook business manager accounts business-manager-for-sale.org
facebook business manager for sale https://buy-business-manager-verified.org/
facebook bm for sale https://buy-bm.org
В этом обзорном материале представлены увлекательные детали, которые находят отражение в различных аспектах жизни. Мы исследуем непонятные и интересные моменты, позволяя читателю увидеть картину целиком. Погрузитесь в мир знаний и удивительных открытий!
Изучить вопрос глубже – https://tigarnacellplus.com/get-ahead-of-your-competition-our-proven-digital
buy business manager facebook https://verified-business-manager-for-sale.org
Для обеспечения максимальной безопасности и эффективности лечения процесс организован в несколько этапов. При обращении пациента наши специалисты проводят первичный осмотр и диагностику, чтобы оценить степень интоксикации и выявить возможные осложнения. Далее назначается детоксикационная терапия, сопровождаемая медикаментозной поддержкой и психологическим консультированием. Основные этапы работы можно описать следующим образом:
Узнать больше – вывод из запоя капельница в екатеринбурге
buy facebook verified business account https://buy-business-manager-accounts.org/
tiktok ads agency account https://buy-tiktok-ads-account.org
buy tiktok ads account https://tiktok-ads-account-buy.org
tiktok agency account for sale https://tiktok-ads-account-for-sale.org
tiktok ads account buy https://tiktok-agency-account-for-sale.org
tiktok ads account for sale https://buy-tiktok-ad-account.org
tiktok ads account for sale https://buy-tiktok-ads-accounts.org
Группа препаратов
Выяснить больше – https://kapelnica-ot-zapoya-novosibirsk8.ru/kapelnica-ot-zapoya-na-domu-v-novosibirske/
После обращения в клинику «Основа» наш специалист незамедлительно выезжает для оказания экстренной медицинской помощи в Новосибирске. Процесс установки капельницы предусматривает комплексную диагностику и последующее детоксикационное лечение, что позволяет снизить токсическую нагрузку и стабилизировать состояние пациента. Описание процедуры включает следующие этапы:
Получить дополнительную информацию – [url=https://kapelnica-ot-zapoya-novosibirsk8.ru/]капельница от запоя вызов город[/url]
tiktok ads account for sale https://tiktok-ads-agency-account.org
Этот обзорный материал предоставляет информационно насыщенные данные, касающиеся актуальных тем. Мы стремимся сделать информацию доступной и структурированной, чтобы читатели могли легко ориентироваться в наших выводах. Познайте новое с нашим обзором!
Получить дополнительные сведения – http://katalog.gzs.si/2024/04/24/vivapen-d-o-o
buy tiktok ads accounts https://buy-tiktok-business-account.org
buy tiktok ad account https://buy-tiktok-ads.org
После первичной диагностики начинается активная фаза медикаментозного вмешательства. Современные препараты вводятся капельничным методом, что позволяет быстро снизить уровень токсинов в крови, восстановить нормальный обмен веществ и стабилизировать работу внутренних органов. Этот этап играет решающую роль в безопасном выводе из запоя.
Получить дополнительные сведения – http://vyvod-iz-zapoya-donetsk-dnr00.ru/vyvod-iz-zapoya-na-domu-doneczk-dnr/https://vyvod-iz-zapoya-donetsk-dnr00.ru
Процесс лечения строится из нескольких ключевых этапов, каждый из которых направлен на оперативное восстановление состояния пациента:
Получить дополнительную информацию – вывод из запоя донецк
Процесс лечения строится из нескольких ключевых этапов, каждый из которых направлен на оперативное восстановление состояния пациента:
Получить больше информации – вывод из запоя донецк
Предлагаем вашему вниманию интересную справочную статью, в которой собраны ключевые моменты и нюансы по актуальным вопросам. Эта информация будет полезна как для профессионалов, так и для тех, кто только начинает изучать тему. Узнайте ответы на важные вопросы и расширьте свои знания!
Подробнее – https://vcelynastrechach.cz/evropa-v-datech
В этой публикации мы предлагаем подробные объяснения по актуальным вопросам, чтобы помочь читателям глубже понять их. Четкость и структурированность материала сделают его удобным для усвоения и применения в повседневной жизни.
Исследовать вопрос подробнее – https://washermdlsettlement.com/menang-big-di-dunia-judi-online-rahasia-sukses-dan-tips-terbaik
antibiotic without presription: get antibiotics without seeing a doctor – buy antibiotics for uti
ed prescriptions online Ero Pharm Fast Ero Pharm Fast
online ed treatments: Ero Pharm Fast – Ero Pharm Fast
http://eropharmfast.com/# Ero Pharm Fast
Анонимность и конфиденциальность: мы гарантируем полную анонимность и конфиденциальность лечения, понимая деликатность проблемы зависимости.
Выяснить больше – [url=https://srochno-vyvod-iz-zapoya.ru/vyvod-iz-zapoya-na-domu-v-ufe.ru/]вывод из запоя цена республика башкортостан[/url]
discount ed meds: best ed pills online – cheapest erectile dysfunction pills
buy antibiotics from canada: buy antibiotics online uk – buy antibiotics for uti
Ero Pharm Fast: Ero Pharm Fast – erectile dysfunction online
get antibiotics quickly Over the counter antibiotics pills buy antibiotics online
Online medication store Australia: pharmacy online australia – Discount pharmacy Australia
https://biotpharm.shop/# best online doctor for antibiotics
Buy medicine online Australia: Pharm Au24 – Licensed online pharmacy AU
buy antibiotics for uti: buy antibiotics online uk – over the counter antibiotics
get antibiotics quickly Biot Pharm buy antibiotics
Эта статья предлагает уникальную подборку занимательных фактов и необычных историй, которые вы, возможно, не знали. Мы постараемся вдохновить ваше воображение и разнообразить ваш кругозор, погружая вас в мир, полный интересных открытий. Читайте и открывайте для себя новое!
Детальнее – https://travelimpact.nl/destination-item/brazil
buy erectile dysfunction treatment: Ero Pharm Fast – online erectile dysfunction medication
http://pharmau24.com/# Pharm Au 24
The sale of general admission tickets for groups (non-season ticket holders, Premium Madridistas and the general public) for the first team in football (men’s and women’s) and basketball. Information will be provided through the website in the realmadrid en-US tickets section. Niles Scott, DT, DC DefendersScott is an Elkton High grad who was then a Division III All-American at Frostburg State before the school’s recent climb to Division II. He appeared in six NFL games for the Cincinnati Bengals in 2018 before numerous practice-squad stops with other teams. He was a DC starter in 2024, making 29 tackles, and had one tackle in an 18-11 win over Birmingham in the 2025 opener. Niles Scott, DT, DC DefendersScott is an Elkton High grad who was then a Division III All-American at Frostburg State before the school’s recent climb to Division II. He appeared in six NFL games for the Cincinnati Bengals in 2018 before numerous practice-squad stops with other teams. He was a DC starter in 2024, making 29 tackles, and had one tackle in an 18-11 win over Birmingham in the 2025 opener.
http://www.redsea.gov.eg/taliano/Lists/Lista%20dei%20reclami/DispForm.aspx?ID=2955691
Aviatrix is a thrilling and engaging crash game that combines simple mechanics with the excitement of timing the perfect cash-out. Its availability on platforms like Sokabet, Betpawa, Sportybet, and Wasafibet ensures that players have easy access to this popular game. Aviatrix is a thrilling and engaging crash game that combines simple mechanics with the excitement of timing the perfect cash-out. Its availability on platforms like Sokabet, Betpawa, Sportybet, and Wasafibet ensures that players have easy access to this popular game. To make use of this strategy, you ought to kick-off which have a small risk and you may twice it after each loss. Put differently, for many who wager $step 1 and lose, your following wager should be $2. Still, remember the size of the money not to ever belong to the brand new red. The fresh JetX crash online game is actually an impressive slot form of having amazing game play no minimal successful size.
pharmacy online australia: Pharm Au 24 – Discount pharmacy Australia
antibiotic without presription buy antibiotics online uk buy antibiotics online
antibiotic without presription: buy antibiotics over the counter – antibiotic without presription
https://eropharmfast.shop/# Ero Pharm Fast
antibiotic without presription: Over the counter antibiotics pills – cheapest antibiotics
В этом информативном тексте представлены захватывающие события и факты, которые заставят вас задуматься. Мы обращаем внимание на важные моменты, которые часто остаются незамеченными, и предлагаем новые перспективы на привычные вещи. Подготовьтесь к тому, чтобы быть поглощенным увлекательными рассказами!
Подробнее тут – https://cospec.diariopampero.com/pasta-with-caramelised-tomatoes-and-yogurt-recipe
Этот информативный текст выделяется своими захватывающими аспектами, которые делают сложные темы доступными и понятными. Мы стремимся предложить читателям глубину знаний вместе с разнообразием интересных фактов. Откройте новые горизонты и развивайте свои способности познавать мир!
Углубиться в тему – https://ericzorn.com/50-things-i-learned-in-my-first-50-years
Эта информационная заметка предлагает лаконичное и четкое освещение актуальных вопросов. Здесь вы найдете ключевые факты и основную информацию по теме, которые помогут вам сформировать собственное мнение и повысить уровень осведомленности.
Подробнее можно узнать тут – https://www.zlatanotary.com/planning/modern-architecture-buildings-2
Sports betting involves placing wagers on the outcome of games or specific events. The most common types of bets include moneyline, point spread, and totals. For example, a moneyline bet simply requires you to pick the winner of a game, while a point spread bet considers the margin of victory. We want to inform you that the Penalty Game in demo mode uses the same random draws and features as the real mode. This means it’s not easier to win in demo mode! An excellent way, in our opinion, to see the reality of Penalty Shoot Out Street before starting with euros or cryptocurrencies. – Il est possible d’y jouer sur mobile à l’aide de son interface responsive sans avoir à télécharger une application. We want to inform you that the Penalty Game in demo mode uses the same random draws and features as the real mode. This means it’s not easier to win in demo mode! An excellent way, in our opinion, to see the reality of Penalty Shoot Out Street before starting with euros or cryptocurrencies.
https://dacafamema.com.br/2025/05/review-of-penalty-shoot-out-by-evoplay-unleash-your-football-passion-in-french-online-casinos/
Découvrez comment jouer à Penalty Shoot Out et amusez-vous tout en gagnant de l’argent. Le jeu est un autre exemple d’instinct qui a déraillé, ce qui signifie qu’il y a 243 lignes de paiement en jeu à tout moment. Il s’agit d’un bonus mensuel, et pour compenser l’absence d’un tour de bonus réel. Ils opèrent à partir d’une société mère appelée Probe Investment Limited, et beaucoup d’entre eux transmettent simplement de l’argent pendant que le râteau ronge les bénéfices potentiels. JOUER DE MANIÈRE RESPONSABLE : Jouer de manière responsable est une priorité sur jeudupenalty.casino, un site web indépendant qui n’est pas affilié aux sites que nous recommandons. Avant de participer à toute forme de jeu ou de pari, il est essentiel de vérifier que vous respectez toutes les exigences légales et d’âge applicables. Notre site web est conçu pour fournir des informations et du contenu de divertissement, dans le but d’améliorer votre expérience de jeu. Veuillez noter que tout lien sur lequel vous cliquez sur notre site vous redirigera vers sa destination respective.
https://kampascher.com/# acheter kamagra site fiable
В этом обзорном материале представлены увлекательные детали, которые находят отражение в различных аспектах жизни. Мы исследуем непонятные и интересные моменты, позволяя читателю увидеть картину целиком. Погрузитесь в мир знаний и удивительных открытий!
Углубиться в тему – https://www.sgpromocodes.com/lazada-coupon-new-user-get-5-off
Эта статья полна интересного контента, который побудит вас исследовать новые горизонты. Мы собрали полезные факты и удивительные истории, которые обогащают ваше понимание темы. Читайте, погружайтесь в детали и наслаждайтесь процессом изучения!
Детальнее – https://llc-cwc.com/%E7%A7%BB%E8%BB%A2%E3%81%AE%E3%81%8A%E7%9F%A5%E3%82%89%E3%81%9B
Незамедлительно после вызова нарколог прибывает на дом для проведения первичного осмотра. Специалист измеряет жизненно важные показатели, такие как пульс, артериальное давление и температура, а также собирает анамнез, чтобы определить степень алкогольной интоксикации. Эта информация позволяет оперативно разработать персонализированный план лечения.
Детальнее – [url=https://narcolog-na-dom-mariupol00.ru/]нарколог на дом анонимно в мариуполе[/url]
Обращение за срочной помощью нарколога на дому в Мариуполе имеет ряд весомых преимуществ, которые способствуют быстрому восстановлению здоровья:
Детальнее – [url=https://narcolog-na-dom-mariupol00.ru/]нарколог на дом анонимно мариуполь[/url]
Sebagai Agen Casino Online terbaik, kami menyediakan layanan pendaftaran mudah dan cepat, didukung oleh sistem keamanan tinggi serta transaksi yang aman. Nikmati pengalaman bermain dengan dealer profesional secara live dan nikmati berbagai fitur eksklusif yang membuat pengalaman bermain live casino semakin seru dan menguntungkan bagi setiap pemain. Anda bisa langsung lakukan regis ID permainan judi SBOBET mobile menggunakan aplikasi atau kalian bisa akses melalui situs judi SBOBET resmi. Atau juga bisa menggunakan bantuan dari pihak admin terkait. Anda bisa hubungi melalui layanan livechat ataupun menggunakan e-mail pasti admin akan bantu buatkan akun permainan judi SBOBET Mobile anda. Best dragontiger hashtags popular on Instagram, Twitter, Facebook, TikTok: One of the main attractions of 96in Casino is its diverse game library. Whether you’re a fan of classic casino games like poker and blackjack or prefer modern, innovative games like Aviator and Dragon Tiger, 96in Casino has it all. The platform continuously updates its game selection, ensuring that players always have something new and exciting to try.
https://www.boscomazzocca.it/2025/05/28/why-mplays-teen-patti-collection-is-a-game-changer-for-pakistani-players/
You can play Hills of Steel for free on Poki. In 1996, a three-judge bench of the Supreme Court upheld its 1967 ruling and ruled that games requiring a substantial and preponderant degree of skill fell within the description of ‘games of mere skill,’ adding that horse-racing betting is a game of skill beyond the scope of gambling. We comply with all applicable rules and regulations for skill-based online games. In addition, we shall cooperate with any court ruling, regulatory body, central or state government, or law enforcement agency that modifies our current legal standing. According to a number of Supreme Court decisions, offering games of skill is a basic right under the Indian constitution; hence, skill games cannot be disallowed. Paytm Games Earn Money 2021 However, this is an ongoing process with current litigations in multiple forums, and we are keeping a careful eye on it. We also have a legal team that is continuously striving to ensure that the gaming regulations in India are becoming increasingly clear and solid. We are also engaged in litigation to bring about this clarity in the law, and while every step has been taken to ensure the website’s legality, gamers are recommended to check their local laws if they have any doubts.
Услуга “Нарколог на дом” в Мариуполе, Донецкая область, предусматривает оперативное оказание медицинской помощи при запое. После получения вызова специалист незамедлительно выезжает к пациенту, проводит детальный осмотр, измеряет жизненно важные показатели и собирает анамнез. На основе полученных данных разрабатывается индивидуальный план терапии, включающий медикаментозную детоксикацию, инфузионную терапию и психологическую поддержку. Такой комплексный подход позволяет эффективно вывести токсины из организма и предотвратить развитие осложнений.
Разобраться лучше – [url=https://narcolog-na-dom-mariupol00.ru/]запой нарколог на дом в мариуполе[/url]
somnifere sur ordonnance: ketum gel – amoxicilline sur ordonnance
Your article helped me a lot, is there any more related content? Thanks!
farmacia siman online: Confia Pharma – farmacia en casa online sl
comprar tobradex sin receta: farmacia en casa online madrid – farmacia online mas barata 2017
В данной обзорной статье представлены интригующие факты, которые не оставят вас равнодушными. Мы критикуем и анализируем события, которые изменили наше восприятие мира. Узнайте, что стоит за новыми открытиями и как они могут изменить ваше восприятие реальности.
Исследовать вопрос подробнее – https://tastysavors.com/everything-you-need-to-know-about-banana-bread-cinnamon-rolls
m̩dicaments anti stress sans ordonnance: viagra avec ou sans ordonnance pharmacie Рtadalafil 10mg sans ordonnance
commande viagra: pharmacie en ligne belgique sans ordonnance Рcicabiafine cr̬me mains anti-taches brunes
Процесс лечения строится из нескольких ключевых этапов, каждый из которых направлен на оперативное восстановление состояния пациента:
Получить больше информации – [url=https://vyvod-iz-zapoya-donetsk-dnr00.ru/]вывод из запоя на дому в донецке[/url]
mutabon antidepressivo: finastid principio attivo – breva a cosa serve
bioderma pp baume Pharmacie Express soft picks
estreva gel: farmacia online mascherine ffp2 bambini – imovax tetano prezzo
universitГ farmacia online: Farmacia Subito – metformina 500 prezzo
tegretol sciroppo lucen 20 prezzo dexavision collirio costo
est-il possible d’acheter du cialis en pharmacie sans ordonnance ?: peut on acheter des aiguilles en pharmacie sans ordonnance – magnésium en pharmacie sans ordonnance
farmacia procaccini: Farmacia Subito – imovane 7 5
С учётом всех этапов (детоксикация, терапевтическая работа и адаптация) курс занимает от одного до трёх месяцев, в зависимости от индивидуальных особенностей пациента.
Выяснить больше – [url=https://lechenie-narkomanii-volgograd9.ru/]анонимное лечение наркомании[/url]
http://pharmacieexpress.com/# faire un ecbu sans ordonnance
Наши специалисты строят программу лечения на основе многоступенчатой схемы, включающей медицинские, психологические и социальные компоненты. Каждый этап нацелен на устранение физической зависимости, стабилизацию психоэмоционального состояния и восстановление социальных связей.
Получить больше информации – http://lechenie-narkomanii-volgograd9.ru
masque avene cleanance roge cavailles savon brosse Г dent orthodontique gum
acheter cialis 20 mg: creme corticoide sans ordonnance – pharmacie cialis sans ordonnance
Полноценное восстановление включает не только прекращение приёма наркотиков, но и формирование здорового образа жизни, навыков эмоционального самоконтроля и социокультурной адаптации.
Детальнее – [url=https://lechenie-narkomanii-volgograd9.ru/]лечение наркомании волгоград[/url]
fucidin unguento: homer antibiotico – quetiapina 50 mg
farmacia online clarityn comprar en farmacia de andorra online farmacia online hospitalet
farmacia online ravenna: Farmacia Subito – efracea 40 mg prezzo
fortacin comprar sin receta: cursos tecnicos de farmacia online gratis – farmacia online probioticos
niklod 200 fiale mutuabile Farmacia Subito advantan emulsione
https://confiapharma.shop/# farmacia altamira farmacia online elche
abiostil unguento nasale prezzo: spedra 200 costo – cefixoral 400 mg prezzo
Полноценное восстановление включает не только прекращение приёма наркотиков, но и формирование здорового образа жизни, навыков эмоционального самоконтроля и социокультурной адаптации.
Получить дополнительные сведения – [url=https://lechenie-narkomanii-volgograd9.ru/]центр лечения наркомании волгоград.[/url]
clexane 4000 prezzo: puntura pappataci – farmacia online consegna 24 ore
С учётом всех этапов (детоксикация, терапевтическая работа и адаптация) курс занимает от одного до трёх месяцев, в зависимости от индивидуальных особенностей пациента.
Получить дополнительную информацию – [url=https://lechenie-narkomanii-volgograd9.ru/]лечение наркомании и алкоголизма в волгограде[/url]
curso online farmacia donde comprar metformina sin receta propranolol comprar sin receta espaГ±a
Полноценное восстановление включает не только прекращение приёма наркотиков, но и формирование здорового образа жизни, навыков эмоционального самоконтроля и социокультурной адаптации.
Углубиться в тему – https://lechenie-narkomanii-volgograd9.ru/lechenie-narkomanii-i-alkogolizma-volgograd/
comprar clamoxyl sin receta: Confia Pharma – como comprar anticonceptivos sin receta
Мы принимаем пациентов старше 18 лет; для лиц старше 65 лет возможна адаптация схемы с учётом сопутствующих заболеваний.
Узнать больше – http://lechenie-narkomanii-volgograd9.ru/czentr-lecheniya-narkomanii-volgograd/
farmacia ofertix online opiniones: levocetirizina se puede comprar sin receta – se puede comprar diazepam sin receta?
bГ©tamГ©thasone crГЁme sans ordonnance pharmacie en ligne sans ordonnance gel erectil en pharmacie sans ordonnance prix
В этом обзорном материале представлены увлекательные детали, которые находят отражение в различных аспектах жизни. Мы исследуем непонятные и интересные моменты, позволяя читателю увидеть картину целиком. Погрузитесь в мир знаний и удивительных открытий!
Подробнее тут – https://michael-lauter.de/2017/09/12/hallo-welt
Этот информативный текст выделяется своими захватывающими аспектами, которые делают сложные темы доступными и понятными. Мы стремимся предложить читателям глубину знаний вместе с разнообразием интересных фактов. Откройте новые горизонты и развивайте свои способности познавать мир!
Получить дополнительную информацию – https://firstdogonthemooninstitute.com.au/2023/03/16/look-who-it-is
http://pharmexpress24.com/# Persantine
Этот интересный отчет представляет собой сборник полезных фактов, касающихся актуальных тем. Мы проанализируем данные, чтобы вы могли сделать обоснованные выводы. Читайте, чтобы узнать больше о последних трендах и значимых событиях!
Изучить вопрос глубже – http://compacttxt.nl/index.php/blog
viagra shanghai pharmacy Pharm Express 24 online pharmacy no prescription viagra
history of pharmacy in india: pharmacy website in india – generic cialis india pharmacy
Группа препаратов
Узнать больше – [url=https://kapelnica-ot-zapoya-sochi0.ru/]капельница от запоя[/url]
modafinil online pharmacy: Aristocort – ingles pharmacy
Запой — это тяжелое состояние, сопровождающееся сильнейшей интоксикацией организма, нарушением работы внутренних органов и нервной системы. Самостоятельно выйти из длительного запоя бывает непросто, а иногда и вовсе опасно для здоровья. В таких случаях самым безопасным и эффективным решением является профессиональная установка капельницы от запоя на дому. Врачи клиники «АлкоДоктор» в Сочи оперативно приедут на вызов и помогут пациенту преодолеть кризисную ситуацию, восстановив здоровье и улучшив самочувствие.
Изучить вопрос глубже – [url=https://kapelnica-ot-zapoya-sochi0.ru/]поставить капельницу от запоя сочи[/url]
domperidone inhouse pharmacy online pharmacy without prescriptions Zebeta
online pharmacy in india: india pharmacy international shipping – e pharmacy in india
http://inpharm24.com/# india prescription drugs
buy priligy online pharmacy: revatio specialty pharmacy – online lortab pharmacy
pharmacy store in india buy medicines online in india india online medicine
target pharmacy gabapentin: Pharm Express 24 – boots pharmacy kamagra
india pharmacy market outlook: india pharmacy delivery to usa – india pharmacy ship to usa
pharmacy name ideas in india: InPharm24 – india prescription drugs
Myambutol pharmacy clothes store terbinafine online pharmacy
https://inpharm24.com/# pharmacy council of india
online medical store india: pharmacy online india – pharmacy franchises in india
giant eagle pharmacy augmentin Pharm Express 24 best online pharmacy to get viagra
online steroid pharmacy legit: Pharm Mex – is mounjaro mexico pharmacy legit
п»їindia pharmacy: buy medicine online india – pharmacy online india
http://inpharm24.com/# buy medicines online
india online pharmacy india pharmacy delivery to usa india mart pharmacy
В этой статье представлен занимательный и актуальный контент, который заставит вас задуматься. Мы обсуждаем насущные вопросы и проблемы, а также освещаем истории, которые вдохновляют на действия и изменения. Узнайте, что стоит за событиями нашего времени!
Исследовать вопрос подробнее – https://workstation.content-plus.co.za/hello-world
Эта познавательная публикация погружает вас в море интересного контента, который быстро захватит ваше внимание. Мы рассмотрим важные аспекты темы и предоставим вам уникальныеInsights и полезные сведения для дальнейшего изучения.
Разобраться лучше – https://hhzhlier-jaarverslag.be/blog/2019/07/08/hallo-wereld
В данной обзорной статье представлены интригующие факты, которые не оставят вас равнодушными. Мы критикуем и анализируем события, которые изменили наше восприятие мира. Узнайте, что стоит за новыми открытиями и как они могут изменить ваше восприятие реальности.
Узнать больше – http://trasvision.com.ar/boletin-de-noticias/nuevo-sitio-web
pharmacy in india: InPharm24 – ivermectin india pharmacy
Super ED Trial Pack: online order medicine – cheapest pharmacy to buy viagra
В этой статье вы найдете познавательную и занимательную информацию, которая поможет вам лучше понять мир вокруг. Мы собрали интересные данные, которые вдохновляют на размышления и побуждают к действиям. Открывайте новую информацию и получайте удовольствие от чтения!
Подробнее можно узнать тут – http://www.thiepcuoidinhdac.com/chao-moi-nguoi
india drug store list of pharmacies in india buy medicine online
Наш стационар оснащён всем необходимым для безопасного и комфортного лечения. Здесь вы получите круглосуточный мониторинг, современное оборудование и услуги психологов, социальных педагогов и физиотерапевтов.
Подробнее – [url=https://narkologicheskaya-klinika-ufa9.ru/]chastnaya narkologicheskaya klinika ufa[/url]
Para empezar a jugar a Lucky Jet en 1win Argentina Casino, debe registrarse y depositar fondos en su cuenta de juego utilizando los métodos de pago disponibles. Puedes hacer tus apuestas sin preocupación en el juego Lucky Jet 1win, ya que la plataforma es completamente legítima y cuenta con su licencia. Para complementar todo esto también tiene un soporte muy bueno que funciona 24 7 de presentarse algún problema. Diviértete en compañía de familiares y amigos con Lucky Jet y el resto de opciones de juegos en 1Win México. Y, todo ello, con un amplio catálogo de bonos en Lucky Jet y otros muchos juegos para arriesgar tu dinero al mínimo: Además de Lucky Jet, los juegos de 1Win son una estupenda opción de ocio para dejarte llevar por la adrenalina y la emoción. En ellos, podrás hacer tus mejores apuestas en juegos de azar como una magnífica alternativa a las slots de toda la vida y en los que, construyéndote una buena estrategia la posibilidad de ganar grandes premios es muy real:
https://www.lori-magic.co.il/balloon-como-ganar-dinero-con-cada-globo-que-explotas/
Lucky Jet 1win es un dinámico juego de choque en el que el protagonista es un tipo llamado Joe. Él no recoge combinaciones, sino que se eleva en el aire, siguiendo las probabilidades crecientes. Los jugadores pueden pulsar el botón en cualquier momento y cobrar sus ganancias, disfrutando del momento en que su saldo aumenta. ¿Quiere saber más sobre las reglas de este emocionante juego? Sumérjase en el mundo de 1win Colombia Lucky Jet antes de empezar a jugar y ¡pruebe suerte! Lucky Jet 1win online tiene una interfaz multiposición fácil de usar y es fácil de aprender para los nuevos jugadores. Veamos los aspectos básicos de los 1win games Lucky Jet para acelerar el proceso: Juegos de ruleta electrónica. Cuando se acredite a su saldo, casinos en paraná entre ríos este casino en línea también viene con gráficos nítidos y tiempos de carga rápidos. Si desea apostar sus ganancias en un intento de duplicarlas, el domingo 15 de junio se enfrentan Francia y Honduras.
Каждый пациент проходит три основные стадии терапии, начиная с момента первого обращения.
Получить дополнительную информацию – https://narkologicheskaya-klinika-ufa9.ru/
Наркологическая клиника «Возрождение» в Уфе предоставляет полный спектр услуг по лечению зависимости от психоактивных веществ и алкоголя. Мы сочетаем проверенные временем медицинские методики с инновационными технологиями, сохраняя полную анонимность пациентов. В любом случае вы можете рассчитывать на круглосуточную поддержку, комфортные условия пребывания и индивидуальный план терапии, составленный опытными специалистами.
Разобраться лучше – https://narkologicheskaya-klinika-ufa9.ru/
Клиника «Возрождение» гарантирует:
Изучить вопрос глубже – http://narkologicheskaya-klinika-ufa9.ru
asda pharmacy viagra: Pharm Express 24 – magellan rx pharmacy network
kroger pharmacy store locator best online indian pharmacy online pharmacy zovirax cream
Каждый пациент проходит три основные стадии терапии, начиная с момента первого обращения.
Выяснить больше – https://narkologicheskaya-klinika-ufa9.ru/narkologicheskie-kliniki-alkogolizm-ufa
online pharmacy india: online pharmacy india – india online medicine
http://inpharm24.com/# pharmacy names in india
mexican pharmacy antibiotics: la times mexican pharmacy – can you buy oxycodone in mexico
Наркологическая клиника «Возрождение» в Уфе предоставляет полный спектр услуг по лечению зависимости от психоактивных веществ и алкоголя. Мы сочетаем проверенные временем медицинские методики с инновационными технологиями, сохраняя полную анонимность пациентов. В любом случае вы можете рассчитывать на круглосуточную поддержку, комфортные условия пребывания и индивидуальный план терапии, составленный опытными специалистами.
Подробнее можно узнать тут – [url=https://narkologicheskaya-klinika-ufa9.ru/]наркологические клиники алкоголизм в уфе[/url]
Наш стационар оснащён всем необходимым для безопасного и комфортного лечения. Здесь вы получите круглосуточный мониторинг, современное оборудование и услуги психологов, социальных педагогов и физиотерапевтов.
Подробнее тут – [url=https://narkologicheskaya-klinika-ufa9.ru/]частная наркологическая клиника[/url]
This dynamic game stands out with its unique features and engaging gameplay, captivating players on PinUp with its simple design and interface. JetX goes beyond the conventional, offering an interesting trip through its SmartSoft-enhanced graphics and intelligent gameplay mechanics. JetX is a flagship project by Smartsoft Gaming, a 20-years old company with 45+ instant games, slots, casino games and lotteries. Smartsoft Gaming has numerous international licenses and certifications from gaming authorities: JetX3 Because this is such a fast-paced game, it’s better to enter it with some sort of plan. Ideally, this will be your own betting strategy that perfectly suits your bankroll and your gaming style. So, spend some time getting used to JetX gambling in practice mode and exploring game stats. Then, spend more time testing and refining your betting strategy.
https://rehan4translation.com/chicken-cross-road-by-inout-review-and-free-play-guide-for-new-zealand-players/
Indiluck Your email address will not be published. Required fields are marked * One-click to install XAPK APK files on Android! Save my name, email, and website in this browser for the next time I comment. Once your account is set up, browse through the available games, select your favorites, and begin your gaming adventure! 92 PKR Game is a wonderful Lucky casino game that was recently launched in Pakistan. This is not just a game but also a real earning platform, which now allows everyone to make a handsome amount of mo Crash Predictor Aviator: A Simple and Useful Betting App Dragon Vs Tiger predict GPT tool offers a variety of features for supporting users such as: Locate the Downloaded File: Open your Downloads folder or the notification panel to find the XP786 APK file. Our tool stands out for its unique approach. Unlike other tools available online that offer the same predictions, ours adapts to your gameplay. If you start losing, the system automatically switches to Reversed Mode or Smart AI Mode, which are exclusive to our app. This adaptability significantly enhances your chances of winning by providing tailored predictions based on your current streak.
pharmacy in progreso mexico best pharmacy websites usa services online pharmacy
Наш стационар оснащён всем необходимым для безопасного и комфортного лечения. Здесь вы получите круглосуточный мониторинг, современное оборудование и услуги психологов, социальных педагогов и физиотерапевтов.
Углубиться в тему – https://narkologicheskaya-klinika-ufa9.ru/narkologicheskie-kliniki-alkogolizm-ufa/
Наш стационар оснащён всем необходимым для безопасного и комфортного лечения. Здесь вы получите круглосуточный мониторинг, современное оборудование и услуги психологов, социальных педагогов и физиотерапевтов.
Выяснить больше – http://narkologicheskaya-klinika-ufa9.ru/
tijuana mexico pharmacy: Pharm Mex – what to buy at a mexican pharmacy
Каждый пациент проходит три основные стадии терапии, начиная с момента первого обращения.
Подробнее – [url=https://narkologicheskaya-klinika-ufa9.ru/]наркологическая клиника нарколог в уфе[/url]
Клиника «Возрождение» гарантирует:
Получить дополнительную информацию – http://narkologicheskaya-klinika-ufa9.ru/chastnaya-narkologicheskaya-klinika-ufa/
adderall mexican pharmacy: Pharm Mex – buy medicine online in usa
mexican pharmacy wellbutrin united kingdom pharmacy online mexican online pharmacy percocet
generic cialis india pharmacy: e pharmacy india – buy medicines online in india
Каждый пациент проходит три основные стадии терапии, начиная с момента первого обращения.
Подробнее можно узнать тут – [url=https://narkologicheskaya-klinika-ufa9.ru/]narkologicheskaya klinika ufa[/url]
https://inpharm24.com/# india prescription drugs
b pharmacy fees in india: indian pharmacies – india pharmacy ship to usa
Thanks for sharing. I read many of your blog posts, cool, your blog is very good.
meds.com.mx online drug store п»їmexican pharmacy
Каждый пациент проходит три основные стадии терапии, начиная с момента первого обращения.
Подробнее – http://narkologicheskaya-klinika-ufa9.ru/narkologicheskie-kliniki-alkogolizm-ufa/
can i bring medicine from mexico to the us: phentermine mexico cost – hydrocodone in mexico
pharmacy in india InPharm24 pharmacy in india
Каждый пациент проходит три основные стадии терапии, начиная с момента первого обращения.
Выяснить больше – https://narkologicheskaya-klinika-ufa9.ru/chastnaya-narkologicheskaya-klinika-ufa/
Клиника «Возрождение» гарантирует:
Ознакомиться с деталями – [url=https://narkologicheskaya-klinika-ufa9.ru/]наркологическая клиника республика башкортостан[/url]
Каждый пациент проходит три основные стадии терапии, начиная с момента первого обращения.
Углубиться в тему – [url=https://narkologicheskaya-klinika-ufa9.ru/]chastnaya narkologicheskaya klinika ufa[/url]
medlife pharmacy: pharmacy council of india – pharmacy name ideas in india
Показанием к стационарному лечению служат случаи, при которых домашняя терапия становится небезопасной или недостаточно эффективной. Рекомендуем госпитализацию при:
Разобраться лучше – [url=https://narkologicheskaya-klinika-ufa9.ru/]наркологическая клиника цены в уфе[/url]
what drugs can you get over counter in mexico: hydroxychloroquine mexican pharmacy – most trusted canadian pharmacy
Наш стационар оснащён всем необходимым для безопасного и комфортного лечения. Здесь вы получите круглосуточный мониторинг, современное оборудование и услуги психологов, социальных педагогов и физиотерапевтов.
Выяснить больше – https://narkologicheskaya-klinika-ufa9.ru/narkologicheskie-kliniki-alkogolizm-ufa/
Показанием к стационарному лечению служат случаи, при которых домашняя терапия становится небезопасной или недостаточно эффективной. Рекомендуем госпитализацию при:
Исследовать вопрос подробнее – [url=https://narkologicheskaya-klinika-ufa9.ru/]наркологические клиники алкоголизм[/url]
Наркологическая клиника «Возрождение» в Уфе предоставляет полный спектр услуг по лечению зависимости от психоактивных веществ и алкоголя. Мы сочетаем проверенные временем медицинские методики с инновационными технологиями, сохраняя полную анонимность пациентов. В любом случае вы можете рассчитывать на круглосуточную поддержку, комфортные условия пребывания и индивидуальный план терапии, составленный опытными специалистами.
Ознакомиться с деталями – https://narkologicheskaya-klinika-ufa9.ru/narkologicheskie-kliniki-alkogolizm-ufa/
viagra best buy india: price viagra uk – purchase generic viagra in canada
can you buy viagra over the counter in canada VGR Sources viagra canada order
Для комплексного восстановления мы предлагаем ряд вспомогательных процедур, которые улучшают самочувствие и ускоряют реабилитацию.
Углубиться в тему – [url=https://narkologicheskaya-klinika-ufa9.ru/]наркологические клиники алкоголизм республика башкортостан[/url]
sildenafil sale uk: where can i get real viagra online – cheap viagra online without prescription
https://vgrsources.com/# viagra online using paypal
sildenafil discount: sildenafil 100 mg tablet – buy female viagra uk online
viagra online pills VGR Sources sildenafil 100mg order
sildenafil 200mg: cheap viagra for sale online – discount generic viagra online
Каждый пациент проходит три основные стадии терапии, начиная с момента первого обращения.
Подробнее – [url=https://narkologicheskaya-klinika-ufa9.ru/]наркологическая клиника цены[/url]
Каждый пациент проходит три основные стадии терапии, начиная с момента первого обращения.
Получить дополнительную информацию – [url=https://narkologicheskaya-klinika-ufa9.ru/]наркологическая клиника республика башкортостан[/url]
where to buy generic viagra in canada: cheap canadian viagra online – ordering viagra from india
sildenafil pills buy: cheap generic viagra online – 400 mg viagra
cheap generic viagra 100mg where can i buy viagra online uk viagra online india buy
Каждый пациент проходит три основные стадии терапии, начиная с момента первого обращения.
Получить больше информации – [url=https://narkologicheskaya-klinika-ufa9.ru/]наркологическая клиника республика башкортостан[/url]
https://vgrsources.com/# sildenafil 1.5
generic viagra 100mg: viagra price in us – viagra 50mg price in india online
viagra uk where to buy: VGR Sources – generic viagra online pharmacy usa
can i buy viagra in canada VGR Sources how to purchase viagra online in india
sildenafil tablets coupon: where can i order viagra online in canada – buy pfizer viagra
cheap viagra in australia: VGR Sources – buying generic viagra
Каждый пациент проходит три основные стадии терапии, начиная с момента первого обращения.
Изучить вопрос глубже – [url=https://narkologicheskaya-klinika-ufa9.ru/]chastnaya narkologicheskaya klinika ufa[/url]
sildenafil generic brand name sildenafil pills in india buy sildenafil
Клиника «Возрождение» гарантирует:
Выяснить больше – [url=https://narkologicheskaya-klinika-ufa9.ru/]наркологические клиники алкоголизм[/url]
Наш стационар оснащён всем необходимым для безопасного и комфортного лечения. Здесь вы получите круглосуточный мониторинг, современное оборудование и услуги психологов, социальных педагогов и физиотерапевтов.
Получить больше информации – http://narkologicheskaya-klinika-ufa9.ru
Наш стационар оснащён всем необходимым для безопасного и комфортного лечения. Здесь вы получите круглосуточный мониторинг, современное оборудование и услуги психологов, социальных педагогов и физиотерапевтов.
Подробнее тут – [url=https://narkologicheskaya-klinika-ufa9.ru/]наркологические клиники алкоголизм в уфе[/url]
https://vgrsources.com/# best price for sildenafil 50 mg
viagra paypal canada: purchase viagra canada – sildenafil generic price
Thank you for your sharing. I am worried that I lack creative ideas. It is your article that makes me full of hope. Thank you. But, I have a question, can you help me?
viagra super force: VGR Sources – buy online sildenafil
viagra buy india cost of 100mg viagra viagra india online pharmacy
Наш стационар оснащён всем необходимым для безопасного и комфортного лечения. Здесь вы получите круглосуточный мониторинг, современное оборудование и услуги психологов, социальных педагогов и физиотерапевтов.
Разобраться лучше – [url=https://narkologicheskaya-klinika-ufa9.ru/]narkologicheskie kliniki alkogolizm ufa[/url]
Клиника «Возрождение» гарантирует:
Узнать больше – https://narkologicheskaya-klinika-ufa9.ru/narkologicheskie-kliniki-alkogolizm-ufa/
online viagra canada: cheap viagra on line – need prescription for viagra
Клиника «Возрождение» гарантирует:
Ознакомиться с деталями – [url=https://narkologicheskaya-klinika-ufa9.ru/]наркологическая клиника в уфе[/url]
can i buy sildenafil in canada: viagra 250 mg – sildenafil buy over the counter
sildenafil medicine in india VGR Sources viagra for sale paypal
Наш стационар оснащён всем необходимым для безопасного и комфортного лечения. Здесь вы получите круглосуточный мониторинг, современное оборудование и услуги психологов, социальных педагогов и физиотерапевтов.
Подробнее – [url=https://narkologicheskaya-klinika-ufa9.ru/]наркологическая клиника нарколог в уфе[/url]
Каждый пациент проходит три основные стадии терапии, начиная с момента первого обращения.
Исследовать вопрос подробнее – [url=https://narkologicheskaya-klinika-ufa9.ru/]наркологическая клиника нарколог[/url]
sildenafil india: where can you buy viagra in south africa – viagra usa prescription
https://vgrsources.com/# buy real viagra
Клиника «Возрождение» гарантирует:
Разобраться лучше – [url=https://narkologicheskaya-klinika-ufa9.ru/]наркологическая клиника на дом[/url]
viagra mexico pharmacy: buy sildenafil – how much is viagra in usa
australia viagra VGR Sources mail order viagra canada
Показанием к стационарному лечению служат случаи, при которых домашняя терапия становится небезопасной или недостаточно эффективной. Рекомендуем госпитализацию при:
Подробнее тут – http://narkologicheskaya-klinika-ufa9.ru/narkologicheskie-kliniki-alkogolizm-ufa/
Наш стационар оснащён всем необходимым для безопасного и комфортного лечения. Здесь вы получите круглосуточный мониторинг, современное оборудование и услуги психологов, социальных педагогов и физиотерапевтов.
Получить больше информации – [url=https://narkologicheskaya-klinika-ufa9.ru/]бесплатная наркологическая клиника уфа[/url]
generic viagra online europe: viagra 100mg uk price – generic viagra over the counter canada
viagra for women over the counter: VGR Sources – order viagra from mexico
buy viagra paypal uk VGR Sources buying viagra in europe
where can i buy viagra in south africa: canada prescription viagra – where can i buy viagra in australia
how to buy sildenafil: generic sildenafil 100mg tablet – buy viagra paypal
https://vgrsources.com/# sildenafil 50 mg price
can i buy viagra over the counter usa: VGR Sources – sildenafil 20 mg tablet
best over the counter female viagra VGR Sources cheap over the counter viagra
Этот информационный обзор станет отличным путеводителем по актуальным темам, объединяющим важные факты и мнения экспертов. Мы исследуем ключевые идеи и представляем их в доступной форме для более глубокого понимания. Читайте, чтобы оставаться в курсе событий!
Подробнее можно узнать тут – https://demiyadeanza.smartonlineorder.com/2020/03/24/hello-world
В этой публикации мы предлагаем подробные объяснения по актуальным вопросам, чтобы помочь читателям глубже понять их. Четкость и структурированность материала сделают его удобным для усвоения и применения в повседневной жизни.
Подробнее можно узнать тут – https://bestprice.info-corea.com/macbookpro14m3keyboardcase-202412181639
Membership in the Tech Accelerator Community is FREE. If you plan to submit a solution to a JETX opportunity, select the paid membership level applicable to your organization. The application of Parimatch JetX for Android should first be downloaded before being usable. It is highly advantageous to use it if you want to play JetX outside of your house, so here’s how to get it: Players should check if their devices are compatible with the casino software before downloading the mobile app Jet X.For Android JetX application: Yes, JetX is free to download the application on your mobile device. When using our JetX Predictor App, you can easily make up to 100% and higher profit from your deposit. In order to avoid any problems with payments, it’s strongly recommended to strictly observe all the rules and know all the restrictions, as well as play exclusively on the websites selected specifically for you, depending on your country of residence.
https://letsfixit.co.uk/diy/a-clear-breakdown-of-how-bonuses-work-in-mines-casino-game-by-spribe/
The rounds of the 1win JetX game go automatically, so you can place a bet at any time when you enter the game. Bets are accepted before the game starts, you need to set the odds from 0.1 to 600. Rules of the game: at a sufficient height, have time to withdraw the odds when the airplane scores height. The higher the airplane, the higher the coefficient, respectively, the higher your final winnings. Just like in the Aviator, if the airplane disappears from the screen, the bet is completely burned out. The rules are simple and clear, you need to try the game in action. JetX has gained huge popularity among players due to its simple rules, engaging gameplay, and big winning potential. Unlike traditional casino games, JetX combines strategy with luck, giving players control over when to cash out. The real-time experience, community interaction, and high RTP make it a top choice for crash game enthusiasts in India.
cost for viagra prescription: where to buy sildenafil over the counter – viagra prescriptions
Группа препаратов
Углубиться в тему – [url=https://narcolog-na-dom-ekaterinburg000.ru/]вызов врача нарколога на дом екатеринбург[/url]
buy real viagra no prescription: VGR Sources – online viagra united states
50mg viagra 2 sildenafil sildenafil 100mg from india
generic viagra 50mg online: VGR Sources – prescription viagra online canada
Группа препаратов
Исследовать вопрос подробнее – http://narcolog-na-dom-ekaterinburg000.ru
viagra 100 mg best price in india: VGR Sources – buy generic viagra canadian pharmacy
Близкий человек в запое? Не ждите ухудшения. Обратитесь в клинику Сочи — здесь проведут профессиональный вывод из запоя с последующим восстановлением организма.
Разобраться лучше – [url=https://vyvod-iz-zapoya-ekaterinburg22.ru/]вывод из запоя в стационаре[/url]
viagra online pfizer: buy viagra soft tabs – can you buy viagra in canada over the counter
В Сочи решение есть — наркологическая клиника. Здесь помогают людям выйти из запоя без страха и осуждения. Всё анонимно, грамотно и с заботой о каждом пациенте.
Ознакомиться с деталями – [url=https://vyvod-iz-zapoya-ekaterinburg22.ru/]вывод из запоя на дому[/url]
https://vgrsources.com/# where can i order viagra online in canada
buy viagra in us online sildenafil price comparison uk where can i buy generic viagra online
sildenafil pills sale: VGR Sources – buy viagra new zealand
Затяжной запой опасен для жизни. Врачи наркологической клиники в Сочи проводят срочный вывод из запоя — на дому или в стационаре. Анонимно, безопасно, круглосуточно.
Получить больше информации – [url=https://vyvod-iz-zapoya-ekaterinburg22.ru/]наркология вывод из запоя[/url]
buy viagra soft tabs: VGR Sources – cheap generic india viagra
Группа препаратов
Подробнее можно узнать тут – http://narcolog-na-dom-ekaterinburg000.ru
sildenafil online prices: sildenafil 50 mg mexico – sildenafil mexico pharmacy
Серьезные состояния, вызванные длительным употреблением алкоголя или наркотиков, требуют немедленного вмешательства. Если пациент испытывает ухудшение самочувствия вследствие продолжительного запоя, его организм начинает накапливать токсичные вещества, что ведёт к нарушению работы внутренних органов. При появлении таких симптомов, как сильная рвота, спутанность сознания, судороги, резкие скачки артериального давления, а также выраженные признаки абстинентного синдрома (сильная дрожь, панические атаки, бессонница, тревожность), вызов нарколога становится жизненно необходимым. Экстренное вмешательство позволяет стабилизировать состояние больного и предотвратить развитие серьёзных осложнений, включая сердечно-сосудистые нарушения, повреждение печени и развитие алкогольного психоза. В таких ситуациях профессиональное лечение на дому — лучший способ сохранить здоровье и жизнь пациента.
Детальнее – https://narcolog-na-dom-ekaterinburg000.ru/
viagra 100 mg tablet buy online cheap viagra pills india viagra 88
female viagra in india online purchase: sildenafil 50 mg tablet price in india – get viagra prescription
online pharmacy viagra no prescription: VGR Sources – best viagra tablets india
При поступлении вызова специалисты клиники «СтопТокс» оперативно выезжают на дом в Екатеринбурге или по всей Свердловской области. По прибытии врач проводит всестороннюю диагностику, включая измерение артериального давления, пульса и уровня кислорода в крови, а также собирает анамнез и оценивает степень интоксикации. На основе полученной информации составляется индивидуальный план лечения, который включает следующие этапы:
Выяснить больше – [url=https://narcolog-na-dom-ekaterinburg000.ru/]нарколог на дом клиника в екатеринбурге[/url]
Для эффективного лечения наши врачи используют только проверенные и сертифицированные медикаменты, которые подбираются индивидуально для каждого пациента. В состав лечебного курса входят:
Изучить вопрос глубже – [url=https://narcolog-na-dom-ekaterinburg000.ru/]нарколог на дом круглосуточно[/url]
buy cheap viagra: sildenafil best price uk – where to get real viagra online
Предлагаем вашему вниманию интересную справочную статью, в которой собраны ключевые моменты и нюансы по актуальным вопросам. Эта информация будет полезна как для профессионалов, так и для тех, кто только начинает изучать тему. Узнайте ответы на важные вопросы и расширьте свои знания!
Изучить вопрос глубже – https://pravinasar.com/blog/?p=189
viagra for sale in mexico: sildenafil for sale uk – sildenafil online canadian pharmacy
https://vgrsources.com/# viagra 100mg cheap price
order viagra online in usa viagra uk 150 mg viagra online
can you buy viagra online uk: VGR Sources – order prescription viagra online
Эта публикация дает возможность задействовать различные источники информации и представить их в удобной форме. Читатели смогут быстро найти нужные данные и получить ответы на интересующие их вопросы. Мы стремимся к четкости и доступности материала для всех!
Получить дополнительную информацию – https://signature.laginebrosa.com/hello-world
В этой статье вы найдете познавательную и занимательную информацию, которая поможет вам лучше понять мир вокруг. Мы собрали интересные данные, которые вдохновляют на размышления и побуждают к действиям. Открывайте новую информацию и получайте удовольствие от чтения!
Получить больше информации – https://seoflx.net/o/sovtb-rank-website-on-first-page
can i take tylenol with rybelsus: how to get semaglutide for weight loss – Semaglu Pharm
LipiPharm: LipiPharm – atorvastatin and belly fat
Своевременное вмешательство специалиста позволяет не только вывести токсины, но и снизить риск развития осложнений, обеспечить восстановление жизненно важных функций организма и предотвратить ухудшение состояния, что особенно важно для сохранения здоровья и жизни пациента.
Выяснить больше – [url=https://narcolog-na-dom-krasnodar0.ru/]врач нарколог на дом[/url]
Predni Pharm prednisone 10mg online prednisone 1 mg for sale
SemagluPharm: Semaglu Pharm – semaglutide or tirzepatide
Процедура длится от 40 минут до 2 часов, в зависимости от тяжести состояния, и проводится в комфортной домашней обстановке, что значительно снижает стресс у пациента и его близких.
Подробнее тут – http://narcolog-na-dom-krasnodar0.ru/narkolog-na-dom-kruglosutochno-krasnodar/
https://lipipharm.shop/# LipiPharm
Самостоятельно выйти из запоя — почти невозможно. В Сочи врачи клиники проводят медикаментозный вывод из запоя с круглосуточным выездом. Доверяйте профессионалам.
Изучить вопрос глубже – [url=https://vyvod-iz-zapoya-ekaterinburg22.ru/]вывод из запоя капельница[/url]
Rybelsus for blood sugar control: SemagluPharm – Rybelsus online pharmacy reviews
Каждый день запоя увеличивает риск для жизни. Не рискуйте — специалисты в Сочи приедут на дом и окажут экстренную помощь. Без боли, стресса и ожидания.
Выяснить больше – [url=https://vyvod-iz-zapoya-ekaterinburg22.ru/]вывод из запоя капельница[/url]
prednisone in india: 5 mg prednisone daily – prednisone pill prices
п»їBuy Rybelsus online USA SemagluPharm Semaglu Pharm
what to avoid when taking lipitor: USA-based pharmacy Lipitor delivery – Lipi Pharm
В Сочи решение есть — наркологическая клиника. Здесь помогают людям выйти из запоя без страха и осуждения. Всё анонимно, грамотно и с заботой о каждом пациенте.
Исследовать вопрос подробнее – [url=https://vyvod-iz-zapoya-ekaterinburg22.ru/]нарколог вывод из запоя[/url]
После поступления вызова клиника «ЗдоровьеНорм» отправляет к пациенту опытного нарколога, который прибывает на дом в течение 30–60 минут. По приезду врач проводит комплексную диагностику, включающую измерение артериального давления, пульса, уровня кислорода в крови и тщательную оценку общего состояния пациента. На основе полученных данных специалист подбирает индивидуальную схему лечения.
Детальнее – [url=https://narcolog-na-dom-krasnodar0.ru/]narkolog-na-dom-kruglosutochno krasnodar[/url]
atorvastatin 20mg tablets: atorvastatin and viagra – Lipi Pharm
prednisone 10 mg coupon: PredniPharm – Predni Pharm
Affordable cholesterol-lowering pills CrestorPharm Crestor Pharm
https://prednipharm.com/# PredniPharm
PredniPharm: 5 mg prednisone daily – prednisone daily use
Для безопасного и эффективного лечения наши специалисты используют только проверенные и сертифицированные медикаменты, подбираемые индивидуально с учетом состояния пациента. В состав капельницы входят следующие группы препаратов:
Ознакомиться с деталями – https://narcolog-na-dom-krasnodar0.ru/vyzov-narkologa-na-dom-krasnodar
После поступления вызова клиника «ЗдоровьеНорм» отправляет к пациенту опытного нарколога, который прибывает на дом в течение 30–60 минут. По приезду врач проводит комплексную диагностику, включающую измерение артериального давления, пульса, уровня кислорода в крови и тщательную оценку общего состояния пациента. На основе полученных данных специалист подбирает индивидуальную схему лечения.
Углубиться в тему – [url=https://narcolog-na-dom-krasnodar0.ru/]вызов нарколога на дом краснодар.[/url]
После поступления вызова клиника «ЗдоровьеНорм» отправляет к пациенту опытного нарколога, который прибывает на дом в течение 30–60 минут. По приезду врач проводит комплексную диагностику, включающую измерение артериального давления, пульса, уровня кислорода в крови и тщательную оценку общего состояния пациента. На основе полученных данных специалист подбирает индивидуальную схему лечения.
Детальнее – [url=https://narcolog-na-dom-krasnodar0.ru/]нарколог на дом вывод из запоя[/url]
Rosuvastatin tablets without doctor approval: Crestor Pharm – Crestor Pharm
Длительный запой представляет собой крайне опасное состояние, способное нанести непоправимый вред организму. При отсутствии своевременного вмешательства алкогольная интоксикация может привести к серьезным осложнениям, таким как нарушение работы сердца, печени, почек и нервной системы, а также развитию алкогольного психоза. В таких ситуациях экстренная медицинская помощь является залогом спасения жизни и предотвращения необратимых последствий. Клиника «ЗдоровьеНорм» предлагает круглосуточный выезд специалистов для вывода из запоя на дому в Краснодаре и по всему Краснодарскому краю. Наши врачи работают 24 часа в сутки, обеспечивая полный комплекс процедур по детоксикации, снятию абстинентного синдрома и восстановлению организма, при этом гарантируя полную анонимность и индивидуальный подход к каждому пациенту.
Получить дополнительные сведения – [url=https://narcolog-na-dom-krasnodar0.ru/]нарколог на дом срочно[/url]
CrestorPharm: Crestor Pharm – CrestorPharm
how to get prednisone tablets 80 mg prednisone daily PredniPharm
Основная процедура включает в себя:
Получить больше информации – https://narcolog-na-dom-krasnodar0.ru/
nursing interventions for lipitor: atorvastatin gastrointestinal side effects – rosuvastatin vs atorvastatin muscle pain
O jogo do aviãozinho da CBet pode ser utilizado no celular, inclusive, muitos nos perguntam sobre um app do JetX CBet, porém, não existe um aplicativo a parte feito para o jogo. O jogo do aviãozinho da CBet pode ser utilizado no celular, inclusive, muitos nos perguntam sobre um app do JetX CBet, porém, não existe um aplicativo a parte feito para o jogo. O jogo do aviãozinho da CBet pode ser utilizado no celular, inclusive, muitos nos perguntam sobre um app do JetX CBet, porém, não existe um aplicativo a parte feito para o jogo. Lembre de evitar programas de trapaça, como, por exemplo, um hack no JetX do CBet, pois este tipo de funcionalidade, apesar de servir como auxílio, pode fornecer sugestões erradas. Vamos mostrar os princípios básicos do jogo e, além disso, apresentar maiores informações sobre um hack do JetX na CBet, visto que muitos perguntam a respeito do tema. Então, fique conosco até o fim e saiba tudo sobre este jogo!
https://spaanslerenamsterdam.com/guia-completo-para-dominar-a-versao-flamejante-do-sweet-bonanza/
With 1win, you can be completely safe when depositing and withdrawing alwihdainfo Les-meilleurs-jeux-de-casino-en-ligne-sur-1Win-en-Afrique-de-l-Ouest_a130533.html?preview=1. With 1win, you can be completely safe when depositing and withdrawing alwihdainfo Les-meilleurs-jeux-de-casino-en-ligne-sur-1Win-en-Afrique-de-l-Ouest_a130533.html?preview=1. N’a pas répondu aux avis négatifs Geometry Dash is a fast-paced rhythm-based platformer where players navigate a series of challenging levels filled with obstacles and traps. With simple one-touch controls, players must time their jumps and movements to the beat of the music. The game features creative level designs and allows players to create and share their own levels. Au départ, je jouais à l’Aviator et je le trouvais déjà spectaculaire. Mais lorsque je suis passée à Jet X, je SAIS que je serais totalement immergée dans ce jeu. J’adore les petits personnages qui sautent dans l’avion avant qu’il ne décolle. Les graphismes sont agréables à regarder et la musique m’empêche d’avoir une crise cardiaque.
SemagluPharm: п»їBuy Rybelsus online USA – Semaglu Pharm
buy prednisone online no script prednisone online pharmacy prednisone 10 tablet
Чем раньше будет проведена процедура детоксикации, тем выше шансы избежать осложнений и быстрее восстановить здоровье пациента. Врачи клиники «ТрезвоПрофи» оперативно реагируют на вызовы, выезжая в любой район Сочи и прилегающие населенные пункты.
Подробнее – https://kapelnica-ot-zapoya-sochi00.ru/kapelnicza-ot-zapoya-na-domu-sochi
https://lipipharm.com/# Lipi Pharm
Капельница от запоя — это комплексная процедура, направленная на быстрое выведение токсинов, нормализацию обменных процессов и восстановление жизненно важных функций организма. Врачи-наркологи подбирают индивидуальный состав капельницы, исходя из состояния пациента. В стандартный набор препаратов обычно входят:
Получить дополнительную информацию – http://kapelnica-ot-zapoya-sochi00.ru/kapelnicza-ot-zapoya-czena-sochi/
Выезд врача-нарколога из клиники «ТрезвоПрофи» на дом происходит в любое время суток, включая выходные и праздники. Перед началом детоксикации врач проводит осмотр, измеряет давление, частоту пульса, уровень кислорода в крови и подбирает индивидуальную схему лечения. Сама процедура обычно занимает от 1 до 2 часов и проводится под строгим контролем врача.
Углубиться в тему – [url=https://kapelnica-ot-zapoya-sochi00.ru/]капельница от запоя в сочи[/url]
Капельница от запоя — это комплексная процедура, направленная на быстрое выведение токсинов, нормализацию обменных процессов и восстановление жизненно важных функций организма. Врачи-наркологи подбирают индивидуальный состав капельницы, исходя из состояния пациента. В стандартный набор препаратов обычно входят:
Ознакомиться с деталями – [url=https://kapelnica-ot-zapoya-sochi00.ru/]капельница от запоя в сочи[/url]
prednisone purchase online: prednisone 2.5 mg price – prednisone 40 mg price
Чем раньше будет проведена процедура детоксикации, тем выше шансы избежать осложнений и быстрее восстановить здоровье пациента. Врачи клиники «ТрезвоПрофи» оперативно реагируют на вызовы, выезжая в любой район Сочи и прилегающие населенные пункты.
Детальнее – [url=https://kapelnica-ot-zapoya-sochi00.ru/]капельница от запоя вызов город[/url]
Semaglu Pharm: SemagluPharm – how long for semaglutide to work
Buy statins online discreet shipping: can you take fish oil with crestor – Crestor Pharm
novo rybelsus Semaglu Pharm Semaglu Pharm
Чем раньше будет проведена процедура детоксикации, тем выше шансы избежать осложнений и быстрее восстановить здоровье пациента. Врачи клиники «ТрезвоПрофи» оперативно реагируют на вызовы, выезжая в любой район Сочи и прилегающие населенные пункты.
Подробнее можно узнать тут – https://kapelnica-ot-zapoya-sochi00.ru/kapelnicza-ot-zapoya-czena-sochi
Semaglu Pharm: rybelsus for non diabetics – Semaglu Pharm
Predni Pharm: prednisone 20mg for sale – Predni Pharm
SemagluPharm Safe delivery in the US rybelsus for what
http://prednipharm.com/# how to get prednisone tablets
CrestorPharm: п»їBuy Crestor without prescription – Affordable cholesterol-lowering pills
Semaglu Pharm: FDA-approved Rybelsus alternative – Semaglu Pharm
LipiPharm: Discreet shipping for Lipitor – Lipi Pharm
rosuvastatin name brand CrestorPharm CrestorPharm
can you buy prednisone online uk: how to purchase prednisone online – PredniPharm
Semaglu Pharm: Semaglutide tablets without prescription – Where to buy Semaglutide legally
where to get prednisone: Predni Pharm – PredniPharm
how to get prednisone without a prescription buy 40 mg prednisone buy prednisone mexico
https://semaglupharm.com/# Semaglu Pharm
order prednisone with mastercard debit: Predni Pharm – PredniPharm
20 mg of prednisone: 50 mg prednisone tablet – PredniPharm
crestor reviews Affordable cholesterol-lowering pills Crestor Pharm
Can you be more specific about the content of your article? After reading it, I still have some doubts. Hope you can help me.
can crestor tablets be cut in half: can you stop taking crestor without side effects – Crestor Pharm
Predni Pharm: Predni Pharm – Predni Pharm
Crestor Pharm CrestorPharm Crestor Pharm
https://semaglupharm.com/# Where to buy Semaglutide legally
should you take lipitor in the morning or at night: Order cholesterol medication online – rosuvastatin vs atorvastatin
PredniPharm: PredniPharm – Predni Pharm
CrestorPharm Order rosuvastatin online legally Crestor 10mg / 20mg / 40mg online
Crestor Pharm: No doctor visit required statins – pdf crestor
FDA-approved generic statins online: atorvastatin and constipation – Lipi Pharm
http://semaglupharm.com/# Semaglu Pharm
CrestorPharm rosuvastatin calcium 5 mg tab п»їBuy Crestor without prescription
Order rosuvastatin online legally: Crestor Pharm – Crestor Pharm
https://lipipharm.com/# Lipi Pharm
https://semaglupharm.com/# Semaglu Pharm
Order Rybelsus discreetly: SemagluPharm – Semaglu Pharm
Predni Pharm PredniPharm prednisone sale
prednisone 50 mg for sale: prednisone 20mg online – PredniPharm
http://semaglupharm.com/# Where to buy Semaglutide legally
buy prednisone mexico: prednisone online for sale – prednisone 50 mg prices
side effects to rosuvastatin Best price for Crestor online USA Safe online pharmacy for Crestor
https://semaglupharm.com/# Safe delivery in the US
PredniPharm: PredniPharm – Predni Pharm
http://lipipharm.com/# LipiPharm
Crestor Pharm: Crestor mail order USA – Crestor Pharm
Crestor Pharm Safe online pharmacy for Crestor Rosuvastatin tablets without doctor approval
https://semaglupharm.com/# Semaglu Pharm
PredniPharm: buying prednisone from canada – PredniPharm
Crestor Pharm: Buy cholesterol medicine online cheap – rosuvastatin side effects muscle pain
Crestor Pharm Buy cholesterol medicine online cheap Affordable cholesterol-lowering pills
http://semaglupharm.com/# Semaglu Pharm
prednisone tablets 2.5 mg: PredniPharm – purchase prednisone canada
where can i get prednisone: Predni Pharm – buy prednisone online canada
https://prednipharm.shop/# PredniPharm
Lipi Pharm LipiPharm LipiPharm
https://semaglupharm.com/# semaglutide allergic reaction
Cheap Lipitor 10mg / 20mg / 40mg: Atorvastatin online pharmacy – Lipi Pharm
No doctor visit required statins: CrestorPharm – Crestor Pharm
https://semaglupharm.shop/# SemagluPharm
PredniPharm Predni Pharm how to buy prednisone online
rosuvastatin+ezetimibe 20/10: Crestor 10mg / 20mg / 40mg online – rosuvastatin and blood pressure
USA-based pharmacy Lipitor delivery: how long to get lipitor out of your system – Lipi Pharm
https://semaglupharm.shop/# semaglutide dosing chart
http://crestorpharm.com/# rosuvastatin л¶Ђмћ‘мљ©
CrestorPharm why take crestor at night Online statin therapy without RX
fenofibrate and rosuvastatin interaction: Crestor Pharm – Crestor Pharm
http://semaglupharm.com/# Semaglu Pharm
prednisone online sale: Predni Pharm – Predni Pharm
rybelsus para bajar de peso Semaglu Pharm SemagluPharm
No doctor visit required statins: CrestorPharm – Crestor Pharm
Embora a Betano seja uma das melhores casas a oferecer Spaceman em sua grade de crash games, é possível encontrar o sucesso da Pragmatic Play em outros cassinos online que também oferecem condições especiais para os fãs do jogo do astronauta. Sites de Aposta » Cassino Online » Jogo do Astronauta Spaceman Blast your way through waves of Alien Abductors and UFOs while defending Spaceman Dudes from being abducted in this fast-paced 80’s style arcade game. O F12 Bet Casino oferece uma cobertura especial dos principais crash games disponíveis no mercado brasileiro, com destaque para títulos populares como Spaceman, da Pragmatic Play. Mesmo sem promoções específicas para novos jogadores, a plataforma se destaca pela variedade e qualidade dos jogos disponíveis.
http://dayawane.ihep.ac.cn/twiki/bin/view/Public/JoleneHall
É possível jogar Spaceman no F12 Bet desde que você tenha criado a sua conta e realizado algum depósito. Ao cumprir esses dois passos simples, todos os planetas deste popular caça-níquel ficam liberados. O Spaceman online é um jogo de cassino da categoria de crash games. O jogo conta com um multiplicador que aumenta gradativamente ao longo de cada rodada até explodir (crash). Este artigo aborda as regras do jogo, dicas de apostas passo a passo e as melhores estratégias de jogo do Spaceman na Betano. Continue por aqui para saber mais! Isso significa que, caso ganhe R$50, o dinheiro é seu para fazer o que quiser, inclusive tentar ganhar mais dinheiro no Spaceman! Está esperando o quê? Corre pra lá! É possível jogar Spaceman no F12 Bet desde que você tenha criado a sua conta e realizado algum depósito. Ao cumprir esses dois passos simples, todos os planetas deste popular caça-níquel ficam liberados.
https://semaglupharm.shop/# Where to buy Semaglutide legally
Lipi Pharm: Lipi Pharm – LipiPharm
Predni Pharm prednisone 20mg price in india apo prednisone
http://lipipharm.com/# Lipi Pharm
Rybelsus for blood sugar control: Semaglu Pharm – SemagluPharm
https://semaglupharm.com/# SemagluPharm
CrestorPharm: crestor high intensity dose – Crestor Pharm
Order cholesterol medication online LipiPharm does lipitor cause leg cramps
Predni Pharm: Predni Pharm – cost of prednisone tablets
https://semaglupharm.shop/# Semaglutide tablets without prescription
Инфузии выполняются с помощью автоматизированных насосов, позволяющих скорректировать скорость введения в зависимости от показателей безопасности.
Исследовать вопрос подробнее – [url=https://medicinskij-vyvod-iz-zapoya.ru/]вывод из запоя на дому круглосуточно в красноярске[/url]
Crestor Pharm: Crestor Pharm – can crestor cause depression
Lipi Pharm Safe atorvastatin purchase without RX Lipi Pharm
how many units is 1.7 mg of semaglutide: how to take semaglutide shot – Semaglu Pharm
Домашний формат идеально подходит для тех, кто находится в удовлетворительном состоянии и не требует круглосуточного контроля.
Получить дополнительные сведения – [url=https://vyvod-iz-zapoya-lyubertsy2.ru/]vyvod iz zapoya kapelnica[/url]
https://semaglupharm.com/# Semaglu Pharm
https://semaglupharm.com/# Semaglu Pharm
drugs from canada: legitimate canadian pharmacy online – www canadianonlinepharmacy
В этой информационной статье вы найдете интересное содержание, которое поможет вам расширить свои знания. Мы предлагаем увлекательный подход и уникальные взгляды на обсуждаемые темы, побуждая пользователей к активному мышлению и критическому анализу!
Детальнее – https://www.beoplast.rs/ownage-in-the-mountains
canadian compounding pharmacy Canada Pharm Global canadian family pharmacy
В этой статье-обзоре мы соберем актуальную информацию и интересные факты, которые освещают важные темы. Читатели смогут ознакомиться с различными мнениями и подходами, что позволит им расширить кругозор и глубже понять обсуждаемые вопросы.
Углубиться в тему – https://aitips.digital/huggingface-hub-a-must-try-for-all-ml-engineers
http://indiapharmglobal.com/# India Pharm Global
best rated canadian pharmacy: legitimate canadian mail order pharmacy – safe canadian pharmacy
Когда человек оказывается в сложной ситуации из-за длительного употребления алкоголя, важно получить быструю и квалифицированную медицинскую помощь. Запойные состояния, алкогольная интоксикация, тяжелый абстинентный синдром — все это требует своевременного вмешательства врача. Однако не всегда есть возможность или желание обращаться в стационар.
Выяснить больше – [url=https://narcolog-na-dom-v-irkutske00.ru/]нарколог на дом иркутск[/url]
Для снятия алкогольной интоксикации врач проводит детоксикационную терапию, которая включает внутривенные инфузии с растворами для выведения токсинов, поддерживающие препараты для печени, сердечно-сосудистой системы и нервной системы. В некоторых случаях назначаются седативные средства, нормализующие эмоциональное состояние пациента.
Получить дополнительные сведения – http://narcolog-na-dom-v-irkutske00.ru/
Эта публикация завернет вас в вихрь увлекательного контента, сбрасывая стереотипы и открывая двери к новым идеям. Каждый абзац станет для вас открытием, полным ярких примеров и впечатляющих достижений. Подготовьтесь быть вовлеченными и удивленными каждый раз, когда продолжите читать.
Получить дополнительные сведения – https://www.soldat.ru/news/1388.html
mexican pharmaceuticals online: purple pharmacy mexico price list – mexican pharmaceuticals online
После прибытия врач проводит осмотр пациента, оценивает его состояние, измеряет давление, пульс, уровень кислорода и выявляет возможные противопоказания. Затем разрабатывается индивидуальный план лечения, направленный на стабилизацию состояния.
Выяснить больше – http://narcolog-na-dom-v-irkutske00.ru/vyzov-narkologa-na-dom-irkutsk/
canadian drug pharmacy pharmacy in canada northwest canadian pharmacy
https://canadapharmglobal.com/# canadian online pharmacy
https://medsfrommexico.com/# Meds From Mexico
mexico pharmacies prescription drugs: Meds From Mexico – Meds From Mexico
Наркологическая клиника «МедЛайн» предоставляет профессиональные услуги врача-нарколога с выездом на дом в Новосибирске и Новосибирской области. Мы оперативно помогаем пациентам справиться с тяжелыми состояниями при алкогольной и наркотической зависимости. Экстренный выезд наших специалистов доступен круглосуточно, а лечение проводится с применением проверенных методик и препаратов, что гарантирует безопасность и конфиденциальность каждому пациенту.
Углубиться в тему – http://
После завершения процедур пациенту предоставляется подробная консультация с рекомендациями по дальнейшему восстановлению и профилактике повторных случаев зависимости.
Ознакомиться с деталями – [url=https://narcolog-na-dom-novosibirsk00.ru/]нарколог на дом цена[/url]
Пациенты выбирают нашу клинику для срочного вызова врача-нарколога благодаря следующим важным преимуществам:
Изучить вопрос глубже – [url=https://narcolog-na-dom-novosibirsk00.ru/]запой нарколог на дом[/url]
mexico drug stores pharmacies: Meds From Mexico – Meds From Mexico
Наркологическая клиника «МедЛайн» предоставляет профессиональные услуги врача-нарколога с выездом на дом в Новосибирске и Новосибирской области. Мы оперативно помогаем пациентам справиться с тяжелыми состояниями при алкогольной и наркотической зависимости. Экстренный выезд наших специалистов доступен круглосуточно, а лечение проводится с применением проверенных методик и препаратов, что гарантирует безопасность и конфиденциальность каждому пациенту.
Получить больше информации – http://narcolog-na-dom-novosibirsk00.ru/vyzov-narkologa-na-dom-novosibirsk/https://narcolog-na-dom-novosibirsk00.ru
https://indiapharmglobal.shop/# India Pharm Global
India Pharm Global India Pharm Global India Pharm Global
canadapharmacyonline legit: canadian pharmacy meds review – pharmacy rx world canada
Наркологическая клиника «МедЛайн» предоставляет профессиональные услуги врача-нарколога с выездом на дом в Новосибирске и Новосибирской области. Мы оперативно помогаем пациентам справиться с тяжелыми состояниями при алкогольной и наркотической зависимости. Экстренный выезд наших специалистов доступен круглосуточно, а лечение проводится с применением проверенных методик и препаратов, что гарантирует безопасность и конфиденциальность каждому пациенту.
Узнать больше – [url=https://narcolog-na-dom-novosibirsk00.ru/]нарколог на дом круглосуточно новосибирск[/url]
Вызов нарколога на дом в Иркутске и Иркутской области — это удобное и безопасное решение, позволяющее получить неотложную помощь в привычной обстановке. Врачи клиники «ЧистоЖизнь» выезжают круглосуточно, приезжают в течение 30–60 минут и проводят комплексное лечение, направленное на стабилизацию состояния пациента и предотвращение осложнений.
Получить больше информации – http://narcolog-na-dom-v-irkutske00.ru/vrach-narkolog-na-dom-irkutsk/
https://indiapharmglobal.shop/# India Pharm Global
certified canadian pharmacy: Canada Pharm Global – legal canadian pharmacy online
https://indiapharmglobal.shop/# pharmacy website india
buy medicines online in india: reputable indian online pharmacy – India Pharm Global
pharmacies in mexico that ship to usa Meds From Mexico Meds From Mexico
Beco Tunisia Zasady gry opisane są na reprezentacji online, gdzie można również pobrać aplikację na telefon lub grać przez przeglądarkę. Co musisz zrobić, aby rozpocząć grę w Aviator za pośrednictwem kasyna Mostbet: aviator game 1win 1win22084.ru . sniper bot crypto Prime Bot is designed for sniping, front-running, and MEV across multiple blockchains. It offers unmatched efficiency, accuracy, and security with advanced AI, providing essential tools for both novice and experienced traders. Prime Bot is designed for sniping, front-running, and MEV across multiple blockchains. It offers unmatched efficiency, accuracy, and security with advanced AI, providing essential tools for both novice and experienced traders. evaholzelova.blog.idnes.cz redir.aspx?url= primebotx
https://community.networkofcare.org/blogs/tolsvabtivent1988/archive/2025/06/14/betonred-kasyno.aspx
Zasady ochrony prywatności mogą się różnić, np. w zależności od używanych funkcji lub Twojego wieku. Więcej informacji Split APKconfig.ar, config.arm64_v8a, config.de, config.en, config.es, config.fr, config.hi, config.in, config.it, config.ja, config.ko, config.my, config.pt, config.ru, config.th, config.tr, config.vi, config.xxhdpi, config.zh FT Aviator to Freeware oprogramowanie w kategorii Audio i multimedia opracowane przez Fluidity Technologies Inc.. Skopiuj i wklej poniższy kod HTML do swojej strony internetowej, aby powyższy widget został wyświetlony Jednak to konkretne oprogramowanie twierdzi, że wykorzystuje sztuczną inteligencję, która analizuje wszystkie loty samolotów i przewiduje czas trwania następnego lotu. Aby uzyskać dostęp do bezpłatnej wersji Aviator Predyktor, możesz wyszukać ją w Internecie, a następnie pobrać plik APK Aviator Predyktor lub po prostu wypróbować naszą wersję. Gdy już to zrobisz, możesz podłączyć program do preferowanego kasyna i postępować zgodnie z przewidywaniami, aby uzyskać lepsze wyniki. Program generuje losową liczbę co 30 sekund.
Основные показания для вызова нарколога:
Получить дополнительную информацию – http://narcolog-na-dom-v-irkutske00.ru
Основные показания для вызова нарколога:
Получить дополнительную информацию – [url=https://narcolog-na-dom-v-irkutske00.ru/]нарколог на дом стоимость в иркутске[/url]
Основные показания для вызова нарколога:
Выяснить больше – [url=https://narcolog-na-dom-v-irkutske00.ru/]врач нарколог на дом платный иркутск[/url]
Наркологическая клиника «МедЛайн» предоставляет профессиональные услуги врача-нарколога с выездом на дом в Новосибирске и Новосибирской области. Мы оперативно помогаем пациентам справиться с тяжелыми состояниями при алкогольной и наркотической зависимости. Экстренный выезд наших специалистов доступен круглосуточно, а лечение проводится с применением проверенных методик и препаратов, что гарантирует безопасность и конфиденциальность каждому пациенту.
Разобраться лучше – [url=https://narcolog-na-dom-novosibirsk00.ru/]narcolog-na-dom-novosibirsk00.ru/[/url]
Наркологическая клиника «МедЛайн» предоставляет профессиональные услуги врача-нарколога с выездом на дом в Новосибирске и Новосибирской области. Мы оперативно помогаем пациентам справиться с тяжелыми состояниями при алкогольной и наркотической зависимости. Экстренный выезд наших специалистов доступен круглосуточно, а лечение проводится с применением проверенных методик и препаратов, что гарантирует безопасность и конфиденциальность каждому пациенту.
Разобраться лучше – [url=https://narcolog-na-dom-novosibirsk00.ru/]вызов врача нарколога на дом новосибирск[/url]
http://indiapharmglobal.com/# indian pharmacy paypal
india online pharmacy: reputable indian online pharmacy – india pharmacy
После поступления вызова наш нарколог выезжает к пациенту в кратчайшие сроки, прибывая по адресу в пределах 30–60 минут. Специалист начинает процедуру с подробного осмотра и диагностики, измеряя ключевые показатели организма: артериальное давление, частоту пульса, насыщенность кислородом и собирая подробный анамнез.
Получить дополнительную информацию – [url=https://narcolog-na-dom-novosibirsk00.ru/]www.domen.ru[/url]
В таких случаях своевременный вызов нарколога на дом позволяет быстро стабилизировать состояние больного и предотвратить тяжелые последствия.
Получить дополнительную информацию – https://narcolog-na-dom-novosibirsk00.ru/narkolog-na-dom-kruglosutochno-novosibirsk
Meds From Mexico Meds From Mexico Meds From Mexico
Основные показания для вызова нарколога:
Выяснить больше – https://narcolog-na-dom-v-irkutske00.ru/vrach-narkolog-na-dom-irkutsk
После завершения процедур пациенту предоставляется подробная консультация с рекомендациями по дальнейшему восстановлению и профилактике повторных случаев зависимости.
Ознакомиться с деталями – [url=https://narcolog-na-dom-novosibirsk00.ru/]вызов врача нарколога на дом в новосибирске[/url]
Основные показания для вызова нарколога:
Выяснить больше – [url=https://narcolog-na-dom-v-irkutske00.ru/]частный нарколог на дом иркутск[/url]
После завершения процедур пациенту предоставляется подробная консультация с рекомендациями по дальнейшему восстановлению и профилактике повторных случаев зависимости.
Углубиться в тему – http://narcolog-na-dom-novosibirsk00.ru/narkolog-na-dom-kruglosutochno-novosibirsk/
http://indiapharmglobal.com/# India Pharm Global
https://canadapharmglobal.shop/# online canadian pharmacy
India Pharm Global: buy prescription drugs from india – indian pharmacy paypal
certified canadian international pharmacy: Canada Pharm Global – prescription drugs canada buy online
На дом выезжает квалифицированный врач, который проводит процедуру детоксикации в комфортных условиях, позволяя пациенту избежать стресса и огласки. С помощью капельницы и медикаментов нормализуется состояние, восстанавливаются основные функции организма. Процедура длится несколько часов, после чего врач оставляет рекомендации по поддерживающему лечению.
Получить дополнительную информацию – http://vyvod-iz-zapoya-lyubertsy2.ru/
Эта информационная заметка предлагает лаконичное и четкое освещение актуальных вопросов. Здесь вы найдете ключевые факты и основную информацию по теме, которые помогут вам сформировать собственное мнение и повысить уровень осведомленности.
Изучить вопрос глубже – https://expathealth.tips/sample-page-2/attachment/279833
buy prescription drugs from india India Pharm Global India Pharm Global
https://medsfrommexico.com/# buying from online mexican pharmacy
Запой может быть не только физически тяжёлым, но и психологически разрушительным. Поэтому важно вовремя обратиться за помощью. Вывод из запоя в Нижнем Новгороде — это необходимая медицинская процедура, которая помогает победить алкогольную зависимость и восстановить здоровье. Мы в клинике «АнтиЗависимость» предлагаем круглосуточную помощь в комфортных условиях — на дому или в стационаре.
Подробнее можно узнать тут – [url=https://narcolog-na-dom-novokuznetsk0.ru/]вызов нарколога на дом новокузнецк[/url]
Лечение зависимости требует не только физической детоксикации, но и работы с психоэмоциональным состоянием пациента. Психотерапевтическая поддержка помогает выявить глубинные причины зависимости, снизить уровень стресса и сформировать устойчивые навыки самоконтроля, что существенно снижает риск рецидивов.
Подробнее – [url=https://narcolog-na-dom-ufa000.ru/]нарколог на дом стоимость уфа[/url]
Как проходит лечение:
Подробнее тут – https://narcolog-na-dom-novokuznetsk0.ru
«Кодирование — это не магическое решение, а важный этап в комплексной программе лечения, — поясняет ведущий нарколог клиники «Ясное Будущее» Марина Иванова. — Главное — сочетание фармакологического воздействия и последующей работы с психологом для формирования устойчивой мотивации к трезвости».
Получить дополнительную информацию – kodirovanie ot alkogolizma na domu
Запой может быть не только физически тяжёлым, но и психологически разрушительным. Поэтому важно вовремя обратиться за помощью. Вывод из запоя в Нижнем Новгороде — это необходимая медицинская процедура, которая помогает победить алкогольную зависимость и восстановить здоровье. Мы в клинике «АнтиЗависимость» предлагаем круглосуточную помощь в комфортных условиях — на дому или в стационаре.
Исследовать вопрос подробнее – [url=https://narcolog-na-dom-novokuznetsk0.ru/]вызов врача нарколога на дом[/url]
Комплексная терапия при выводе из запоя на дому включает в себя два основных направления: медикаментозную детоксикацию и психологическую поддержку. Такой подход позволяет добиться быстрого и устойчивого эффекта, минимизируя риск осложнений и обеспечивая долгосрочную ремиссию.
Углубиться в тему – [url=https://narcolog-na-dom-ufa000.ru/]частный нарколог на дом уфа[/url]
Запой может быть не только физически тяжёлым, но и психологически разрушительным. Поэтому важно вовремя обратиться за помощью. Вывод из запоя в Нижнем Новгороде — это необходимая медицинская процедура, которая помогает победить алкогольную зависимость и восстановить здоровье. Мы в клинике «АнтиЗависимость» предлагаем круглосуточную помощь в комфортных условиях — на дому или в стационаре.
Детальнее – [url=https://narcolog-na-dom-novokuznetsk0.ru/]вызов нарколога на дом новокузнецк[/url]
Лечение зависимости требует не только физической детоксикации, но и работы с психоэмоциональным состоянием пациента. Психотерапевтическая поддержка помогает выявить глубинные причины зависимости, снизить уровень стресса и сформировать устойчивые навыки самоконтроля, что существенно снижает риск рецидивов.
Детальнее – https://narcolog-na-dom-ufa000.ru/narkolog-na-dom-ufa-czeny/
Meds From Mexico: Meds From Mexico – Meds From Mexico
Алкогольная и наркотическая зависимость требуют незамедлительного и комплексного вмешательства для предотвращения серьезных осложнений и сохранения здоровья пациента. В Уфе, Республика Башкортостан, опытные наркологи выезжают на дом 24 часа в сутки, предоставляя оперативную помощь при запоях и в случаях наркотической интоксикации. Такой формат лечения позволяет начать детоксикацию в комфортной, привычной обстановке, обеспечивая максимальную конфиденциальность и индивидуальный подход к каждому пациенту.
Детальнее – http://narcolog-na-dom-ufa000.ru/narkolog-na-dom-czena-ufa/
reputable indian online pharmacy: India Pharm Global – best online pharmacy india
Запой может быть не только физически тяжёлым, но и психологически разрушительным. Поэтому важно вовремя обратиться за помощью. Вывод из запоя в Нижнем Новгороде — это необходимая медицинская процедура, которая помогает победить алкогольную зависимость и восстановить здоровье. Мы в клинике «АнтиЗависимость» предлагаем круглосуточную помощь в комфортных условиях — на дому или в стационаре.
Детальнее – [url=https://narcolog-na-dom-novokuznetsk0.ru/]врач нарколог на дом кемеровская область[/url]
medicine in mexico pharmacies Meds From Mexico Meds From Mexico
Экстренное вмешательство необходимо, когда самостоятельное прекращение употребления алкоголя или наркотиков становится невозможным, а состояние пациента ухудшается. Основные показания включают:
Подробнее – [url=https://narcolog-na-dom-ufa000.ru/]narkolog na dom[/url]
https://indiapharmglobal.com/# India Pharm Global
Сразу после вызова нарколог приезжает на дом для проведения первичного осмотра и диагностики. На этом этапе проводится сбор анамнеза, измеряются жизненно важные показатели (пульс, артериальное давление, температура) и определяется степень алкогольной интоксикации. Эти данные являются основой для разработки индивидуального плана лечения.
Разобраться лучше – [url=https://kapelnica-ot-zapoya-tyumen0.ru/]после капельницы от запоя в тюмени[/url]
Процедура вывода из запоя начинается с тщательной диагностики состояния пациента, чтобы определить, какие методы лечения будут наиболее эффективными. Мы применяем индивидуальный подход и комбинируем медикаментозное лечение с психотерапевтической поддержкой, что даёт лучший результат.
Подробнее тут – [url=https://narcolog-na-dom-novokuznetsk0.ru/]нарколог на дом круглосуточно новокузнецк[/url]
Запой сопровождается быстрым накоплением токсинов, что может привести к нарушению работы сердца, печени и почек. Использование капельничного метода позволяет оперативно ввести современные препараты для детоксикации, что способствует быстрому восстановлению обменных процессов и нормализации работы внутренних органов. Оперативное лечение на дому особенно актуально, когда каждая минута имеет значение для спасения здоровья.
Изучить вопрос глубже – http://kapelnica-ot-zapoya-tyumen0.ru
Процедура вывода из запоя начинается с тщательной диагностики состояния пациента, чтобы определить, какие методы лечения будут наиболее эффективными. Мы применяем индивидуальный подход и комбинируем медикаментозное лечение с психотерапевтической поддержкой, что даёт лучший результат.
Узнать больше – [url=https://narcolog-na-dom-novokuznetsk0.ru/]narcolog-na-dom-novokuznetsk0.ru/[/url]
Алкогольная и наркотическая зависимость требуют незамедлительного и комплексного вмешательства для предотвращения серьезных осложнений и сохранения здоровья пациента. В Уфе, Республика Башкортостан, опытные наркологи выезжают на дом 24 часа в сутки, предоставляя оперативную помощь при запоях и в случаях наркотической интоксикации. Такой формат лечения позволяет начать детоксикацию в комфортной, привычной обстановке, обеспечивая максимальную конфиденциальность и индивидуальный подход к каждому пациенту.
Подробнее тут – [url=https://narcolog-na-dom-ufa000.ru/]нарколог на дом в уфе[/url]
https://medsfrommexico.shop/# mexico drug stores pharmacies
legitimate canadian pharmacy online: best canadian pharmacy to order from – best canadian online pharmacy
Комплексная терапия при выводе из запоя на дому включает в себя два основных направления: медикаментозную детоксикацию и психологическую поддержку. Такой подход позволяет добиться быстрого и устойчивого эффекта, минимизируя риск осложнений и обеспечивая долгосрочную ремиссию.
Получить дополнительную информацию – https://narcolog-na-dom-ufa000.ru/narkolog-na-dom-kruglosutochno-ufa
Запой может быть не только физически тяжёлым, но и психологически разрушительным. Поэтому важно вовремя обратиться за помощью. Вывод из запоя в Нижнем Новгороде — это необходимая медицинская процедура, которая помогает победить алкогольную зависимость и восстановить здоровье. Мы в клинике «АнтиЗависимость» предлагаем круглосуточную помощь в комфортных условиях — на дому или в стационаре.
Углубиться в тему – http://narcolog-na-dom-novokuznetsk0.ru/narkolog-na-dom-klinika-novokuzneczk/https://narcolog-na-dom-novokuznetsk0.ru
Запой может быть не только физически тяжёлым, но и психологически разрушительным. Поэтому важно вовремя обратиться за помощью. Вывод из запоя в Нижнем Новгороде — это необходимая медицинская процедура, которая помогает победить алкогольную зависимость и восстановить здоровье. Мы в клинике «АнтиЗависимость» предлагаем круглосуточную помощь в комфортных условиях — на дому или в стационаре.
Разобраться лучше – [url=https://narcolog-na-dom-novokuznetsk0.ru/]врач нарколог на дом[/url]
Когда следует немедленно обращаться за помощью:
Подробнее тут – [url=https://narcolog-na-dom-novokuznetsk0.ru/]vyzvat-narkologa-na-dom novokuznetsk[/url]
Экстренное вмешательство необходимо, когда самостоятельное прекращение употребления алкоголя или наркотиков становится невозможным, а состояние пациента ухудшается. Основные показания включают:
Изучить вопрос глубже – [url=https://narcolog-na-dom-ufa000.ru/]вызов нарколога цена уфа[/url]
Лечение зависимости требует не только физической детоксикации, но и работы с психоэмоциональным состоянием пациента. Психотерапевтическая поддержка помогает выявить глубинные причины зависимости, снизить уровень стресса и сформировать устойчивые навыки самоконтроля, что существенно снижает риск рецидивов.
Ознакомиться с деталями – [url=https://narcolog-na-dom-ufa000.ru/]narkolog na dom[/url]
canadian discount pharmacy: Canada Pharm Global – canada pharmacy online legit
Алкогольная и наркотическая зависимость требуют незамедлительного и комплексного вмешательства для предотвращения серьезных осложнений и сохранения здоровья пациента. В Уфе, Республика Башкортостан, опытные наркологи выезжают на дом 24 часа в сутки, предоставляя оперативную помощь при запоях и в случаях наркотической интоксикации. Такой формат лечения позволяет начать детоксикацию в комфортной, привычной обстановке, обеспечивая максимальную конфиденциальность и индивидуальный подход к каждому пациенту.
Узнать больше – [url=https://narcolog-na-dom-ufa000.ru/]нарколог в уфе[/url]
Процесс вывода из запоя капельничным методом организован по строгой схеме, позволяющей обеспечить максимальную эффективность терапии. Каждая стадия направлена на комплексное восстановление организма и минимизацию риска осложнений.
Детальнее – http://kapelnica-ot-zapoya-tyumen0.ru/postavit-kapelniczu-ot-zapoya-tyumen/
Запой может быть не только физически тяжёлым, но и психологически разрушительным. Поэтому важно вовремя обратиться за помощью. Вывод из запоя в Нижнем Новгороде — это необходимая медицинская процедура, которая помогает победить алкогольную зависимость и восстановить здоровье. Мы в клинике «АнтиЗависимость» предлагаем круглосуточную помощь в комфортных условиях — на дому или в стационаре.
Ознакомиться с деталями – http://narcolog-na-dom-novokuznetsk0.ru/narkolog-na-dom-klinika-novokuzneczk/
India Pharm Global India Pharm Global online pharmacy india
Алкогольная и наркотическая зависимость требуют незамедлительного и комплексного вмешательства для предотвращения серьезных осложнений и сохранения здоровья пациента. В Уфе, Республика Башкортостан, опытные наркологи выезжают на дом 24 часа в сутки, предоставляя оперативную помощь при запоях и в случаях наркотической интоксикации. Такой формат лечения позволяет начать детоксикацию в комфортной, привычной обстановке, обеспечивая максимальную конфиденциальность и индивидуальный подход к каждому пациенту.
Подробнее – [url=https://narcolog-na-dom-ufa000.ru/]нарколог на дом уфа[/url]
https://indiapharmglobal.shop/# India Pharm Global
canadian pharmacy: canada drug pharmacy – cheap canadian pharmacy
Когда следует немедленно обращаться за помощью:
Ознакомиться с деталями – [url=https://narcolog-na-dom-novokuznetsk0.ru/]нарколог на дом новокузнецк[/url]
Услуга “Нарколог на дом” в Уфе охватывает широкий спектр лечебных мероприятий, направленных как на устранение токсической нагрузки, так и на работу с психоэмоциональным состоянием пациента. Комплексная терапия включает в себя медикаментозную детоксикацию, корректировку обменных процессов, а также психотерапевтическую поддержку, что позволяет не только вывести пациента из состояния запоя, но и помочь ему справиться с наркотической зависимостью.
Исследовать вопрос подробнее – [url=https://narcolog-na-dom-ufa000.ru/]нарколог в уфе[/url]
India Pharm Global: indianpharmacy com – Online medicine order
https://indiapharmglobal.shop/# india pharmacy mail order
Запой может быть не только физически тяжёлым, но и психологически разрушительным. Поэтому важно вовремя обратиться за помощью. Вывод из запоя в Нижнем Новгороде — это необходимая медицинская процедура, которая помогает победить алкогольную зависимость и восстановить здоровье. Мы в клинике «АнтиЗависимость» предлагаем круглосуточную помощь в комфортных условиях — на дому или в стационаре.
Узнать больше – [url=https://narcolog-na-dom-novokuznetsk0.ru/]врач нарколог на дом в новокузнецке[/url]
https://raskapotek.com/# flГҐttfjerner apotek
Rask Apotek: nГҐr stenger apotek – Rask Apotek
babypaket apotek apotek produkter Svenska Pharma
farmacia continua recensioni: ortopedia shop recensioni – broncho munal bambini
https://efarmaciait.com/# vermox recensioni
Эта познавательная публикация погружает вас в море интересного контента, который быстро захватит ваше внимание. Мы рассмотрим важные аспекты темы и предоставим вам уникальныеInsights и полезные сведения для дальнейшего изучения.
Получить больше информации – https://oficinas.unsch.edu.pe/ocri/convenio-para-otorgamiento-de-prestamos-con-descuento-enplanilla-entre-la-universidad-nacional-de-san-cristobal-de-huamanga-einterbank
acne apotek: bestГ¤lla hem recept frГҐn apoteket – tabletter
trova cort crema vessel 250 uls amazon xanax compresse 0 50 prezzo
http://papafarma.com/# farmacia ventas
farmacie dr max italia: EFarmaciaIt – farmacie online autorizzate ministero
https://efarmaciait.shop/# expose cosa serve
deo fГ¶r barn: Svenska Pharma – medicine online
https://efarmaciait.com/# amicafarmacia login
Специалист выясняет, как долго продолжается запой, какие симптомы наблюдаются, а также наличие сопутствующих заболеваний. Эти данные позволяют сформировать индивидуальный план лечения и выбрать оптимальные методы детоксикации.
Подробнее можно узнать тут – http://vyvod-iz-zapoya-vladimir0.ru/srochnyj-vyvod-iz-zapoya-vladimir/
legitimasjon apotek kompresjonsstrГёmper apotek Rask Apotek
Системы автоматизированного дозирования обеспечивают точное введение медикаментов, что минимизирует риск побочных эффектов. Постоянный мониторинг жизненно важных показателей позволяет врачу корректировать терапию в режиме реального времени, гарантируя безопасность процедуры.
Подробнее тут – [url=https://vyvod-iz-zapoya-vladimir0.ru/]вывод из запоя стационар владимир[/url]
Комплексное лечение на дому организовано по четкой схеме, состоящей из последовательных этапов. Каждый из них направлен на быстрое восстановление нормального функционирования организма.
Детальнее – http://vyvod-iz-zapoya-vladimir0.ru/vyvod-iz-zapoya-na-domu-vladimir/https://vyvod-iz-zapoya-vladimir0.ru
Специалист выясняет, как долго продолжается запой, какие симптомы наблюдаются, а также наличие сопутствующих заболеваний. Эти данные позволяют сформировать индивидуальный план лечения и выбрать оптимальные методы детоксикации.
Изучить вопрос глубже – [url=https://vyvod-iz-zapoya-vladimir0.ru/]вывод из запоя на дому владимир недорого[/url]
Алкогольный запой — это острое состояние тяжёлой интоксикации, при котором организм накапливает критические уровни продуктов распада этанола и перестаёт справляться с их нейтрализацией. При этом страдают важнейшие органы и системы: печень, почки, сердце, центральная нервная система. Без квалифицированной медицинской помощи риск развития судорог, алкогольного делирия и полиорганной недостаточности возрастает многократно.
Разобраться лучше – https://vyvod-iz-zapoya-krasnogorsk2.ru/vyvod-iz-zapoya-na-domu/
Papa Farma: dolmen pastillas – Papa Farma
В этой заметке мы представляем шаги, которые помогут в процессе преодоления зависимостей. Рассматриваются стратегии поддержки и чек-листы для тех, кто хочет сделать первый шаг к выздоровлению. Наша цель — вдохновить читателей на положительные изменения и поддержать их в трудных моментах.
Разобраться лучше – [url=https://narkolog-na-dom-krasnodar11.ru/]нарколог на дом анонимно[/url]
efarma telefono: deursil 300 senza ricetta – farma italia
Специалист выясняет, как долго продолжается запой, какие симптомы наблюдаются, а также наличие сопутствующих заболеваний. Эти данные позволяют сформировать индивидуальный план лечения и выбрать оптимальные методы детоксикации.
Исследовать вопрос подробнее – [url=https://vyvod-iz-zapoya-vladimir0.ru/]вывод из запоя цены на дому владимир[/url]
https://svenskapharma.shop/# apotek ta hål i öronen
Эта статья подробно расскажет о процессе выздоровления, который включает в себя эмоциональную, физическую и психологическую реабилитацию. Мы обсуждаем значимость поддержки и наличие профессиональных программ. Читатели узнают, как строить новую жизнь и не возвращаться к старым привычкам.
Углубиться в тему – [url=https://narkolog-na-dom-krasnodar11.ru/]нарколог на дом вывод из запоя[/url]
natecal d3 600 mg + 400 ui prezzo EFarmaciaIt microser 8 mg compresse
https://efarmaciait.com/# EFarmaciaIt
Комплексное лечение на дому организовано по четкой схеме, состоящей из последовательных этапов. Каждый из них направлен на быстрое восстановление нормального функционирования организма.
Ознакомиться с деталями – https://vyvod-iz-zapoya-vladimir0.ru/vyvod-iz-zapoya-na-domu-vladimir/
Комплексное лечение на дому организовано по четкой схеме, состоящей из последовательных этапов. Каждый из них направлен на быстрое восстановление нормального функционирования организма.
Углубиться в тему – https://vyvod-iz-zapoya-vladimir0.ru/
farmacia online espaГ±a envГo internacional: Papa Farma – Papa Farma
Специалист выясняет, как долго продолжается запой, какие симптомы наблюдаются, а также наличие сопутствующих заболеваний. Эти данные позволяют сформировать индивидуальный план лечения и выбрать оптимальные методы детоксикации.
Детальнее – https://vyvod-iz-zapoya-vladimir0.ru/
Запой характеризуется накоплением токсинов и ухудшением работы внутренних органов. Чем дольше продолжается состояние интоксикации, тем выше риск серьезных осложнений. Помощь нарколога на дому позволяет начать детоксикацию в первые часы кризиса, что существенно повышает шансы на успешное восстановление и предотвращает развитие хронических заболеваний.
Выяснить больше – [url=https://vyvod-iz-zapoya-vladimir0.ru/]вывод из запоя дешево владимир[/url]
https://raskapotek.com/# Rask Apotek
Системы автоматизированного дозирования обеспечивают точное введение медикаментов, что минимизирует риск побочных эффектов. Постоянный мониторинг жизненно важных показателей позволяет врачу корректировать терапию в режиме реального времени, гарантируя безопасность процедуры.
Ознакомиться с деталями – https://vyvod-iz-zapoya-vladimir0.ru/vyvod-iz-zapoya-anonimno-vladimir
Thank you for your sharing. I am worried that I lack creative ideas. It is your article that makes me full of hope. Thank you. But, I have a question, can you help me?
Этот обзор посвящен успешным стратегиям избавления от зависимости, включая реальные примеры и советы. Мы разоблачим мифы и предоставим читателям достоверную информацию о различных подходах. Получите опыт многообразия методов и найдите подходящий способ для себя!
Получить больше информации – [url=https://narkolog-na-dom-krasnodar11.ru/]врач нарколог на дом[/url]
Запой характеризуется накоплением токсинов и ухудшением работы внутренних органов. Чем дольше продолжается состояние интоксикации, тем выше риск серьезных осложнений. Помощь нарколога на дому позволяет начать детоксикацию в первые часы кризиса, что существенно повышает шансы на успешное восстановление и предотвращает развитие хронических заболеваний.
Изучить вопрос глубже – [url=https://vyvod-iz-zapoya-vladimir0.ru/]вывод из запоя владимир[/url]
b12 apotek Rask Apotek legemidler utenom apotek
e-recept apotek: Svenska Pharma – munskydd svart apotek
Этот информативный материал предлагает содержательную информацию по множеству задач и вопросов. Мы призываем вас исследовать различные идеи и факты, обобщая их для более глубокого понимания. Наша цель — сделать обучение доступным и увлекательным.
Получить больше информации – https://thehrbreakdown.com/2024/09/10/job-supervisors-with-disabilities-can-boost-productivity-research-indicates
В этом информативном тексте представлены захватывающие события и факты, которые заставят вас задуматься. Мы обращаем внимание на важные моменты, которые часто остаются незамеченными, и предлагаем новые перспективы на привычные вещи. Подготовьтесь к тому, чтобы быть поглощенным увлекательными рассказами!
Подробнее – https://cjps.coou.edu.ng/latest-u-s-news-rankings-cap-a-strong-year-in-academic-recognition
apotek magnesium: finns lГ¤kemedlet pГҐ apoteket – Svenska Pharma
Как подчёркивает врач-нарколог клиники «Гармония здоровья» Александр Ветров, «любая зависимость — это не слабость, а болезнь, требующая медицинского вмешательства и системного подхода».
Подробнее – http://narkologicheskaya-klinika-voronezh9.ru
http://raskapotek.com/# apotek åpningstider
glycerol apotek Svenska Pharma Svenska Pharma
https://papafarma.com/# Papa Farma
Rask Apotek: Rask Apotek – svovelkrem apotek
Svenska Pharma: Svenska Pharma – isopropylalkohol apotek
Клиника также предлагает долгосрочные программы, которые включают как стационарное, так и амбулаторное лечение. Мы понимаем, что восстановление требует не только медицинской помощи, но и значительной психологической поддержки на каждом этапе.
Узнать больше – https://медицина-вывод-из-запоя.рф/vyvod-iz-zapoya-v-stacionare-v-nizhnem-novgoroge.xn--p1ai
Наркологическая клиника “Возрождение” находится по адресу: ул. Агрономическая, д. 122А, г. Нижний Новгород, Россия. Мы открыты для вас круглосуточно и также предлагаем онлайн-консультации, чтобы сделать наши услуги более доступными.
Получить дополнительную информацию – http://медицина-вывод-из-запоя.рф
Наркологическая клиника “Возрождение” находится по адресу: ул. Агрономическая, д. 122А, г. Нижний Новгород, Россия. Мы открыты для вас круглосуточно и также предлагаем онлайн-консультации, чтобы сделать наши услуги более доступными.
Получить больше информации – http://медицина-вывод-из-запоя.рф
http://efarmaciait.com/# EFarmaciaIt
Миссия клиники — оказание комплексной помощи людям с зависимостями. Основные задачи, которые мы ставим перед собой:
Выяснить больше – http://медицина-вывод-из-запоя.рф/vyvod-iz-zapoya-cena-v-nizhnem-novgoroge.xn--p1ai/
Клиника «Центр реабилитации «Свет Надежды» – специализированное учреждение, предоставляющее профессиональную помощь пациентам, страдающим от алкогольной и наркотической зависимости. Наша главная цель – помощь людям в преодолении зависимости и возвращении к здоровому образу жизни с применением современных методик реабилитации и индивидуального подхода.
Разобраться лучше – http://быстро-вывод-из-запоя.рф/vyvod-iz-zapoya-na-domu-v-volgograde.xn--p1ai/
Мы также уделяем большое внимание социальной адаптации. Пациенты учатся восстанавливать навыки общения и обретать уверенность в себе, что помогает в будущем избежать рецидивов и успешно вернуться к полноценной жизни, будь то работа или учеба.
Разобраться лучше – https://быстро-вывод-из-запоя.рф/vyvod-iz-zapoya-anonimno-v-volgograde.xn--p1ai
Зависимость от психоактивных веществ — серьёзная проблема, которая становится всё актуальнее в современном мире. Алкоголизм, наркомания и игромания представляют угрозу как для здоровья отдельного человека, так и для общества в целом. В условиях растущей нагрузки на систему здравоохранения Наркологическая клиника “Возрождение” предлагает комплексные решения для тех, кто страдает от различных видов зависимости. Мы придерживаемся индивидуального подхода, что позволяет достигать высоких результатов в лечении и реабилитации.
Детальнее – http://медицина-вывод-из-запоя.рф/vyvod-iz-zapoya-anonimno-v-nizhnem-novgoroge.xn--p1ai/
nagelsvamp apotek torr förhud online pharmacy
Клиника «Центр реабилитации «Свет Надежды» – специализированное учреждение, предоставляющее профессиональную помощь пациентам, страдающим от алкогольной и наркотической зависимости. Наша главная цель – помощь людям в преодолении зависимости и возвращении к здоровому образу жизни с применением современных методик реабилитации и индивидуального подхода.
Изучить вопрос глубже – http://быстро-вывод-из-запоя.рф
kamagra potenza: EFarmaciaIt – neonato non apre gli occhi forum
Rask Apotek: Rask Apotek – Rask Apotek
Наш подход охватывает все аспекты реабилитации, помогая пациентам справиться с зависимостями и вернуться к полноценной жизни.
Подробнее – https://медицина-вывод-из-запоя.рф/
http://papafarma.com/# trabajo farmacia barcelona
Зависимость от психоактивных веществ — серьёзная проблема, которая становится всё актуальнее в современном мире. Алкоголизм, наркомания и игромания представляют угрозу как для здоровья отдельного человека, так и для общества в целом. В условиях растущей нагрузки на систему здравоохранения Наркологическая клиника “Возрождение” предлагает комплексные решения для тех, кто страдает от различных видов зависимости. Мы придерживаемся индивидуального подхода, что позволяет достигать высоких результатов в лечении и реабилитации.
Узнать больше – https://медицина-вывод-из-запоя.рф/
Наркологическая клиника “Возрождение” находится по адресу: ул. Агрономическая, д. 122А, г. Нижний Новгород, Россия. Мы открыты для вас круглосуточно и также предлагаем онлайн-консультации, чтобы сделать наши услуги более доступными.
Выяснить больше – http://медицина-вывод-из-запоя.рф/vyvod-iz-zapoya-anonimno-v-nizhnem-novgoroge.xn--p1ai/
Миссия клиники — оказание комплексной помощи людям с зависимостями. Основные задачи, которые мы ставим перед собой:
Исследовать вопрос подробнее – http://медицина-вывод-из-запоя.рф/vyvod-iz-zapoya-v-kruglosutochno-v-nizhnem-novgoroge.xn--p1ai/
Зависимость от психоактивных веществ — серьёзная проблема, которая становится всё актуальнее в современном мире. Алкоголизм, наркомания и игромания представляют угрозу как для здоровья отдельного человека, так и для общества в целом. В условиях растущей нагрузки на систему здравоохранения Наркологическая клиника “Возрождение” предлагает комплексные решения для тех, кто страдает от различных видов зависимости. Мы придерживаемся индивидуального подхода, что позволяет достигать высоких результатов в лечении и реабилитации.
Получить дополнительную информацию – https://медицина-вывод-из-запоя.рф/vyvod-iz-zapoya-cena-v-nizhnem-novgoroge.xn--p1ai/
Клиника также предлагает долгосрочные программы, которые включают как стационарное, так и амбулаторное лечение. Мы понимаем, что восстановление требует не только медицинской помощи, но и значительной психологической поддержки на каждом этапе.
Подробнее – https://медицина-вывод-из-запоя.рф/vyvod-iz-zapoya-anonimno-v-nizhnem-novgoroge.xn--p1ai/
https://papafarma.shop/# farmacia oline
EFarmaciaIt EFarmaciaIt consegna farmaci lavora con noi
alun apotek: Svenska Pharma – Svenska Pharma
https://efarmaciait.shop/# broncho vaxom cos’è
yasminelle prezzo: EFarmaciaIt – EFarmaciaIt
Наши специалисты гарантируют пациентам конфиденциальность и внимательное отношение, создавая атмосферу доверия. Врач сопровождает пациента на каждом этапе лечения, отслеживая его состояние и корректируя терапию по мере необходимости. Профессионализм и забота наших специалистов являются основой успешной реабилитации.
Исследовать вопрос подробнее – https://быстро-вывод-из-запоя.рф/vyvod-iz-zapoya-cena-v-volgograde.xn--p1ai/
Наш подход охватывает все аспекты реабилитации, помогая пациентам справиться с зависимостями и вернуться к полноценной жизни.
Получить дополнительную информацию – https://медицина-вывод-из-запоя.рф/vyvod-iz-zapoya-na-domu-v-nizhnem-novgoroge.xn--p1ai/
В этой статье мы рассматриваем разные способы борьбы с алкогольной зависимостью. Обсуждаются методы лечения, программы реабилитации и советы для поддержки близких. Читатели получат информацию о том, как преодолеть зависимость и добиться успешного выздоровления.
Выяснить больше – https://lechenienasmorka.ru/kapelnica-ot-zapoya-v-sanktpeterburge-bezopasnyy-i-effektivnyy-detoks-s-klinikoy-narkolog-ekspress.html
Этот обзор медицинских исследований собрал самое важное из последних публикаций в области медицины. Мы проанализировали ключевые находки и представили их в доступной форме, чтобы читатели могли легко ориентироваться в актуальных темах. Этот материал станет отличным подспорьем для изучения медицины.
Подробнее – https://sichuan-krd.ru/platnaya-skoraya-pomoshh-v-rostove-na-donu
apotek melatonin Rask Apotek Rask Apotek
Svenska Pharma: mina recwpt – apotek pГҐ nГ¤tet billigt
http://papafarma.com/# Papa Farma
Papa Farma: Papa Farma – Papa Farma
Эта статья полна интересного контента, который побудит вас исследовать новые горизонты. Мы собрали полезные факты и удивительные истории, которые обогащают ваше понимание темы. Читайте, погружайтесь в детали и наслаждайтесь процессом изучения!
Получить дополнительную информацию – https://media.collinfannincms.org/team/anthony-mann
AntiNarcoForum — анонимное сообщество помощи людям, страдающим от алкогольной, наркотической и игровой зависимости. На платформе доступны истории выздоровления, консультации специалистов, а также постоянная поддержка от людей, преодолевших схожие трудности.
Подробнее можно узнать тут – https://antinarcoforum.ru/reabilitaczionnye-czentry/otzyvy-byvshih-paczientov-kak-ponyat-chto-czentr-dejstvitelno-pomogaet/
AntiNarcoForum — анонимное сообщество помощи людям, страдающим от алкогольной, наркотической и игровой зависимости. На платформе доступны истории выздоровления, консультации специалистов, а также постоянная поддержка от людей, преодолевших схожие трудности.
Изучить вопрос глубже – [url=https://antinarcoforum.ru/narkozavisimost/]реабилитация наркозависимости[/url]
AntiNarcoForum — форум помощи при зависимостях, обеспечивающий анонимность и поддержку каждому участнику. Здесь доступны проверенные методики лечения, реальные истории выздоровления и профессиональные рекомендации специалистов для эффективного преодоления зависимости.
Выяснить больше – [url=https://antinarcoforum.ru/reabilitaczionnye-czentry/chto-proishodit-v-czentre-reabilitaczii/]деятельность реабилитационного центра[/url]
Выезд врача-нарколога из клиники «ТрезвоПрофи» на дом происходит в любое время суток, включая выходные и праздники. Перед началом детоксикации врач проводит осмотр, измеряет давление, частоту пульса, уровень кислорода в крови и подбирает индивидуальную схему лечения. Сама процедура обычно занимает от 1 до 2 часов и проводится под строгим контролем врача.
Получить дополнительную информацию – [url=https://kapelnica-ot-zapoya-sochi00.ru/]капельница от запоя цена в сочи[/url]
AntiNarcoForum — анонимное сообщество помощи людям, страдающим от алкогольной, наркотической и игровой зависимости. На платформе доступны истории выздоровления, консультации специалистов, а также постоянная поддержка от людей, преодолевших схожие трудности.
Разобраться лучше – [url=https://antinarcoforum.ru/narkozavisimost/kakie-narkotiki-vyzyvayut-zavisimost-bystree-vsego/]какой наркотик вызывает зависимость мгновенно[/url]
Капельница от запоя — это комплексная процедура, направленная на быстрое выведение токсинов, нормализацию обменных процессов и восстановление жизненно важных функций организма. Врачи-наркологи подбирают индивидуальный состав капельницы, исходя из состояния пациента. В стандартный набор препаратов обычно входят:
Узнать больше – [url=https://kapelnica-ot-zapoya-sochi00.ru/]капельница от запоя клиника сочи[/url]
Выезд врача-нарколога из клиники «ТрезвоПрофи» на дом происходит в любое время суток, включая выходные и праздники. Перед началом детоксикации врач проводит осмотр, измеряет давление, частоту пульса, уровень кислорода в крови и подбирает индивидуальную схему лечения. Сама процедура обычно занимает от 1 до 2 часов и проводится под строгим контролем врача.
Углубиться в тему – [url=https://kapelnica-ot-zapoya-sochi00.ru/]капельница от запоя клиника в сочи[/url]
Капельница от запоя — это комплексная процедура, направленная на быстрое выведение токсинов, нормализацию обменных процессов и восстановление жизненно важных функций организма. Врачи-наркологи подбирают индивидуальный состав капельницы, исходя из состояния пациента. В стандартный набор препаратов обычно входят:
Подробнее тут – https://kapelnica-ot-zapoya-sochi00.ru/kapelnicza-ot-zapoya-na-domu-sochi/
AntiNarcoForum — анонимное сообщество помощи людям, страдающим от алкогольной, наркотической и игровой зависимости. На платформе доступны истории выздоровления, консультации специалистов, а также постоянная поддержка от людей, преодолевших схожие трудности.
Исследовать вопрос подробнее – [url=https://antinarcoforum.ru/reabilitaczionnye-czentry/pochemu-sryv-posle-czentra-ne-konecz-puti-a-etap-vyzdorovleniya/]рецидив наркомании[/url]
http://efarmaciait.com/# EFarmaciaIt
ta vaksine apotek Rask Apotek Rask Apotek
https://efarmaciait.com/# EFarmaciaIt
Врач устанавливает внутривенную капельницу, через которую вводятся специально подобранные препараты для очищения организма от алкоголя, восстановления баланса жидкости и нормализации работы всех органов и систем. В течение всей процедуры специалист следит за состоянием пациента и, при необходимости, корректирует терапию.
Подробнее – [url=https://kapelnica-ot-zapoya-sochi00.ru/]капельница от запоя на дому[/url]
apotek influensavaksine 2022: apotek ГҐpent pГҐ sГёndag – Rask Apotek
EFarmaciaIt: nicetile 500 mg miglior prezzo – betametasone 1 mg
AntiNarcoForum — форум помощи при зависимостях, обеспечивающий анонимность и поддержку каждому участнику. Здесь доступны проверенные методики лечения, реальные истории выздоровления и профессиональные рекомендации специалистов для эффективного преодоления зависимости.
Подробнее можно узнать тут – [url=https://antinarcoforum.ru/alkogolizm/psihologicheskie-prichiny-alkogolnoj-zavisimosti/]психология алкогольной зависимости[/url]
Платформа AntiNarcoForum объединяет людей, нуждающихся в анонимной и квалифицированной помощи при игровой, алкогольной или наркотической зависимости. Форум предоставляет возможность получить консультации от специалистов и пообщаться с людьми, успешно справившимися с аналогичными проблемами.
Детальнее – https://antinarcoforum.ru/narkozavisimost/kak-formiruetsya-narkoticheskaya-zavisimost-razbor-psihologicheskih-i-biologicheskih-mehanizmov/
Чем раньше будет проведена процедура детоксикации, тем выше шансы избежать осложнений и быстрее восстановить здоровье пациента. Врачи клиники «ТрезвоПрофи» оперативно реагируют на вызовы, выезжая в любой район Сочи и прилегающие населенные пункты.
Ознакомиться с деталями – [url=https://kapelnica-ot-zapoya-sochi00.ru/]капельница от запоя клиника сочи[/url]
После процедуры пациент чувствует значительное облегчение состояния, улучшение самочувствия и снижение тяги к алкоголю.
Углубиться в тему – [url=https://kapelnica-ot-zapoya-sochi00.ru/]после капельницы от запоя сочи[/url]
Платформа AntiNarcoForum объединяет людей, нуждающихся в анонимной и квалифицированной помощи при игровой, алкогольной или наркотической зависимости. Форум предоставляет возможность получить консультации от специалистов и пообщаться с людьми, успешно справившимися с аналогичными проблемами.
Углубиться в тему – [url=https://antinarcoforum.ru/narkozavisimost/kakie-narkotiki-vyzyvayut-zavisimost-bystree-vsego/]какой наркотик вызывает сильную зависимость[/url]
Платформа AntiNarcoForum объединяет людей, нуждающихся в анонимной и квалифицированной помощи при игровой, алкогольной или наркотической зависимости. Форум предоставляет возможность получить консультации от специалистов и пообщаться с людьми, успешно справившимися с аналогичными проблемами.
Углубиться в тему – [url=https://antinarcoforum.ru/reabilitaczionnye-czentry/chto-proishodit-v-czentre-reabilitaczii/]деятельность реабилитационного центра[/url]
https://papafarma.com/# Papa Farma
После процедуры пациент чувствует значительное облегчение состояния, улучшение самочувствия и снижение тяги к алкоголю.
Ознакомиться с деталями – [url=https://kapelnica-ot-zapoya-sochi00.ru/]капельница от запоя выезд в сочи[/url]
После процедуры пациент чувствует значительное облегчение состояния, улучшение самочувствия и снижение тяги к алкоголю.
Выяснить больше – https://kapelnica-ot-zapoya-sochi00.ru/kapelnicza-ot-zapoya-na-domu-sochi
AntiNarcoForum — это онлайн-форум, созданный для тех, кто столкнулся с проблемой алкоголизма или наркомании. Анонимность, индивидуальный подход к каждому пользователю и квалифицированная поддержка делают форум эффективным инструментом в борьбе с зависимостью.
Разобраться лучше – [url=https://antinarcoforum.ru/narkozavisimost/]страдает наркотической зависимостью[/url]
Svenska Pharma apotek logga in recept Svenska Pharma
После процедуры пациент чувствует значительное облегчение состояния, улучшение самочувствия и снижение тяги к алкоголю.
Ознакомиться с деталями – [url=https://kapelnica-ot-zapoya-sochi00.ru/]капельница от запоя[/url]
AntiNarcoForum — анонимное сообщество помощи людям, страдающим от алкогольной, наркотической и игровой зависимости. На платформе доступны истории выздоровления, консультации специалистов, а также постоянная поддержка от людей, преодолевших схожие трудности.
Разобраться лучше – [url=https://antinarcoforum.ru/narkozavisimost/]страдает наркотической зависимостью[/url]
Экстренная установка капельницы необходима, если пациент находится в состоянии запоя более 2–3 дней или испытывает симптомы тяжелой интоксикации алкоголем:
Подробнее – http://kapelnica-ot-zapoya-sochi00.ru/kapelnicza-ot-zapoya-detoks-sochi/
Papa Farma: Papa Farma – Papa Farma
Rask Apotek: Rask Apotek – Rask Apotek
https://raskapotek.shop/# Rask Apotek
Выезд врача-нарколога из клиники «ТрезвоПрофи» на дом происходит в любое время суток, включая выходные и праздники. Перед началом детоксикации врач проводит осмотр, измеряет давление, частоту пульса, уровень кислорода в крови и подбирает индивидуальную схему лечения. Сама процедура обычно занимает от 1 до 2 часов и проводится под строгим контролем врача.
Ознакомиться с деталями – http://kapelnica-ot-zapoya-sochi00.ru
https://medicijnpunt.com/# MedicijnPunt
faut-il une ordonnance pour le viagra: Pharma Confiance – farmacia paris
PharmaJetzt gГјnstige online apotheke auf rechnung PharmaJetzt
Выезд врача-нарколога из клиники «ТрезвоПрофи» на дом происходит в любое время суток, включая выходные и праздники. Перед началом детоксикации врач проводит осмотр, измеряет давление, частоту пульса, уровень кислорода в крови и подбирает индивидуальную схему лечения. Сама процедура обычно занимает от 1 до 2 часов и проводится под строгим контролем врача.
Подробнее тут – https://kapelnica-ot-zapoya-sochi00.ru/kapelnicza-ot-zapoya-czena-sochi
shop-apotheke online: PharmaJetzt – PharmaJetzt
AntiNarcoForum — форум помощи при зависимостях, обеспечивающий анонимность и поддержку каждому участнику. Здесь доступны проверенные методики лечения, реальные истории выздоровления и профессиональные рекомендации специалистов для эффективного преодоления зависимости.
Получить больше информации – [url=https://antinarcoforum.ru/narkozavisimost/kakie-narkotiki-vyzyvayut-zavisimost-bystree-vsego/]какой наркотик вызывает зависимость мгновенно[/url]
http://pharmaconnectusa.com/# PharmaConnectUSA
После процедуры пациент чувствует значительное облегчение состояния, улучшение самочувствия и снижение тяги к алкоголю.
Углубиться в тему – [url=https://kapelnica-ot-zapoya-sochi00.ru/]капельница от запоя цена[/url]
AntiNarcoForum — это онлайн-форум, созданный для тех, кто столкнулся с проблемой алкоголизма или наркомании. Анонимность, индивидуальный подход к каждому пользователю и квалифицированная поддержка делают форум эффективным инструментом в борьбе с зависимостью.
Разобраться лучше – [url=https://antinarcoforum.ru/narkozavisimost/kak-formiruetsya-narkoticheskaya-zavisimost-razbor-psihologicheskih-i-biologicheskih-mehanizmov/]формирование наркотической зависимости[/url]
Выезд врача-нарколога из клиники «ТрезвоПрофи» на дом происходит в любое время суток, включая выходные и праздники. Перед началом детоксикации врач проводит осмотр, измеряет давление, частоту пульса, уровень кислорода в крови и подбирает индивидуальную схему лечения. Сама процедура обычно занимает от 1 до 2 часов и проводится под строгим контролем врача.
Детальнее – https://kapelnica-ot-zapoya-sochi00.ru/kapelnicza-ot-zapoya-detoks-sochi/
Экстренная установка капельницы необходима, если пациент находится в состоянии запоя более 2–3 дней или испытывает симптомы тяжелой интоксикации алкоголем:
Выяснить больше – [url=https://kapelnica-ot-zapoya-sochi00.ru/]после капельницы от запоя в сочи[/url]
https://pharmaconfiance.shop/# para sante online
MedicijnPunt: belgie apotheek online – Medicijn Punt
Выезд врача-нарколога из клиники «ТрезвоПрофи» на дом происходит в любое время суток, включая выходные и праздники. Перед началом детоксикации врач проводит осмотр, измеряет давление, частоту пульса, уровень кислорода в крови и подбирает индивидуальную схему лечения. Сама процедура обычно занимает от 1 до 2 часов и проводится под строгим контролем врача.
Исследовать вопрос подробнее – [url=https://kapelnica-ot-zapoya-sochi00.ru/]posle-kapelniczy-ot-zapoya sochi[/url]
Выезд врача-нарколога из клиники «ТрезвоПрофи» на дом происходит в любое время суток, включая выходные и праздники. Перед началом детоксикации врач проводит осмотр, измеряет давление, частоту пульса, уровень кислорода в крови и подбирает индивидуальную схему лечения. Сама процедура обычно занимает от 1 до 2 часов и проводится под строгим контролем врача.
Получить дополнительные сведения – [url=https://kapelnica-ot-zapoya-sochi00.ru/]капельница от запоя выезд в сочи[/url]
Pharma Connect USA PharmaConnectUSA fluoxetine india pharmacy
MedicijnPunt: online medicijnen kopen zonder recept – medicijnen bestellen zonder recept
AntiNarcoForum — анонимное сообщество помощи людям, страдающим от алкогольной, наркотической и игровой зависимости. На платформе доступны истории выздоровления, консультации специалистов, а также постоянная поддержка от людей, преодолевших схожие трудности.
Подробнее тут – [url=https://antinarcoforum.ru/narkozavisimost/]про наркозависимость[/url]
AntiNarcoForum — форум помощи при зависимостях, обеспечивающий анонимность и поддержку каждому участнику. Здесь доступны проверенные методики лечения, реальные истории выздоровления и профессиональные рекомендации специалистов для эффективного преодоления зависимости.
Получить дополнительную информацию – https://antinarcoforum.ru/narkozavisimost/5-rannih-priznakov-narkozavisimosti-kotorye-nelzya-ignorirovat/
http://pharmaconfiance.com/# Pharma Confiance
Форум AntiNarcoForum — место, где зависимые и их близкие могут анонимно получить помощь профессионалов и участников сообщества. Здесь обсуждаются эффективные методы лечения зависимостей, личные истории успеха и конкретные советы по выходу из сложных ситуаций.
Выяснить больше – [url=https://antinarcoforum.ru/reabilitaczionnye-czentry/pochemu-sryv-posle-czentra-ne-konecz-puti-a-etap-vyzdorovleniya/]срыв после рехаба[/url]
AntiNarcoForum — это онлайн-форум, созданный для тех, кто столкнулся с проблемой алкоголизма или наркомании. Анонимность, индивидуальный подход к каждому пользователю и квалифицированная поддержка делают форум эффективным инструментом в борьбе с зависимостью.
Изучить вопрос глубже – [url=https://antinarcoforum.ru/narkozavisimost/]синдромы наркотической зависимости[/url]
Выезд врача-нарколога из клиники «ТрезвоПрофи» на дом происходит в любое время суток, включая выходные и праздники. Перед началом детоксикации врач проводит осмотр, измеряет давление, частоту пульса, уровень кислорода в крови и подбирает индивидуальную схему лечения. Сама процедура обычно занимает от 1 до 2 часов и проводится под строгим контролем врача.
Подробнее – [url=https://kapelnica-ot-zapoya-sochi00.ru/]капельница от запоя цена сочи.[/url]
После процедуры пациент чувствует значительное облегчение состояния, улучшение самочувствия и снижение тяги к алкоголю.
Ознакомиться с деталями – [url=https://kapelnica-ot-zapoya-sochi00.ru/]капельница от запоя на дому сочи[/url]
online medicijnen bestellen: belgische online apotheek – medicatielijst apotheek
united healthcare online pharmacy: Fulvicin – PharmaConnectUSA
Капельница от запоя — это комплексная процедура, направленная на быстрое выведение токсинов, нормализацию обменных процессов и восстановление жизненно важных функций организма. Врачи-наркологи подбирают индивидуальный состав капельницы, исходя из состояния пациента. В стандартный набор препаратов обычно входят:
Получить дополнительную информацию – [url=https://kapelnica-ot-zapoya-sochi00.ru/]www.domen.ru[/url]
Medicijn Punt Medicijn Punt online medicijnen
https://pharmajetzt.com/# apotheke online shop
Платформа AntiNarcoForum объединяет людей, нуждающихся в анонимной и квалифицированной помощи при игровой, алкогольной или наркотической зависимости. Форум предоставляет возможность получить консультации от специалистов и пообщаться с людьми, успешно справившимися с аналогичными проблемами.
Углубиться в тему – [url=https://antinarcoforum.ru/reabilitaczionnye-czentry/]центр реабилитации алкоголиков[/url]
https://medicijnpunt.com/# MedicijnPunt
AntiNarcoForum — это онлайн-форум, созданный для тех, кто столкнулся с проблемой алкоголизма или наркомании. Анонимность, индивидуальный подход к каждому пользователю и квалифицированная поддержка делают форум эффективным инструментом в борьбе с зависимостью.
Подробнее можно узнать тут – [url=https://antinarcoforum.ru/reabilitaczionnye-czentry/chto-proishodit-v-czentre-reabilitaczii/]что делают в центре реабилитации[/url]
Pharma Connect USA: PharmaConnectUSA – crestor people’s pharmacy
MedicijnPunt: ons medicatie voor apotheken – medicijne
https://pharmaconnectusa.com/# super saver pharmacy
Medicijn Punt Medicijn Punt Medicijn Punt
После процедуры пациент чувствует значительное облегчение состояния, улучшение самочувствия и снижение тяги к алкоголю.
Ознакомиться с деталями – [url=https://kapelnica-ot-zapoya-sochi00.ru/]капельница от запоя выезд[/url]
Выезд врача-нарколога из клиники «ТрезвоПрофи» на дом происходит в любое время суток, включая выходные и праздники. Перед началом детоксикации врач проводит осмотр, измеряет давление, частоту пульса, уровень кислорода в крови и подбирает индивидуальную схему лечения. Сама процедура обычно занимает от 1 до 2 часов и проводится под строгим контролем врача.
Ознакомиться с деталями – https://kapelnica-ot-zapoya-sochi00.ru/kapelnicza-ot-zapoya-na-domu-sochi/
AntiNarcoForum — форум помощи при зависимостях, обеспечивающий анонимность и поддержку каждому участнику. Здесь доступны проверенные методики лечения, реальные истории выздоровления и профессиональные рекомендации специалистов для эффективного преодоления зависимости.
Углубиться в тему – [url=https://antinarcoforum.ru/rodstvenniki-i-blizkie-zavisimyh/kak-sohranit-semyu-kogda-v-nej-zavisimyj/]пьянство и алкоголизм в семье[/url]
pharmacy online: apotheke bestellen – internetapotheke versandkostenfrei
http://pharmaconfiance.com/# xyrem achat en ligne
После процедуры пациент чувствует значительное облегчение состояния, улучшение самочувствия и снижение тяги к алкоголю.
Углубиться в тему – [url=https://kapelnica-ot-zapoya-sochi00.ru/]капельница от запоя на дому в сочи[/url]
collagГЁne homГ©opathie: parapharmacie cannes – pharmacie diarville
AntiNarcoForum — это онлайн-форум, созданный для тех, кто столкнулся с проблемой алкоголизма или наркомании. Анонимность, индивидуальный подход к каждому пользователю и квалифицированная поддержка делают форум эффективным инструментом в борьбе с зависимостью.
Получить больше информации – [url=https://antinarcoforum.ru/reabilitaczionnye-czentry/pochemu-sryv-posle-czentra-ne-konecz-puti-a-etap-vyzdorovleniya/]срыв после рехаба[/url]
thyroxine pharmacy amoxicillin uk pharmacy Pharma Connect USA
https://pharmaconnectusa.shop/# baclofen pharmacy
AntiNarcoForum — анонимное сообщество помощи людям, страдающим от алкогольной, наркотической и игровой зависимости. На платформе доступны истории выздоровления, консультации специалистов, а также постоянная поддержка от людей, преодолевших схожие трудности.
Исследовать вопрос подробнее – [url=https://antinarcoforum.ru/narkozavisimost/]центры наркозависимости[/url]
https://medicijnpunt.shop/# medicijnen op recept online bestellen
mijn medicijn bestellen: Medicijn Punt – netherlands online pharmacy
clomid uk pharmacy: topical rx pharmacy – world rx pharmacy
apothekenbedarf online-shop online apotheke germany Pharma Jetzt
Чем раньше будет проведена процедура детоксикации, тем выше шансы избежать осложнений и быстрее восстановить здоровье пациента. Врачи клиники «ТрезвоПрофи» оперативно реагируют на вызовы, выезжая в любой район Сочи и прилегающие населенные пункты.
Подробнее – [url=https://kapelnica-ot-zapoya-sochi00.ru/]капельница от запоя выезд сочи[/url]
Выезд врача-нарколога из клиники «ТрезвоПрофи» на дом происходит в любое время суток, включая выходные и праздники. Перед началом детоксикации врач проводит осмотр, измеряет давление, частоту пульса, уровень кислорода в крови и подбирает индивидуальную схему лечения. Сама процедура обычно занимает от 1 до 2 часов и проводится под строгим контролем врача.
Выяснить больше – [url=https://kapelnica-ot-zapoya-sochi00.ru/]капельница от запоя сочи.[/url]
Экстренная установка капельницы необходима, если пациент находится в состоянии запоя более 2–3 дней или испытывает симптомы тяжелой интоксикации алкоголем:
Получить больше информации – [url=https://kapelnica-ot-zapoya-sochi00.ru/]postavit-kapelniczu-ot-zapoya sochi[/url]
http://pharmaconnectusa.com/# best online thai pharmacy
recept online: medicatie apotheker – apotheek winkel 24 review
После процедуры пациент чувствует значительное облегчение состояния, улучшение самочувствия и снижение тяги к алкоголю.
Изучить вопрос глубже – [url=https://kapelnica-ot-zapoya-sochi00.ru/]kapelnicza-ot-zapoya-na-domu sochi[/url]
online aphotheke: PharmaJetzt – metaflow rabattcode
Платформа AntiNarcoForum объединяет людей, нуждающихся в анонимной и квалифицированной помощи при игровой, алкогольной или наркотической зависимости. Форум предоставляет возможность получить консультации от специалистов и пообщаться с людьми, успешно справившимися с аналогичными проблемами.
Детальнее – [url=https://antinarcoforum.ru/narkozavisimost/mozhno-li-vylechit-narkomaniyu-navsegda-mnenie-speczialistov/]как вылечить человека от наркомании[/url]
lapsa avis cialis generique en ligne Pharma Confiance
Форум AntiNarcoForum — место, где зависимые и их близкие могут анонимно получить помощь профессионалов и участников сообщества. Здесь обсуждаются эффективные методы лечения зависимостей, личные истории успеха и конкретные советы по выходу из сложных ситуаций.
Подробнее – [url=https://antinarcoforum.ru/reabilitaczionnye-czentry/]реабилитационный центр для наркозависимых[/url]
Платформа AntiNarcoForum объединяет людей, нуждающихся в анонимной и квалифицированной помощи при игровой, алкогольной или наркотической зависимости. Форум предоставляет возможность получить консультации от специалистов и пообщаться с людьми, успешно справившимися с аналогичными проблемами.
Разобраться лучше – [url=https://antinarcoforum.ru/narkozavisimost/]наркозависимость это[/url]
Чем раньше будет проведена процедура детоксикации, тем выше шансы избежать осложнений и быстрее восстановить здоровье пациента. Врачи клиники «ТрезвоПрофи» оперативно реагируют на вызовы, выезжая в любой район Сочи и прилегающие населенные пункты.
Получить больше информации – [url=https://kapelnica-ot-zapoya-sochi00.ru/]капельница от запоя на дому сочи.[/url]
http://pharmajetzt.com/# deutsche apotheke
Форум AntiNarcoForum — место, где зависимые и их близкие могут анонимно получить помощь профессионалов и участников сообщества. Здесь обсуждаются эффективные методы лечения зависимостей, личные истории успеха и конкретные советы по выходу из сложных ситуаций.
Изучить вопрос глубже – https://antinarcoforum.ru/reabilitaczionnye-czentry/kak-vybrat-reabilitaczionnyj-czentr-7-glavnyh-kriteriev/
https://pharmajetzt.shop/# apotheke deutschland
pharmacie olive: pharmacie dieue sur meuse – Pharma Confiance
После процедуры пациент чувствует значительное облегчение состояния, улучшение самочувствия и снижение тяги к алкоголю.
Выяснить больше – [url=https://kapelnica-ot-zapoya-sochi00.ru/]врач на дом капельница от запоя[/url]
Чем раньше будет проведена процедура детоксикации, тем выше шансы избежать осложнений и быстрее восстановить здоровье пациента. Врачи клиники «ТрезвоПрофи» оперативно реагируют на вызовы, выезжая в любой район Сочи и прилегающие населенные пункты.
Подробнее тут – [url=https://kapelnica-ot-zapoya-sochi00.ru/]капельница от запоя цена[/url]
pharmacy online 365 legit: sildenafil citrate online pharmacy – pharmacy selling cytotec
online pharmacy uk prozac bupropion pharmacy asda pharmacy mefloquine
AntiNarcoForum — анонимное сообщество помощи людям, страдающим от алкогольной, наркотической и игровой зависимости. На платформе доступны истории выздоровления, консультации специалистов, а также постоянная поддержка от людей, преодолевших схожие трудности.
Узнать больше – [url=https://antinarcoforum.ru/narkozavisimost/mozhno-li-vylechit-narkomaniyu-navsegda-mnenie-speczialistov/]как вылечить человека от наркозависимости[/url]
Выезд врача-нарколога из клиники «ТрезвоПрофи» на дом происходит в любое время суток, включая выходные и праздники. Перед началом детоксикации врач проводит осмотр, измеряет давление, частоту пульса, уровень кислорода в крови и подбирает индивидуальную схему лечения. Сама процедура обычно занимает от 1 до 2 часов и проводится под строгим контролем врача.
Подробнее можно узнать тут – https://kapelnica-ot-zapoya-sochi00.ru/kapelnicza-ot-zapoya-detoks-sochi
https://pharmaconnectusa.shop/# target pharmacy cephalexin
Платформа AntiNarcoForum объединяет людей, нуждающихся в анонимной и квалифицированной помощи при игровой, алкогольной или наркотической зависимости. Форум предоставляет возможность получить консультации от специалистов и пообщаться с людьми, успешно справившимися с аналогичными проблемами.
Детальнее – [url=https://antinarcoforum.ru/narkozavisimost/]что такое наркозависимость[/url]
Выезд врача-нарколога из клиники «ТрезвоПрофи» на дом происходит в любое время суток, включая выходные и праздники. Перед началом детоксикации врач проводит осмотр, измеряет давление, частоту пульса, уровень кислорода в крови и подбирает индивидуальную схему лечения. Сама процедура обычно занимает от 1 до 2 часов и проводится под строгим контролем врача.
Получить дополнительные сведения – http://kapelnica-ot-zapoya-sochi00.ru/kapelnicza-ot-zapoya-detoks-sochi/
Pharma Connect USA: good neighbor pharmacy omeprazole – Pharma Connect USA
Форум AntiNarcoForum — место, где зависимые и их близкие могут анонимно получить помощь профессионалов и участников сообщества. Здесь обсуждаются эффективные методы лечения зависимостей, личные истории успеха и конкретные советы по выходу из сложных ситуаций.
Выяснить больше – [url=https://antinarcoforum.ru/reabilitaczionnye-czentry/pochemu-sryv-posle-czentra-ne-konecz-puti-a-etap-vyzdorovleniya/]рецидив алкоголизма это[/url]
Экстренная установка капельницы необходима, если пациент находится в состоянии запоя более 2–3 дней или испытывает симптомы тяжелой интоксикации алкоголем:
Получить дополнительную информацию – [url=https://kapelnica-ot-zapoya-sochi00.ru/]капельница от запоя анонимно в сочи[/url]
safeway pharmacy: Pharma Connect USA – prescription without a doctor’s prescription
PharmaJetzt PharmaJetzt shop apitheke
Экстренная установка капельницы необходима, если пациент находится в состоянии запоя более 2–3 дней или испытывает симптомы тяжелой интоксикации алкоголем:
Подробнее тут – http://kapelnica-ot-zapoya-sochi00.ru/
https://pharmaconfiance.com/# pharmacie de ligne
Эта разъяснительная статья содержит простые и доступные разъяснения по актуальным вопросам. Мы стремимся сделать информацию понятной для широкой аудитории, чтобы каждый смог разобраться в предмете и извлечь из него максимум пользы.
Изучить вопрос глубже – https://winter-ing.de/2016/01/24/test
Pharma Jetzt: PharmaJetzt – PharmaJetzt
Эта медицинская заметка содержит сжатую информацию о новых находках и методах в области здравоохранения. Мы предлагаем читателям свежие данные о заболеваниях, профилактике и лечении. Наша цель — быстро и доступно донести важную информацию, которая поможет в повседневной жизни и понимании здоровья.
Получить дополнительные сведения – https://2prishi.ru/priznaki-peredozirovki-narkotikami
Эта статья сочетает познавательный и занимательный контент, что делает ее идеальной для любителей глубоких исследований. Мы рассмотрим увлекательные аспекты различных тем и предоставим вам новые знания, которые могут оказаться полезными в будущем.
Выяснить больше – https://cecu.es/que-puedes-hacer-2
Эта статья предлагает уникальную подборку занимательных фактов и необычных историй, которые вы, возможно, не знали. Мы постараемся вдохновить ваше воображение и разнообразить ваш кругозор, погружая вас в мир, полный интересных открытий. Читайте и открывайте для себя новое!
Подробнее – https://domnaberegu.ru/russia/%D0%B4%D0%BE%D0%B1%D1%80%D0%BE-%D0%BF%D0%BE%D0%B6%D0%B0%D0%BB%D0%BE%D0%B2%D0%B0%D1%82%D1%8C
http://pharmaconnectusa.com/# Pharma Connect USA
В статье по вопросам здоровья мы рассматриваем актуальные проблемы, с которыми сталкивается общество. Обсуждаются заболевания, факторы риска и важные аспекты профилактики. Читатели получат полезные советы о том, как сохранить здоровье и улучшить качество жизни.
Получить дополнительные сведения – https://mylucklife.ru/kak-vovremya-zametit-zavisimost-i-ne-poteryat-cheloveka
wedgewood pharmacy: PharmaConnectUSA – boots pharmacy uk viagra
Medicijn Punt europese apotheek medicijnen bestellen online
Эта информационная заметка содержит увлекательные сведения, которые могут вас удивить! Мы собрали интересные факты, которые сделают вашу жизнь ярче и полнее. Узнайте нечто новое о привычных аспектах повседневности и откройте для себя удивительный мир информации.
Получить дополнительную информацию – https://misericordiadibadia.it/timetable/event/surgery-2
Служба выезда «ТюменьМед» функционирует 24/7, что позволяет незамедлительно реагировать на срочные вызовы. В распоряжении клиники — собственный автопарк с санитарными машинами, оснащёнными всем необходимым для проведения инфузионной терапии на дому. При экстренном вызове врач прибывает к пациенту в пределах города в течение 30–60 минут.
Узнать больше – https://narkologicheskaya-klinika-tyumen10.ru/narkologicheskaya-klinika-klinika-pomoshh-tyumen/
Aviator zalety gry – dlaczego warto zagrać? Stale rosnąca liczba fanów gry 888Starz Aviator Poland nie bierze się z przypadku. Ta wyśmienita gra kasynowa gwarantuje użytkownikom mnóstwo fantastycznych przeżyć. Zobacz, jakie są największe zalety gry Aviator 888Starz: Gotowy, by odkryć świat gier Spribe? Zarejestruj się na swoje konto w Starcasino jeszcze dziś i zacznij grać w najlepsze belgijskie gry kasynowe online. Dzięki harmonijnemu systemowi zarządzania kontem, szybkiej i bezpiecznej obsłudze płatności, kuszącym bonusom i nagradzających programom lojalnościowym, Starcasino to najwspanialsze miejsce dla miłośników kasyna. Dołącz teraz i poczuj dreszczyk emocji, jaki oferują gry Spribe! Aviator to znana i lubiana na całym świecie crash game, w której zadaniem gracza jest wypłacenie potencjalnej wygranej przed odlotem samolotu. Maszyna wznosi się na ekranie, a im dalej leci, tym większy jest mnożnik wygranych. Przed rozpoczęciem każdej rundy wystarczy obstawić pojedynczą lub podwójną stawkę, a następnie kliknąć „cashout” w odpowiednim momencie.
https://b.io/timitigu1976
Dive into the excitement with Dabet, where every bet brings you closer to big wins. Their modern platform and real-time updates keep you ahead of the game. betabuys.uk Join pediascape.science wiki User:ChristenaHarold for premier betting mostbet bd com! Experience top sports events and secure wins with mostbet bd. Bet now! Discover thrilling wins and top games at Mostbet Casino! Enjoy secure betting, bonuses, and more mostbet casino. Play now! Discover thrilling wins and top games at Mostbet Casino! Enjoy secure betting, bonuses, and more mostbet casino. Play now! Ganhe 100$ no campobet – campobetbr ao Se Registrar – Comece a Apostar Agora! Discover thrilling wins and top games at Mostbet Casino! Enjoy secure betting, bonuses, and more mostbet casino. Play now!
https://pharmaconnectusa.com/# Pharma Connect USA
Врач индивидуально подбирает:
Получить дополнительную информацию – https://lechenie-alkogolizma-tyumen10.ru
Врач индивидуально подбирает:
Подробнее – http://lechenie-alkogolizma-tyumen10.ru
PharmaJetzt: PharmaJetzt – welche versandapotheke ist die gГјnstigste
Для каждого пациента используется индивидуальный монитор жизненно важных функций, передающий данные врачу в клинике через защищённый канал связи. Это обеспечивает безопасность при лечении как лёгких, так и тяжёлых форм интоксикации, снижая вероятность осложнений.
Получить дополнительную информацию – http://narkologicheskaya-klinika-tyumen10.ru/
Обращение к врачу становится жизненно необходимым, если пациент находится в состоянии длительного запоя, при котором организм не справляется с накоплением токсинов. Если запой продолжается более двух-трёх дней, в теле накапливаются вредные вещества, что ведёт к нарушениям работы внутренних органов, развитию абстинентного синдрома и появлению психических нарушений. Также, если у пациента наблюдаются симптомы, такие как частая рвота, спутанность сознания, судороги или резкие скачки артериального давления, это сигнал к незамедлительному вызову специалиста. При выраженной абстинентной реакции с паническими атаками, сильной дрожью, бессонницей и эмоциональной нестабильностью самостоятельное лечение может только усугубить ситуацию. Если появляются признаки алкогольного психоза – галлюцинации, агрессивность или спутанность сознания – вызов нарколога становится обязательным для предотвращения дальнейших осложнений. Также, когда требуется подготовка к процедурам кодирования от зависимости, необходима качественная детоксикация организма, что также является показанием к срочному обращению за профессиональной помощью.
Разобраться лучше – https://narcolog-na-dom-ekaterinburg0.ru/vrach-narkolog-na-dom-ekb
Служба выезда «ТюменьМед» функционирует 24/7, что позволяет незамедлительно реагировать на срочные вызовы. В распоряжении клиники — собственный автопарк с санитарными машинами, оснащёнными всем необходимым для проведения инфузионной терапии на дому. При экстренном вызове врач прибывает к пациенту в пределах города в течение 30–60 минут.
Изучить вопрос глубже – [url=https://narkologicheskaya-klinika-tyumen10.ru/]бесплатная наркологическая клиника[/url]
Наркологическая помощь «ТюменьМед» не ограничивается только физической детоксикацией. В состав команды входят психологи и социальные работники, которые проводят мотивационные беседы, обучают навыкам самоконтроля и оказывают помощь в планировании досуга и социальных активностей после детоксикации.
Подробнее – [url=https://narkologicheskaya-klinika-tyumen10.ru/]наркологическая клиника[/url]
Наркологическое лечение на дому начинается с приезда врача в течение 30-60 минут после вызова. Специалист проводит первичную диагностику состояния пациента, включая измерение артериального давления, пульса и уровня кислорода в крови, а также общую оценку тяжести интоксикации. Затем врач подбирает оптимальный состав лекарств для детоксикационной капельницы, которая эффективно очищает организм от токсинов, восстанавливает водно-солевой баланс и нормализует работу внутренних органов.
Детальнее – [url=https://narcolog-na-dom-sochi00.ru/]нарколог на дом вывод в сочи[/url]
Индивидуальный план включает детоксикацию, медикаментозную поддержку, психотерапию и реабилитацию. Специалисты учитывают:
Получить дополнительную информацию – [url=https://lechenie-alkogolizma-tyumen10.ru/]лечение алкоголизма[/url]
Обращение за медицинской помощью становится необходимым, когда пациент пребывает в состоянии, требующем немедленного вмешательства, так как самостоятельное лечение может только усугубить ситуацию. Это происходит, если запой продолжается несколько дней, и организм не успевает справляться с накопившимися токсинами, что ведёт к нарушению работы внутренних органов. Если у пациента регулярно наблюдаются симптомы, такие как частая рвота, сильное головокружение, спутанность сознания, судороги или резкие колебания артериального давления, это является явным сигналом к вызову специалиста. Особенно важно обращаться за помощью при выраженных признаках абстинентного синдрома, когда сильная дрожь, панические атаки, бессонница, тревожность и даже галлюцинации свидетельствуют о том, что организм испытывает критическую нехватку поддержки. Наличие психических нарушений, таких как агрессивное поведение, спутанность сознания или признаки алкогольного психоза, также требует незамедлительного вмешательства. В таких ситуациях обращение за профессиональной помощью помогает быстро стабилизировать состояние пациента, предотвратить развитие тяжелых осложнений и сохранить жизнь.
Исследовать вопрос подробнее – [url=https://narcolog-na-dom-ekaterinburg00.ru/]narkolog-na-dom-czena ekaterinburg[/url]
Служба выезда «ТюменьМед» функционирует 24/7, что позволяет незамедлительно реагировать на срочные вызовы. В распоряжении клиники — собственный автопарк с санитарными машинами, оснащёнными всем необходимым для проведения инфузионной терапии на дому. При экстренном вызове врач прибывает к пациенту в пределах города в течение 30–60 минут.
Исследовать вопрос подробнее – [url=https://narkologicheskaya-klinika-tyumen10.ru/]narkologicheskaya-klinika-tyumen10.ru/[/url]
В нашей клинике применяются различные техники кодирования, которые подбираются с учётом медицинских показаний, психологического состояния и пожеланий пациента.
Получить больше информации – https://kodirovanie-ot-alkogolizma-odintsovo2.ru
Основу терапии составляют современные методы детоксикации и восстановления функций организма. Клиника предлагает амбулаторные и стационарные программы, адаптированные под состояние пациента и пожелания семьи.
Изучить вопрос глубже – [url=https://lechenie-alkogolizma-tyumen10.ru/]клиника лечения алкоголизма тюмень[/url]
Pharma Jetzt: PharmaJetzt – Pharma Jetzt
Для каждого пациента используется индивидуальный монитор жизненно важных функций, передающий данные врачу в клинике через защищённый канал связи. Это обеспечивает безопасность при лечении как лёгких, так и тяжёлых форм интоксикации, снижая вероятность осложнений.
Получить больше информации – [url=https://narkologicheskaya-klinika-tyumen10.ru/]частная наркологическая клиника тюмень[/url]
https://pharmajetzt.com/# versandapotheken auf rechnung
Ampicillin PharmaConnectUSA Pharma Connect USA
Врач индивидуально подбирает:
Получить больше информации – [url=https://lechenie-alkogolizma-tyumen10.ru/]лечение алкоголизма тюмень[/url]
PharmaConnectUSA: PharmaConnectUSA – Pharma Connect USA
Индивидуальный план включает детоксикацию, медикаментозную поддержку, психотерапию и реабилитацию. Специалисты учитывают:
Исследовать вопрос подробнее – [url=https://lechenie-alkogolizma-tyumen10.ru/]клиника лечения алкоголизма в тюмени[/url]
Алкогольная зависимость — сложное хроническое заболевание, требующее комплексного подхода и квалифицированной помощи. В клинике «Тюменьбезалко» в центре Тюмени разработаны эффективные программы реабилитации, сочетающие современные медицинские методы, психологическую поддержку и социальную адаптацию. Опытные врачи-наркологи и психотерапевты помогают пациентам преодолеть употребление алкоголя, восстановить физическое и эмоциональное здоровье и вернуться к полноценной жизни.
Углубиться в тему – [url=https://lechenie-alkogolizma-tyumen10.ru/]анонимное лечение алкоголизма в тюмени[/url]
https://medicijnpunt.shop/# medicijnen online bestellen
Пациенты, которые обращаются в нашу клинику за наркологической помощью, получают не просто стандартное лечение, а комплексный подход к проблеме зависимости. Наши врачи имеют большой практический опыт и высокую квалификацию, благодаря чему могут эффективно справляться даже с самыми сложными случаями. Мы используем только проверенные методики и сертифицированные препараты, гарантирующие безопасность и эффективность лечения.
Подробнее можно узнать тут – https://narcolog-na-dom-sochi00.ru/vyzov-narkologa-na-dom-sochi/
https://pharmaconfiance.com/# la grande pharmacie du 15
PharmaJetzt: апотека – PharmaJetzt
mijn apotheek online MedicijnPunt medicatie apotheker
Основу терапии составляют современные методы детоксикации и восстановления функций организма. Клиника предлагает амбулаторные и стационарные программы, адаптированные под состояние пациента и пожелания семьи.
Углубиться в тему – [url=https://lechenie-alkogolizma-tyumen10.ru/]центр лечения алкоголизма в тюмени[/url]
Служба выезда «ТюменьМед» функционирует 24/7, что позволяет незамедлительно реагировать на срочные вызовы. В распоряжении клиники — собственный автопарк с санитарными машинами, оснащёнными всем необходимым для проведения инфузионной терапии на дому. При экстренном вызове врач прибывает к пациенту в пределах города в течение 30–60 минут.
Углубиться в тему – [url=https://narkologicheskaya-klinika-tyumen10.ru/]наркологические клиники алкоголизм тюмень[/url]
PharmaConnectUSA: PharmaConnectUSA – PharmaConnectUSA
В нашей клинике применяются различные техники кодирования, которые подбираются с учётом медицинских показаний, психологического состояния и пожеланий пациента.
Ознакомиться с деталями – http://kodirovanie-ot-alkogolizma-odintsovo2.ru
В условиях стационара или на дневном стационаре применяются сбалансированные инфузионные растворы, витамины, антиоксиданты и препараты для поддержки печени. Цель — минимизировать интоксикацию и предотвратить осложнения.
Подробнее можно узнать тут – [url=https://lechenie-alkogolizma-tyumen10.ru/]центр лечения алкоголизма[/url]
http://pharmajetzt.com/# pzn apotheke
Клиника «Нарколог-Профи» предлагает круглосуточную помощь на дому в Екатеринбурге и Свердловской области. Наши опытные специалисты готовы оперативно приехать по вашему вызову и оказать экстренную медицинскую поддержку при алкогольной или наркотической зависимости. Мы проводим детоксикацию организма, купируем абстинентный синдром и стабилизируем состояние пациента, обеспечивая при этом полную конфиденциальность и комфорт в домашних условиях.
Разобраться лучше – [url=https://narcolog-na-dom-ekaterinburg00.ru/]нарколог на дом срочно в екатеринбурге[/url]
Pharma Confiance: offre pharmacien officine – logo parapharmacie
В этой статье вы найдете познавательную и занимательную информацию, которая поможет вам лучше понять мир вокруг. Мы собрали интересные данные, которые вдохновляют на размышления и побуждают к действиям. Открывайте новую информацию и получайте удовольствие от чтения!
Узнать больше – https://haricart.com/hello-world
pharmacie paris 18 ouverte: ghd service client – Pharma Confiance
Этот информационный обзор станет отличным путеводителем по актуальным темам, объединяющим важные факты и мнения экспертов. Мы исследуем ключевые идеи и представляем их в доступной форме для более глубокого понимания. Читайте, чтобы оставаться в курсе событий!
Изучить вопрос глубже – https://direkt-pkw-ankauf.de/how-close-are-we-to-autonomous-cars
https://pharmajetzt.com/# online-apotheke testsieger
https://medicijnpunt.shop/# Medicijn Punt
Pharma Connect USA: Pharma Connect USA – rx discount pharmacy hazard ky
Современные клиники предоставляют широкий спектр услуг, начиная с первичной консультации и заканчивая долгосрочной поддержкой после прохождения курса лечения. Ключевым этапом является детоксикация — процедура, направленная на выведение токсинов и стабилизацию физического состояния пациента.
Узнать больше – http://narkologicheskaya-pomoshh-arkhangelsk0.ru
Pharma Connect USA: zyprexa prices pharmacy – provigil uk pharmacy
Анонимность — один из ключевых принципов работы клиники «Северная Звезда». Все обращения регистрируются под кодовым номером, без упоминания фамилии и контактных данных в базе данных, доступ к которой имеют только прямые исполнители процедур. Круглосуточная линия позволяет связаться со специалистом в любой момент: ночью, в праздники или выходные. Вызов врача на дом возможен в любой час, без предварительной записи, а при необходимости пациент может быть госпитализирован в отдельное крыло клиники с минимальным контактом с другими посетителями.
Исследовать вопрос подробнее – [url=https://lechenie-alkogolizma-arkhangelsk0.ru/]центр лечения алкоголизма архангельская область[/url]
Критерий
Подробнее можно узнать тут – https://narkologicheskaya-pomoshh-arkhangelsk0.ru/neotlozhnaya-narkologicheskaya-pomoshh-arkhangelsk/
https://pharmaconfiance.shop/# pharmacie en ligne française
В зависимости от состояния пациента, помощь может быть оказана в домашних условиях или в стационаре. Вызов нарколога на дом особенно актуален при абстинентном синдроме или тяжелом алкогольном опьянении. Как отмечается в материалах НМИЦ психиатрии и наркологии, в таких ситуациях крайне важно избежать самолечения и довериться врачам, способным правильно подобрать препараты и дозировки.
Изучить вопрос глубже – [url=https://narkologicheskaya-pomoshh-arkhangelsk0.ru/]вызвать наркологическую помощь в архангельске[/url]
Современные клиники предоставляют широкий спектр услуг, начиная с первичной консультации и заканчивая долгосрочной поддержкой после прохождения курса лечения. Ключевым этапом является детоксикация — процедура, направленная на выведение токсинов и стабилизацию физического состояния пациента.
Изучить вопрос глубже – https://narkologicheskaya-pomoshh-arkhangelsk0.ru/
I don’t think the title of your article matches the content lol. Just kidding, mainly because I had some doubts after reading the article.
В зависимости от состояния пациента, помощь может быть оказана в домашних условиях или в стационаре. Вызов нарколога на дом особенно актуален при абстинентном синдроме или тяжелом алкогольном опьянении. Как отмечается в материалах НМИЦ психиатрии и наркологии, в таких ситуациях крайне важно избежать самолечения и довериться врачам, способным правильно подобрать препараты и дозировки.
Получить дополнительную информацию – https://narkologicheskaya-pomoshh-arkhangelsk0.ru
pharmacie online: online apoteke – gГјnstige apotheke
В зависимости от состояния пациента, помощь может быть оказана в домашних условиях или в стационаре. Вызов нарколога на дом особенно актуален при абстинентном синдроме или тяжелом алкогольном опьянении. Как отмечается в материалах НМИЦ психиатрии и наркологии, в таких ситуациях крайне важно избежать самолечения и довериться врачам, способным правильно подобрать препараты и дозировки.
Детальнее – [url=https://narkologicheskaya-pomoshh-arkhangelsk0.ru/]анонимная наркологическая помощь архангельск[/url]
Процесс терапии в клинике построен по поэтапной схеме, включающей:
Углубиться в тему – [url=https://lechenie-alkogolizma-arkhangelsk0.ru/]lechenie alkogolizma arhangel’sk[/url]
PharmaJetzt: Pharma Jetzt – PharmaJetzt
http://pharmaconnectusa.com/# Viagra with Fluoxetine
MedicijnPunt: п»їmedicijnen bestellen – MedicijnPunt
http://medicijnpunt.com/# nieuwe pharma
Pharma Confiance: pharmacie de garde 60 aujourd’hui – Pharma Confiance
http://pharmajetzt.com/# Pharma Jetzt
Проблемы зависимости требуют оперативного вмешательства. Чем раньше начато лечение, тем выше вероятность полного восстановления. Наркологическая помощь в Архангельске представлена как государственными, так и частными клиниками, каждая из которых предлагает свой уровень сервиса и спектр услуг. Однако для получения эффективной и безопасной помощи важно понимать, какие критерии определяют качество наркологической поддержки.
Углубиться в тему – [url=https://narkologicheskaya-pomoshh-arkhangelsk0.ru/]наркологическая помощь в архангельске[/url]
Эта разъяснительная статья содержит простые и доступные разъяснения по актуальным вопросам. Мы стремимся сделать информацию понятной для широкой аудитории, чтобы каждый смог разобраться в предмете и извлечь из него максимум пользы.
Подробнее – http://kendrasmiley.com/cropped-042-jpg/?thc-month=201509
pharmacy price of viagra: viagra and online pharmacy – Pharma Connect USA
Эта статья предлагает живое освещение актуальной темы с множеством интересных фактов. Мы рассмотрим ключевые моменты, которые делают данную тему важной и актуальной. Подготовьтесь к насыщенному путешествию по неизвестным аспектам и узнайте больше о значимых событиях.
Детальнее – https://pacificpayrollgroup.steelpoolinc.com/the-difference-between-domicile-and-residence
internet apotheke: Pharma Jetzt – apotheke auf rechnung
https://medicijnpunt.shop/# holland apotheke
shop apptheke: PharmaJetzt – medikamente bestellen sofort
de online apotheek: netherlands online pharmacy – MedicijnPunt
http://pharmajetzt.com/# apotheke shop
http://pharmaconfiance.com/# Pharma Confiance
Мы понимаем, что каждая минута имеет решающее значение, поэтому наши специалисты готовы выехать на дом в кратчайшие сроки и провести все необходимые процедуры по детоксикации организма. Наша цель — помочь пациенту вернуться к нормальной жизни без лишних стрессов и рискованных попыток самостоятельного лечения.
Выяснить больше – https://vyvod-iz-zapoya-krasnodar00.ru/vyvod-iz-zapoya-kruglosutochno-krasnodar/
Растворы для детоксикации
Подробнее тут – [url=https://narcolog-na-dom-ekaterinburg00.ru/]врач нарколог на дом екатеринбург[/url]
Дополнительно, если у пациента отмечаются психические нарушения — галлюцинации, агрессия или спутанность сознания, это является прямым сигналом к срочному вмешательству. В этом случае своевременное лечение помогает предотвратить риск инсульта, инфаркта или других серьезных заболеваний.
Детальнее – http://vyvod-iz-zapoya-krasnodar00.ru
Мы понимаем, что каждая минута имеет решающее значение, поэтому наши специалисты готовы выехать на дом в кратчайшие сроки и провести все необходимые процедуры по детоксикации организма. Наша цель — помочь пациенту вернуться к нормальной жизни без лишних стрессов и рискованных попыток самостоятельного лечения.
Исследовать вопрос подробнее – [url=https://vyvod-iz-zapoya-krasnodar00.ru/]наркология вывод из запоя краснодар[/url]
Длительный запой способен нанести непоправимый вред организму, привести к тяжелым нарушениям работы внутренних органов и поставить под угрозу жизнь пациента. В таких случаях необходимо срочное медицинское вмешательство, которое позволяет быстро стабилизировать состояние, вывести токсины и предотвратить развитие опасных осложнений. Клиника «ЗдоровьеНорм» в Краснодаре предлагает профессиональный вывод из запоя на дому, обеспечивая комплексное лечение с максимальной оперативностью и полной конфиденциальностью.
Получить дополнительную информацию – [url=https://vyvod-iz-zapoya-krasnodar00.ru/]vyvod-iz-zapoya-krasnodar00.ru/[/url]
Клиника «Нарколог-Профи» предлагает круглосуточную помощь на дому в Екатеринбурге и Свердловской области. Наши опытные специалисты готовы оперативно приехать по вашему вызову и оказать экстренную медицинскую поддержку при алкогольной или наркотической зависимости. Мы проводим детоксикацию организма, купируем абстинентный синдром и стабилизируем состояние пациента, обеспечивая при этом полную конфиденциальность и комфорт в домашних условиях.
Детальнее – [url=https://narcolog-na-dom-ekaterinburg00.ru/]нарколог на дом[/url]
MedicijnPunt: medicijnen bestellen online – online medicijnen
Pharma Confiance: nizoral shampooing pharmacie – Pharma Confiance
https://pharmajetzt.shop/# Pharma Jetzt
При поступлении вызова специалисты клиники «ЗдоровьеНорм» выезжают на дом в течение 30–60 минут. Врач проводит тщательную диагностику, измеряя артериальное давление, пульс, уровень кислорода в крови и оценивая общее состояние пациента. После этого осуществляется индивидуальный подбор лечебной схемы, основанной на объективных данных и анамнезе пациента.
Разобраться лучше – [url=https://vyvod-iz-zapoya-krasnodar00.ru/]вывод из запоя в стационаре в краснодаре[/url]
Дополнительно, если у пациента отмечаются психические нарушения — галлюцинации, агрессия или спутанность сознания, это является прямым сигналом к срочному вмешательству. В этом случае своевременное лечение помогает предотвратить риск инсульта, инфаркта или других серьезных заболеваний.
Подробнее тут – https://vyvod-iz-zapoya-krasnodar00.ru/vyvod-iz-zapoya-czena-krasnodar
Мы понимаем, что каждая минута имеет решающее значение, поэтому наши специалисты готовы выехать на дом в кратчайшие сроки и провести все необходимые процедуры по детоксикации организма. Наша цель — помочь пациенту вернуться к нормальной жизни без лишних стрессов и рискованных попыток самостоятельного лечения.
Получить дополнительные сведения – http://vyvod-iz-zapoya-krasnodar00.ru
https://pharmajetzt.shop/# apotheke online bestellen
pharmacy viagra joke: Pharma Connect USA – PharmaConnectUSA
Мы понимаем, что каждая минута имеет решающее значение, поэтому наши специалисты готовы выехать на дом в кратчайшие сроки и провести все необходимые процедуры по детоксикации организма. Наша цель — помочь пациенту вернуться к нормальной жизни без лишних стрессов и рискованных попыток самостоятельного лечения.
Ознакомиться с деталями – [url=https://vyvod-iz-zapoya-krasnodar00.ru/]вывод из запоя недорого[/url]
wellbutrin sr pharmacy: Pharma Connect USA – discount drug store pharmacy
http://pharmaconfiance.com/# Pharma Confiance
В этой публикации мы предлагаем подробные объяснения по актуальным вопросам, чтобы помочь читателям глубже понять их. Четкость и структурированность материала сделают его удобным для усвоения и применения в повседневной жизни.
Узнать больше – https://www.breakingbreadstudios.com/2024/10/16/hello-world
https://pharmajetzt.com/# online apotheke kostenloser versand
MedicijnPunt: MedicijnPunt – Medicijn Punt
pharmacie italienne en ligne: cariban 10mg – farmacie online
В условиях стационара или на дневном стационаре применяются сбалансированные инфузионные растворы, витамины, антиоксиданты и препараты для поддержки печени. Цель — минимизировать интоксикацию и предотвратить осложнения.
Ознакомиться с деталями – [url=https://lechenie-alkogolizma-tyumen10.ru/]lechenie-alkogolizma-tyumen10.ru/[/url]
Medicijn Punt: MedicijnPunt – apotheek spanje online
В условиях стационара или на дневном стационаре применяются сбалансированные инфузионные растворы, витамины, антиоксиданты и препараты для поддержки печени. Цель — минимизировать интоксикацию и предотвратить осложнения.
Разобраться лучше – http://lechenie-alkogolizma-tyumen10.ru
http://pharmaconnectusa.com/# Pharma Connect USA
Pharma Jetzt: shop apotheke versandapotheke versandkostenfrei – Pharma Jetzt
https://pharmaconnectusa.com/# PharmaConnectUSA
Индивидуальный план включает детоксикацию, медикаментозную поддержку, психотерапию и реабилитацию. Специалисты учитывают:
Подробнее тут – [url=https://lechenie-alkogolizma-tyumen10.ru/]анонимное лечение алкоголизма[/url]
В условиях стационара или на дневном стационаре применяются сбалансированные инфузионные растворы, витамины, антиоксиданты и препараты для поддержки печени. Цель — минимизировать интоксикацию и предотвратить осложнения.
Получить больше информации – http://
antibiotica kopen zonder recept: pharmacy nederlands – online apotheek frankrijk
Врач индивидуально подбирает:
Детальнее – [url=https://lechenie-alkogolizma-tyumen10.ru/]лечение наркомании и алкоголизма[/url]
Pharma Confiance: Pharma Confiance – Pharma Confiance
Основу терапии составляют современные методы детоксикации и восстановления функций организма. Клиника предлагает амбулаторные и стационарные программы, адаптированные под состояние пациента и пожелания семьи.
Подробнее – [url=https://lechenie-alkogolizma-tyumen10.ru/]лечение алкоголизма тюмень[/url]
В условиях стационара или на дневном стационаре применяются сбалансированные инфузионные растворы, витамины, антиоксиданты и препараты для поддержки печени. Цель — минимизировать интоксикацию и предотвратить осложнения.
Выяснить больше – [url=https://lechenie-alkogolizma-tyumen10.ru/]лечение наркомании и алкоголизма тюмень[/url]
http://pharmaconfiance.com/# pharmacie saint philippe
Medicijn Punt: apotheek apotheek – Medicijn Punt
В условиях стационара или на дневном стационаре применяются сбалансированные инфузионные растворы, витамины, антиоксиданты и препараты для поддержки печени. Цель — минимизировать интоксикацию и предотвратить осложнения.
Подробнее тут – [url=https://lechenie-alkogolizma-tyumen10.ru/]lechenie alkogolizma tjumen'[/url]
la pharmacie le plus proche: pharmacie de garde grasse ouverte aujourd’hui – Pharma Confiance
Эта статья сочетает в себе как полезные, так и интересные сведения, которые обогатят ваше понимание насущных тем. Мы предлагаем практические советы и рекомендации, которые легко внедрить в повседневную жизнь. Узнайте, как улучшить свои навыки и обогатить свой опыт с помощью простых, но эффективных решений.
Ознакомиться с деталями – https://www.ime-project.com/interview-to-marc-one-of-the-composers-from-spain
http://pharmaconnectusa.com/# PharmaConnectUSA
http://pharmajetzt.com/# online shop apotheke
pharmacie grand large: Pharma Confiance – prix forcapil en pharmacie
ozempic 1 mg prix maroc Pharma Confiance ordonnance francaise en espagne
Medicijn Punt: MedicijnPunt – Medicijn Punt
Если состояние пациента не позволяет доставить его в стационар, на дом выезжает врач-нарколог с необходимым оборудованием. Применяются капельницы, дезинтоксикационная терапия, медикаментозная коррекция поведения и поддержка родственников.
Получить больше информации – https://narkologicheskaya-pomoshh-tula10.ru
Пациенты, нуждающиеся в круглосуточном наблюдении, могут пройти курс терапии в стационаре. Обстановка клиники рассчитана на комфортное пребывание: палаты с индивидуальным санитарным блоком, охрана, контроль приёма препаратов, поддержка психологов.
Детальнее – https://narkologicheskaya-pomoshh-tula10.ru
luitpold apotheke bad steben bestellschein: internet apotheken – Pharma Jetzt
Если состояние пациента не позволяет доставить его в стационар, на дом выезжает врач-нарколог с необходимым оборудованием. Применяются капельницы, дезинтоксикационная терапия, медикаментозная коррекция поведения и поддержка родственников.
Подробнее – [url=https://narkologicheskaya-pomoshh-tula10.ru/]скорая наркологическая помощь тульская область[/url]
Если состояние пациента не позволяет доставить его в стационар, на дом выезжает врач-нарколог с необходимым оборудованием. Применяются капельницы, дезинтоксикационная терапия, медикаментозная коррекция поведения и поддержка родственников.
Изучить вопрос глубже – [url=https://narkologicheskaya-pomoshh-tula10.ru/]неотложная наркологическая помощь тула[/url]
https://pharmaconfiance.shop/# pharmacie de garde lyon 5 aujourd’hui
MedicijnPunt: pharma online – viata online apotheek
I don’t think the title of your article matches the content lol. Just kidding, mainly because I had some doubts after reading the article.
Как подчёркивает врач-нарколог клиники «Новая Энергия» Алексей Геннадьевич Лапшин, «запой — это не слабость, а болезнь. И чем быстрее начато лечение, тем меньше будет последствий. Не ждите осложнений — вызывайте врача».
Детальнее – http://vyvod-iz-zapoya-serpuhov3.ru/srochnyj-vyvod-iz-zapoya-v-serpuhove/
Пациенты, нуждающиеся в круглосуточном наблюдении, могут пройти курс терапии в стационаре. Обстановка клиники рассчитана на комфортное пребывание: палаты с индивидуальным санитарным блоком, охрана, контроль приёма препаратов, поддержка психологов.
Подробнее тут – [url=https://narkologicheskaya-pomoshh-tula10.ru/]скорая наркологическая помощь тульская область[/url]
lidocaine cream pharmacy: PharmaConnectUSA – silkroad online pharmacy
Medicijn Punt MedicijnPunt MedicijnPunt
Пациенты, нуждающиеся в круглосуточном наблюдении, могут пройти курс терапии в стационаре. Обстановка клиники рассчитана на комфортное пребывание: палаты с индивидуальным санитарным блоком, охрана, контроль приёма препаратов, поддержка психологов.
Выяснить больше – [url=https://narkologicheskaya-pomoshh-tula10.ru/]анонимная наркологическая помощь тула[/url]
Пациенты, нуждающиеся в круглосуточном наблюдении, могут пройти курс терапии в стационаре. Обстановка клиники рассчитана на комфортное пребывание: палаты с индивидуальным санитарным блоком, охрана, контроль приёма препаратов, поддержка психологов.
Получить дополнительную информацию – http://narkologicheskaya-pomoshh-tula10.ru/vyzov-narkologicheskoj-pomoshhi-tula/https://narkologicheskaya-pomoshh-tula10.ru
http://pharmaconnectusa.com/# PharmaConnectUSA
kapsel apotheke: online apptheke – Pharma Jetzt
Проблемы, связанные с употреблением алкоголя или наркотических веществ, могут застать человека врасплох и требовать немедленного медицинского вмешательства. В Туле предоставляется наркологическая помощь, направленная на купирование острых состояний и оказание поддержки пациентам в кризисной ситуации. В клинике «Здоровье+» используются современные методы лечения, основанные на отечественных клинических рекомендациях, с акцентом на безопасность и индивидуальный подход.
Узнать больше – [url=https://narkologicheskaya-pomoshh-tula10.ru/]вызвать наркологическую помощь в туле[/url]
http://pharmaconfiance.com/# chaussures de marche pour diabétiques hommes
PharmaConnectUSA: PharmaConnectUSA – clozaril pharmacy registration
Пациенты, нуждающиеся в круглосуточном наблюдении, могут пройти курс терапии в стационаре. Обстановка клиники рассчитана на комфортное пребывание: палаты с индивидуальным санитарным блоком, охрана, контроль приёма препаратов, поддержка психологов.
Ознакомиться с деталями – [url=https://narkologicheskaya-pomoshh-tula10.ru/]наркологическая помощь на дому в туле[/url]
Pharma Confiance: Pharma Confiance – Pharma Confiance
pharmacy certificate programs online Pharma Connect USA pharmacy store
Если состояние пациента не позволяет доставить его в стационар, на дом выезжает врач-нарколог с необходимым оборудованием. Применяются капельницы, дезинтоксикационная терапия, медикаментозная коррекция поведения и поддержка родственников.
Получить больше информации – [url=https://narkologicheskaya-pomoshh-tula10.ru/]вызов наркологической помощи[/url]
Medicijn Punt: Medicijn Punt – apotheken nederland
На базе частной клиники «Здоровье+» пациентам доступны как экстренные, так и плановые формы наркологической помощи. Все процедуры соответствуют стандартам Минздрава РФ и проводятся с соблюдением конфиденциальности.
Изучить вопрос глубже – [url=https://narkologicheskaya-pomoshh-tula10.ru/]наркологическая помощь в туле[/url]
http://medicijnpunt.com/# Medicijn Punt
Если состояние пациента не позволяет доставить его в стационар, на дом выезжает врач-нарколог с необходимым оборудованием. Применяются капельницы, дезинтоксикационная терапия, медикаментозная коррекция поведения и поддержка родственников.
Углубиться в тему – [url=https://narkologicheskaya-pomoshh-tula10.ru/]неотложная наркологическая помощь[/url]
Pharma Confiance: ibuprofene parapharmacie – nuxe anti rides
https://medicijnpunt.shop/# MedicijnPunt
На базе частной клиники «Здоровье+» пациентам доступны как экстренные, так и плановые формы наркологической помощи. Все процедуры соответствуют стандартам Минздрава РФ и проводятся с соблюдением конфиденциальности.
Изучить вопрос глубже – https://narkologicheskaya-pomoshh-tula10.ru/vyzov-narkologicheskoj-pomoshhi-tula
pillen kaufen: PharmaJetzt – Pharma Jetzt
Наркологическая помощь может понадобиться в разных ситуациях — от тяжёлой алкогольной интоксикации до абстинентного синдрома при отказе от наркотиков. Своевременное обращение за помощью снижает риски для жизни и здоровья, а также упрощает последующую терапию.
Детальнее – https://narkologicheskaya-pomoshh-tula10.ru/neotlozhnaya-narkologicheskaya-pomoshh-tula
hq pharmacy online 365 Pharma Connect USA Pharma Connect USA
Пациенты, нуждающиеся в круглосуточном наблюдении, могут пройти курс терапии в стационаре. Обстановка клиники рассчитана на комфортное пребывание: палаты с индивидуальным санитарным блоком, охрана, контроль приёма препаратов, поддержка психологов.
Детальнее – [url=https://narkologicheskaya-pomoshh-tula10.ru/]наркологическая помощь на дому тульская область[/url]
https://pharmaconnectusa.shop/# Pharma Connect USA
discount pharmacy online: Pharma Connect USA – vipps online pharmacy
medikamente: PharmaJetzt – Pharma Jetzt
Если состояние пациента не позволяет доставить его в стационар, на дом выезжает врач-нарколог с необходимым оборудованием. Применяются капельницы, дезинтоксикационная терапия, медикаментозная коррекция поведения и поддержка родственников.
Получить дополнительную информацию – https://narkologicheskaya-pomoshh-tula10.ru/vyzov-narkologicheskoj-pomoshhi-tula/
Во многих регионах, в том числе и в Тульской области, работают десятки учреждений, предоставляющих услуги по наркологической помощи. Однако далеко не каждое из них соответствует современным стандартам. Часть клиник работает без лицензии, другие используют устаревшие методики или предлагают исключительно детоксикацию, без последующей психотерапевтической поддержки. Чтобы не ошибиться, важно заранее проанализировать основные характеристики надёжного медицинского учреждения.
Исследовать вопрос подробнее – http://narkologicheskaya-klinika-tula10.ru/anonimnaya-narkologicheskaya-klinika-tula/
online pharmacy finasteride: Pharma Connect USA – prednisolone pharmacy
apotheek webshop: MedicijnPunt – MedicijnPunt
https://pharmaconfiance.com/# sildenafil 100 mg durée de l’effet prix
Frumil Malegra FXT dapoxetine in malaysia pharmacy
http://pharmaconnectusa.com/# pharmacy grade nolvadex
Проблемы, связанные с употреблением алкоголя или наркотических веществ, могут застать человека врасплох и требовать немедленного медицинского вмешательства. В Туле предоставляется наркологическая помощь, направленная на купирование острых состояний и оказание поддержки пациентам в кризисной ситуации. В клинике «Здоровье+» используются современные методы лечения, основанные на отечественных клинических рекомендациях, с акцентом на безопасность и индивидуальный подход.
Разобраться лучше – https://narkologicheskaya-pomoshh-tula10.ru/vyzov-narkologicheskoj-pomoshhi-tula
На базе частной клиники «Здоровье+» пациентам доступны как экстренные, так и плановые формы наркологической помощи. Все процедуры соответствуют стандартам Минздрава РФ и проводятся с соблюдением конфиденциальности.
Получить больше информации – https://narkologicheskaya-pomoshh-tula10.ru/vyzov-narkologicheskoj-pomoshhi-tula
Пациенты, нуждающиеся в круглосуточном наблюдении, могут пройти курс терапии в стационаре. Обстановка клиники рассчитана на комфортное пребывание: палаты с индивидуальным санитарным блоком, охрана, контроль приёма препаратов, поддержка психологов.
Ознакомиться с деталями – [url=https://narkologicheskaya-pomoshh-tula10.ru/]наркологическая клиника клиника помощь[/url]
Проблемы, связанные с употреблением алкоголя или наркотических веществ, могут застать человека врасплох и требовать немедленного медицинского вмешательства. В Туле предоставляется наркологическая помощь, направленная на купирование острых состояний и оказание поддержки пациентам в кризисной ситуации. В клинике «Здоровье+» используются современные методы лечения, основанные на отечественных клинических рекомендациях, с акцентом на безопасность и индивидуальный подход.
Получить больше информации – [url=https://narkologicheskaya-pomoshh-tula10.ru/]наркологическая помощь тула.[/url]
Основные случаи, когда следует незамедлительно вызвать нарколога:
Выяснить больше – [url=https://narkologicheskaya-pomoshh-tula10.ru/]срочная наркологическая помощь в туле[/url]
PharmaConnectUSA: savon pharmacy – Pharma Connect USA
Pharma Jetzt: schopapoteke – europa apotheek
Наркологическая помощь может понадобиться в разных ситуациях — от тяжёлой алкогольной интоксикации до абстинентного синдрома при отказе от наркотиков. Своевременное обращение за помощью снижает риски для жизни и здоровья, а также упрощает последующую терапию.
Получить дополнительные сведения – [url=https://narkologicheskaya-pomoshh-tula10.ru/]платная наркологическая помощь тула[/url]
http://medicijnpunt.com/# Medicijn Punt
PharmaJetzt PharmaJetzt ihre apotheken de
apotheker medicatie: Medicijn Punt – dokter online medicijnen bestellen
Проблемы, связанные с употреблением алкоголя или наркотических веществ, могут застать человека врасплох и требовать немедленного медицинского вмешательства. В Туле предоставляется наркологическая помощь, направленная на купирование острых состояний и оказание поддержки пациентам в кризисной ситуации. В клинике «Здоровье+» используются современные методы лечения, основанные на отечественных клинических рекомендациях, с акцентом на безопасность и индивидуальный подход.
Получить дополнительную информацию – [url=https://narkologicheskaya-pomoshh-tula10.ru/]платная наркологическая помощь тула[/url]
https://pharmaconnectusa.shop/# Pharma Connect USA
apotheke onlin: Pharma Jetzt – PharmaJetzt
https://medicijnpunt.shop/# medicijn bestellen
Medicijn Punt: MedicijnPunt – nieuwe pharma
Pharma Confiance Pharma Confiance Pharma Confiance
Фундаментом качественного лечения является профессиональная команда. Только при участии врачей-наркологов, психиатров, клинических психологов, терапевтов и консультантов по зависимому поведению можно говорить о комплексной помощи. По словам специалистов ФГБУН «Национальный научный центр наркологии», именно междисциплинарный подход формирует устойчивую динамику на всех этапах терапии — от стабилизации состояния до ресоциализации пациента.
Детальнее – частная наркологическая клиника тульская область
Показатель
Исследовать вопрос подробнее – наркологическая клиника в туле
the online pharmacy: Pharma Connect USA – online pharmacy abilify
Pharma Connect USA: gabapentin online pharmacy – PharmaConnectUSA
Фундаментом качественного лечения является профессиональная команда. Только при участии врачей-наркологов, психиатров, клинических психологов, терапевтов и консультантов по зависимому поведению можно говорить о комплексной помощи. По словам специалистов ФГБУН «Национальный научный центр наркологии», именно междисциплинарный подход формирует устойчивую динамику на всех этапах терапии — от стабилизации состояния до ресоциализации пациента.
Подробнее – http://www.domen.ru
http://pharmajetzt.com/# versand apotheke online
Если состояние пациента не позволяет доставить его в стационар, на дом выезжает врач-нарколог с необходимым оборудованием. Применяются капельницы, дезинтоксикационная терапия, медикаментозная коррекция поведения и поддержка родственников.
Исследовать вопрос подробнее – [url=https://narkologicheskaya-pomoshh-tula10.ru/]платная наркологическая помощь[/url]
Пациенты, нуждающиеся в круглосуточном наблюдении, могут пройти курс терапии в стационаре. Обстановка клиники рассчитана на комфортное пребывание: палаты с индивидуальным санитарным блоком, охрана, контроль приёма препаратов, поддержка психологов.
Получить больше информации – [url=https://narkologicheskaya-pomoshh-tula10.ru/]наркологическая помощь на дому[/url]
Pharma Confiance: viagra et doliprane – prix tadalafil
MedicijnPunt: MedicijnPunt – medicijnen aanvragen
doxycycline mexican pharmacy uf pharmacy online refill PharmaConnectUSA
Этот информативный материал предлагает содержательную информацию по множеству задач и вопросов. Мы призываем вас исследовать различные идеи и факты, обобщая их для более глубокого понимания. Наша цель — сделать обучение доступным и увлекательным.
Исследовать вопрос подробнее – https://www.hotel-sugano.com/bbs/sugano.cgi/sosh13.pascal.ru/forum/datasphere.ru/club/user/12/blog/2477/sinopipefittings.com/e_Feedback/sinopipefittings.com/e_Feedback/www.tovery.net/datasphere.ru/club/user/12/blog
В этом информативном тексте представлены захватывающие события и факты, которые заставят вас задуматься. Мы обращаем внимание на важные моменты, которые часто остаются незамеченными, и предлагаем новые перспективы на привычные вещи. Подготовьтесь к тому, чтобы быть поглощенным увлекательными рассказами!
Получить дополнительную информацию – https://francanet.com.br/2024/12/13/vejas-as-datas-de-pagamento
https://pharmaconnectusa.shop/# tretinoin gel online pharmacy
https://tijuanameds.com/# mexican mail order pharmacies
Эта статья предлагает уникальную подборку занимательных фактов и необычных историй, которые вы, возможно, не знали. Мы постараемся вдохновить ваше воображение и разнообразить ваш кругозор, погружая вас в мир, полный интересных открытий. Читайте и открывайте для себя новое!
Углубиться в тему – https://www.ingridremvall.se/sample-page
TijuanaMeds: mexican rx online – mexico pharmacies prescription drugs
TijuanaMeds: purple pharmacy mexico price list – TijuanaMeds
Современное общество сталкивается с серьёзными проблемами, связанными с зависимостями. Злоупотребление психоактивными веществами оказывает влияние не только на здоровье, но и на социальные отношения, а также на качество жизни. Наркологическая клиника “Новая Жизнь” предлагает широкий спектр услуг, направленных на восстановление и реабилитацию людей, которые сталкиваются с подобными трудностями.
Подробнее – [url=https://tajnyj-vyvod-iz-zapoya.ru/vyvod-iz-zapoya-v-kruglosutochno-v-omske.ru/]наркология вывод из запоя[/url]
Клиника «ТюменьМед» специализируется на лечении алкогольной зависимости и вывода из запоя с 2010 года. За годы работы накоплен уникальный опыт в проведении комплексной детоксикации, реабилитации и последующего сопровождения пациентов. В основе методик лежат стандарты доказательной медицины, а команда состоит из наркологов, психотерапевтов, заведующих отделением интенсивной терапии и логистов для выездов.
Получить дополнительную информацию – http://narkologicheskaya-klinika-tyumen10.ru/narkologicheskaya-klinika-klinika-pomoshh-tyumen/
IndiMeds Direct IndiMeds Direct indianpharmacy com
https://canrxdirect.shop/# canadian online pharmacy
Все вызовы фиксируются под кодовым номером без указания ФИО, что обеспечивает полную конфиденциальность каждого пациента.
Подробнее – [url=https://narkologicheskaya-klinika-vladimir10.ru/]наркологическая клиника на дом[/url]
Алкогольная и наркотическая зависимость являются серьёзными заболеваниями, требующими оперативного и квалифицированного вмешательства. Когда речь идёт о критическом состоянии пациента, особенно после длительного употребления алкоголя или наркотических веществ, время играет ключевую роль. Клиника «РеабилитАльянс» в Краснодаре предлагает услугу нарколога на дом, обеспечивая пациентам необходимую помощь в любой момент дня и ночи. Наши специалисты готовы оперативно выехать по указанному адресу и предоставить все необходимые медицинские процедуры на месте.
Получить больше информации – [url=https://narcolog-na-dom-krasnodar00.ru/]вызов врача нарколога на дом в краснодаре[/url]
Перед началом терапии врач собирает анамнез, оценивает состояние органов-мишеней (печень, почки, сердце), проводит лабораторные тесты на уровень электролитов и маркёры цирроза. Результаты обследования играют ключевую роль при выборе схемы инфузий и психотерапевтических методик.
Подробнее тут – [url=https://lechenie-alkogolizma-tyumen10.ru/]centr lecheniya alkogolizma tjumen'[/url]
Алкогольная и наркотическая зависимость являются серьёзными заболеваниями, требующими оперативного и квалифицированного вмешательства. Когда речь идёт о критическом состоянии пациента, особенно после длительного употребления алкоголя или наркотических веществ, время играет ключевую роль. Клиника «РеабилитАльянс» в Краснодаре предлагает услугу нарколога на дом, обеспечивая пациентам необходимую помощь в любой момент дня и ночи. Наши специалисты готовы оперативно выехать по указанному адресу и предоставить все необходимые медицинские процедуры на месте.
Ознакомиться с деталями – [url=https://narcolog-na-dom-krasnodar00.ru/]нарколог на дом недорого[/url]
Medication impacts explained. Recent medicine developments.
purchase sumatriptan
Access pill details. Patient drug info.
Все вызовы фиксируются под кодовым номером без указания ФИО, что обеспечивает полную конфиденциальность каждого пациента.
Получить дополнительные сведения – [url=https://narkologicheskaya-klinika-vladimir10.ru/]наркологическая клиника владимир[/url]
– затяжной запой более 5–7 дней; – наличие галлюцинаций, судорог, бредовых состояний; – тяжёлое общее состояние (высокая температура, спутанность сознания, обезвоживание); – хронические болезни в стадии обострения.
Исследовать вопрос подробнее – https://vyvod-iz-zapoya-kolomna3.ru/vyvod-iz-zapoya-stacionar-v-kolomne
canadianpharmacy com: CanRx Direct – reliable canadian online pharmacy
IndiMeds Direct: IndiMeds Direct – mail order pharmacy india
Клиника «ТюменьМед» специализируется на лечении алкогольной зависимости и вывода из запоя с 2010 года. За годы работы накоплен уникальный опыт в проведении комплексной детоксикации, реабилитации и последующего сопровождения пациентов. В основе методик лежат стандарты доказательной медицины, а команда состоит из наркологов, психотерапевтов, заведующих отделением интенсивной терапии и логистов для выездов.
Детальнее – https://narkologicheskaya-klinika-tyumen10.ru
https://tijuanameds.shop/# TijuanaMeds
IndiMeds Direct IndiMeds Direct mail order pharmacy india
http://canrxdirect.com/# canadian drugs online
Процедура выезда врача на дом в Краснодаре строго регламентирована и включает несколько последовательных этапов. После поступления звонка и уточнения подробностей состояния пациента врач выезжает на место в течение 30–60 минут. На месте проводится первичный осмотр с оценкой жизненно важных показателей: артериального давления, уровня кислорода в крови, сердечного ритма и степени общей интоксикации.
Подробнее – https://narcolog-na-dom-krasnodar00.ru/narkolog-na-dom-czena-krasnodar
Все вызовы фиксируются под кодовым номером без указания ФИО, что обеспечивает полную конфиденциальность каждого пациента.
Разобраться лучше – [url=https://narkologicheskaya-klinika-vladimir10.ru/]наркологические клиники алкоголизм в владимире[/url]
Своевременное обращение к специалисту позволяет избежать опасных осложнений и облегчить процесс восстановления организма. Экстренный вызов врача-нарколога необходим в следующих случаях:
Получить больше информации – [url=https://narcolog-na-dom-krasnodar00.ru/]нарколог на дом цена[/url]
Клиника «ВладимирМед» предоставляет круглосуточную анонимную помощь при алкогольной зависимости с возможностью выезда врача на дом. Мы объединяем профессиональную наркологию, психологическую поддержку и современные технологии детоксикации, чтобы каждый пациент мог получить комплексное лечение в безопасной и комфортной обстановке. Конфиденциальность и оперативность — ключевые принципы нашей работы, помогающие начать новый этап жизни без страха осуждения и лишних процедур.
Получить дополнительную информацию – [url=https://narkologicheskaya-klinika-vladimir10.ru/]частная наркологическая клиника владимирская область[/url]
sumatriptan https://imitrex2rp.top/# buy imitrex pills online buy imitrex pills online
canadian pharmacy uk delivery: ordering drugs from canada – canadianpharmacyworld com
Врач индивидуально подбирает:
Получить дополнительные сведения – [url=https://lechenie-alkogolizma-tyumen10.ru/]центр лечения алкоголизма[/url]
Каждая выездная бригада укомплектована портативным лабораторным оборудованием для экспресс-анализов крови и мочи, современными инфузионными насосами и средствами телеметрии. Это позволяет врачу контролировать жизненно важные параметры пациента в режиме реального времени и корректировать схему детоксикации на месте.
Получить больше информации – частная наркологическая клиника тюмень
https://indimedsdirect.com/# IndiMeds Direct
IndiMeds Direct online shopping pharmacy india top 10 pharmacies in india
Своевременное обращение к специалисту позволяет избежать опасных осложнений и облегчить процесс восстановления организма. Экстренный вызов врача-нарколога необходим в следующих случаях:
Подробнее – http://narcolog-na-dom-krasnodar00.ru
Все вызовы фиксируются под кодовым номером без указания ФИО, что обеспечивает полную конфиденциальность каждого пациента.
Углубиться в тему – [url=https://narkologicheskaya-klinika-vladimir10.ru/]наркологическая клиника владимир.[/url]
Медицинский вывод из запоя включает несколько обязательных этапов:
Подробнее – https://vyvod-iz-zapoya-kolomna3.ru/anonimnyj-vyvod-iz-zapoya-v-kolomne
Алкогольная и наркотическая зависимость являются серьёзными заболеваниями, требующими оперативного и квалифицированного вмешательства. Когда речь идёт о критическом состоянии пациента, особенно после длительного употребления алкоголя или наркотических веществ, время играет ключевую роль. Клиника «РеабилитАльянс» в Краснодаре предлагает услугу нарколога на дом, обеспечивая пациентам необходимую помощь в любой момент дня и ночи. Наши специалисты готовы оперативно выехать по указанному адресу и предоставить все необходимые медицинские процедуры на месте.
Разобраться лучше – [url=https://narcolog-na-dom-krasnodar00.ru/]вызов нарколога на дом краснодарский край[/url]
Алкогольная и наркотическая зависимость являются серьёзными заболеваниями, требующими оперативного и квалифицированного вмешательства. Когда речь идёт о критическом состоянии пациента, особенно после длительного употребления алкоголя или наркотических веществ, время играет ключевую роль. Клиника «РеабилитАльянс» в Краснодаре предлагает услугу нарколога на дом, обеспечивая пациентам необходимую помощь в любой момент дня и ночи. Наши специалисты готовы оперативно выехать по указанному адресу и предоставить все необходимые медицинские процедуры на месте.
Узнать больше – [url=https://narcolog-na-dom-krasnodar00.ru/]нарколог на дом круглосуточно[/url]
«ВладимирМед» основана группой врачей-наркологов и психотерапевтов, объединивших опыт работы в государственных и частных учреждениях. Мы предлагаем не просто преодоление запоя, а глубокую комплексную реабилитацию, включающую медико-психологическую оценку и долгосрочное сопровождение. Наша цель — восстановление здоровья на физическом и эмоциональном уровнях, возвращение пациента к полноценной социальной жизни без рецидивов.
Получить больше информации – [url=https://narkologicheskaya-klinika-vladimir10.ru/]наркологическая клиника на дом[/url]
Latest medication updates. https://buyedpills.shop/# Get pill facts. buy edpills shop
«ВладимирМед» основана группой врачей-наркологов и психотерапевтов, объединивших опыт работы в государственных и частных учреждениях. Мы предлагаем не просто преодоление запоя, а глубокую комплексную реабилитацию, включающую медико-психологическую оценку и долгосрочное сопровождение. Наша цель — восстановление здоровья на физическом и эмоциональном уровнях, возвращение пациента к полноценной социальной жизни без рецидивов.
Подробнее – [url=https://narkologicheskaya-klinika-vladimir10.ru/]бесплатная наркологическая клиника[/url]
canadian pharmacy online: CanRx Direct – canadian drugstore online
http://tijuanameds.com/# TijuanaMeds
https://tijuanameds.shop/# best online pharmacies in mexico
buy edpills shop https://buyedpills.shop/# edpills shop buy ed pills online
п»їbest mexican online pharmacies mexican rx online buying prescription drugs in mexico
Алкогольная и наркотическая зависимость являются серьёзными заболеваниями, требующими оперативного и квалифицированного вмешательства. Когда речь идёт о критическом состоянии пациента, особенно после длительного употребления алкоголя или наркотических веществ, время играет ключевую роль. Клиника «РеабилитАльянс» в Краснодаре предлагает услугу нарколога на дом, обеспечивая пациентам необходимую помощь в любой момент дня и ночи. Наши специалисты готовы оперативно выехать по указанному адресу и предоставить все необходимые медицинские процедуры на месте.
Детальнее – [url=https://narcolog-na-dom-krasnodar00.ru/]нарколог на дом[/url]
Клиника «ВладимирМед» предоставляет круглосуточную анонимную помощь при алкогольной зависимости с возможностью выезда врача на дом. Мы объединяем профессиональную наркологию, психологическую поддержку и современные технологии детоксикации, чтобы каждый пациент мог получить комплексное лечение в безопасной и комфортной обстановке. Конфиденциальность и оперативность — ключевые принципы нашей работы, помогающие начать новый этап жизни без страха осуждения и лишних процедур.
Узнать больше – [url=https://narkologicheskaya-klinika-vladimir10.ru/]наркологическая клиника нарколог в владимире[/url]
mexican drugstore online: buying from online mexican pharmacy – TijuanaMeds
buy ed pills buy edpills shop edpills shop edpills shop
https://indimedsdirect.com/# indian pharmacy online
Эта статья сочетает познавательный и занимательный контент, что делает ее идеальной для любителей глубоких исследований. Мы рассмотрим увлекательные аспекты различных тем и предоставим вам новые знания, которые могут оказаться полезными в будущем.
Подробнее тут – https://4gviettel5gviettel.vn/5g-viettel
Эта публикация погружает вас в мир увлекательных фактов и удивительных открытий. Мы расскажем о ключевых событиях, которые изменили ход истории, и приоткроем завесу над научными достижениями, которые вдохновили миллионы. Узнайте, чему может научить нас прошлое и как применить эти знания в будущем.
Подробнее можно узнать тут – https://www.visitfashions.com/simple-arabic-mehndi-designs
Эта познавательная публикация погружает вас в море интересного контента, который быстро захватит ваше внимание. Мы рассмотрим важные аспекты темы и предоставим вам уникальныеInsights и полезные сведения для дальнейшего изучения.
Получить дополнительную информацию – http://burana.ac.th/web2563/2020/05/20/%E0%B8%9B%E0%B8%A3%E0%B8%B0%E0%B8%81%E0%B8%B2%E0%B8%A8%E0%B8%A3%E0%B8%B2%E0%B8%A2%E0%B8%8A%E0%B8%B7%E0%B9%88%E0%B8%AD%E0%B8%99%E0%B8%B1%E0%B8%81%E0%B9%80%E0%B8%A3%E0%B8%B5%E0%B8%A2%E0%B8%99-%E0%B8%9B/%E0%B8%A1-2-4-2
safe canadian pharmacy CanRx Direct canadian pharmacy ltd
Эта публикация погружает вас в мир увлекательных фактов и удивительных открытий. Мы расскажем о ключевых событиях, которые изменили ход истории, и приоткроем завесу над научными достижениями, которые вдохновили миллионы. Узнайте, чему может научить нас прошлое и как применить эти знания в будущем.
Изучить вопрос глубже – https://montaguemarkets.com.au/lifestyle-epicentre-of-west-end-taking-shape
buy ed pills https://buyedpills.shop/# edpills shop edpills shop
В этом обзорном материале представлены увлекательные детали, которые находят отражение в различных аспектах жизни. Мы исследуем непонятные и интересные моменты, позволяя читателю увидеть картину целиком. Погрузитесь в мир знаний и удивительных открытий!
Подробнее тут – https://subhajitbiswas.com/rule-of-7-repetitive-marketing
mexican mail order pharmacies: best online pharmacies in mexico – pharmacies in mexico that ship to usa
https://tijuanameds.shop/# buying from online mexican pharmacy
Эта публикация завернет вас в вихрь увлекательного контента, сбрасывая стереотипы и открывая двери к новым идеям. Каждый абзац станет для вас открытием, полным ярких примеров и впечатляющих достижений. Подготовьтесь быть вовлеченными и удивленными каждый раз, когда продолжите читать.
Получить дополнительные сведения – https://multistyle.work/helping-companies-in-their-green-transition-2
buy ed pills edpills shop buy ed pills online buy ed pills
Для эффективного лечения алкогольной интоксикации и восстановления организма врачи клиники «АлкоДоктор» используют комплекс препаратов, которые индивидуально подбираются с учетом состояния пациента.
Узнать больше – [url=https://kapelnica-ot-zapoya-sochi0.ru/]капельница от запоя сочи[/url]
Возможные признаки
Разобраться лучше – https://narkologicheskaya-klinika-tula10.ru/chastnaya-narkologicheskaya-klinika-tula
Первый и самый важный момент — какие методики применяются в клинике. Качественное лечение наркозависимости включает несколько этапов: детоксикация, стабилизация состояния, психотерапия, ресоциализация. Одного лишь выведения токсинов из организма недостаточно — без проработки психологических причин употребления высокий риск рецидива.
Подробнее – лечение наркомании владимир.
buy prescription drugs from india india pharmacy IndiMeds Direct
Используя современные инфузионные системы, мы постепенно вводим растворы для выведения токсинов, коррекции водно-электролитного баланса и восстановления функции печени. Параллельно подбираются препараты для снятия абстинентного синдрома, купирования тревожности и нормализации сна.
Получить больше информации – http://narkologicheskaya-klinika-dolgoprudnyj3.ru/anonimnaya-narkologicheskaya-klinika-v-dolgoprudnom/
Преимущество
Получить дополнительную информацию – [url=https://narcolog-na-dom-ekaterinburg0.ru/]вызвать нарколога на дом[/url]
http://canrxdirect.com/# reliable canadian pharmacy
IndiMeds Direct: IndiMeds Direct – IndiMeds Direct
mexican border pharmacies shipping to usa: medication from mexico pharmacy – medication from mexico pharmacy
Для эффективного лечения наши врачи используют только проверенные и сертифицированные медикаменты, которые подбираются индивидуально для каждого пациента. В состав лечебного курса входят:
Исследовать вопрос подробнее – [url=https://narcolog-na-dom-ekaterinburg000.ru/]нарколог на дом вывод екатеринбург[/url]
Обращение к врачу становится жизненно необходимым, если пациент находится в состоянии длительного запоя, при котором организм не справляется с накоплением токсинов. Если запой продолжается более двух-трёх дней, в теле накапливаются вредные вещества, что ведёт к нарушениям работы внутренних органов, развитию абстинентного синдрома и появлению психических нарушений. Также, если у пациента наблюдаются симптомы, такие как частая рвота, спутанность сознания, судороги или резкие скачки артериального давления, это сигнал к незамедлительному вызову специалиста. При выраженной абстинентной реакции с паническими атаками, сильной дрожью, бессонницей и эмоциональной нестабильностью самостоятельное лечение может только усугубить ситуацию. Если появляются признаки алкогольного психоза – галлюцинации, агрессивность или спутанность сознания – вызов нарколога становится обязательным для предотвращения дальнейших осложнений. Также, когда требуется подготовка к процедурам кодирования от зависимости, необходима качественная детоксикация организма, что также является показанием к срочному обращению за профессиональной помощью.
Подробнее – [url=https://narcolog-na-dom-ekaterinburg0.ru/]нарколог на дом срочно екатеринбург[/url]
buy ed pills online https://buyedpills.shop/# edpills shop buy ed pills online
Медицинский вывод из запоя включает несколько обязательных этапов:
Детальнее – [url=https://vyvod-iz-zapoya-kolomna3.ru/]vyvod-iz-zapoya-klinika[/url]
Проблема алкогольной зависимости требует срочного вмешательства, ведь чем дольше человек находится в запое, тем выше риск серьезных осложнений для его здоровья. Наркологическая клиника «Трезвый Путь» предоставляет услуги нарколога на дом в Екатеринбурге, гарантируя круглосуточную помощь и эффективное решение проблемы.
Подробнее можно узнать тут – [url=https://narcolog-na-dom-ekaterinburg0.ru/]нарколог на дом анонимно в екатеринбурге[/url]
При поступлении или выезде на дом врач-нарколог собирает анамнез, оценивает степень зависимости, измеряет жизненные показатели и назначает необходимые анализы. Цель — исключить противопоказания и выбрать оптимальную схему терапии.
Получить дополнительные сведения – http://narkologicheskaya-klinika-dolgoprudnyj3.ru
Пациенты, нуждающиеся в круглосуточном наблюдении, могут пройти курс терапии в стационаре. Обстановка клиники рассчитана на комфортное пребывание: палаты с индивидуальным санитарным блоком, охрана, контроль приёма препаратов, поддержка психологов.
Исследовать вопрос подробнее – http://narkologicheskaya-pomoshh-tula10.ru
https://lottoland-br.com/lottoland-confianca-metodos-de-pagamento-e-seguranca/
http://indimedsdirect.com/# IndiMeds Direct
Группа препаратов
Подробнее – [url=https://kapelnica-ot-zapoya-sochi0.ru/]kapelnica-ot-zapoya-sochi0.ru/[/url]
Преимущество
Углубиться в тему – [url=https://narcolog-na-dom-ekaterinburg0.ru/]narkolog-na-dom-kruglosutochno ekaterinburg[/url]
https://germany-football.com/d8aed98ad8a7d8b1d8a7d8aa-d8a8d8b1d988d986d988-d984d984d8a3d981d8b6d984-d985d983d8a7d986d8a9-d8aed8a7d8b5d8a9-d984d8a3d8b3d8b7d988d8b1/
Для эффективного лечения наши врачи используют только проверенные и сертифицированные медикаменты, которые подбираются индивидуально для каждого пациента. В состав лечебного курса входят:
Получить дополнительные сведения – https://narcolog-na-dom-ekaterinburg000.ru/vrach-narkolog-na-dom-ekb/
Возможные признаки
Детальнее – [url=https://narkologicheskaya-klinika-tula10.ru/]www.domen.ru[/url]
Группа препаратов
Детальнее – https://kapelnica-ot-zapoya-sochi0.ru/kapelnicza-ot-zapoya-czena-sochi
Наша наркологическая клиника предоставляет круглосуточную помощь, использует только сертифицированные медикаменты и строго соблюдает полную конфиденциальность лечения.
Подробнее тут – [url=https://kapelnica-ot-zapoya-sochi0.ru/]капельница от запоя вызов город[/url]
Обращение к врачу становится жизненно необходимым, если пациент находится в состоянии длительного запоя, при котором организм не справляется с накоплением токсинов. Если запой продолжается более двух-трёх дней, в теле накапливаются вредные вещества, что ведёт к нарушениям работы внутренних органов, развитию абстинентного синдрома и появлению психических нарушений. Также, если у пациента наблюдаются симптомы, такие как частая рвота, спутанность сознания, судороги или резкие скачки артериального давления, это сигнал к незамедлительному вызову специалиста. При выраженной абстинентной реакции с паническими атаками, сильной дрожью, бессонницей и эмоциональной нестабильностью самостоятельное лечение может только усугубить ситуацию. Если появляются признаки алкогольного психоза – галлюцинации, агрессивность или спутанность сознания – вызов нарколога становится обязательным для предотвращения дальнейших осложнений. Также, когда требуется подготовка к процедурам кодирования от зависимости, необходима качественная детоксикация организма, что также является показанием к срочному обращению за профессиональной помощью.
Углубиться в тему – [url=https://narcolog-na-dom-ekaterinburg0.ru/]нарколог на дом[/url]
mx pharmacy easy mx pharmacy easy mx pharmacy easy mx pharmacy easy
При поступлении или выезде на дом врач-нарколог собирает анамнез, оценивает степень зависимости, измеряет жизненные показатели и назначает необходимые анализы. Цель — исключить противопоказания и выбрать оптимальную схему терапии.
Ознакомиться с деталями – http://narkologicheskaya-klinika-dolgoprudnyj3.ru
Обращение к врачу становится жизненно необходимым, если пациент находится в состоянии длительного запоя, при котором организм не справляется с накоплением токсинов. Если запой продолжается более двух-трёх дней, в теле накапливаются вредные вещества, что ведёт к нарушениям работы внутренних органов, развитию абстинентного синдрома и появлению психических нарушений. Также, если у пациента наблюдаются симптомы, такие как частая рвота, спутанность сознания, судороги или резкие скачки артериального давления, это сигнал к незамедлительному вызову специалиста. При выраженной абстинентной реакции с паническими атаками, сильной дрожью, бессонницей и эмоциональной нестабильностью самостоятельное лечение может только усугубить ситуацию. Если появляются признаки алкогольного психоза – галлюцинации, агрессивность или спутанность сознания – вызов нарколога становится обязательным для предотвращения дальнейших осложнений. Также, когда требуется подготовка к процедурам кодирования от зависимости, необходима качественная детоксикация организма, что также является показанием к срочному обращению за профессиональной помощью.
Получить дополнительную информацию – [url=https://narcolog-na-dom-ekaterinburg0.ru/]нарколог на дом вывод из запоя екатеринбург[/url]
Особенно важны первые дни пребывания, когда проводится диагностика, назначается медикаментозная поддержка и формируется план лечения. Компетентные врачи способны адаптировать программу под физическое и психоэмоциональное состояние пациента, учитывая как длительность употребления, так и возможные сопутствующие диагнозы. На этом этапе важно исключить риски осложнений и создать условия для безопасного перехода к следующему этапу — психологической реабилитации.
Подробнее можно узнать тут – [url=https://narkologicheskaya-klinika-tula10.ru/]частная наркологическая клиника тульская область[/url]
Фундаментом качественного лечения является профессиональная команда. Только при участии врачей-наркологов, психиатров, клинических психологов, терапевтов и консультантов по зависимому поведению можно говорить о комплексной помощи. По словам специалистов ФГБУН «Национальный научный центр наркологии», именно междисциплинарный подход формирует устойчивую динамику на всех этапах терапии — от стабилизации состояния до ресоциализации пациента.
Получить больше информации – [url=https://narkologicheskaya-klinika-tula10.ru/]частная наркологическая клиника[/url]
canadian pharmacy meds canadapharmacyonline legit canadian pharmacy online store
Как отмечают наркологи нашей клиники, чем раньше пациент получает необходимую помощь, тем меньше риск тяжелых последствий и тем быстрее восстанавливаются функции организма.
Подробнее тут – [url=https://kapelnica-ot-zapoya-sochi0.ru/]капельница от запоя на дому цена сочи[/url]
При поступлении вызова специалисты клиники «СтопТокс» оперативно выезжают на дом в Екатеринбурге или по всей Свердловской области. По прибытии врач проводит всестороннюю диагностику, включая измерение артериального давления, пульса и уровня кислорода в крови, а также собирает анамнез и оценивает степень интоксикации. На основе полученной информации составляется индивидуальный план лечения, который включает следующие этапы:
Детальнее – [url=https://narcolog-na-dom-ekaterinburg000.ru/]нарколог на дом цена екатеринбург[/url]
Каждый пациент получает индивидуальный план лечения, основанный на клинических исследованиях, данных лабораторных анализов и психологических тестов.
Получить больше информации – http://narkologicheskaya-klinika-dolgoprudnyj3.ru/
https://77z9t.mr9895.com
Can I simply say what a relief to find someone who really knows what
they are discussing over the internet. You definitely
understand how to bring a problem to light and make it important.
More and more people really need to read this and understand this side of your story.
It’s surprising you’re not more popular given that you definitely
have the gift.
https://goobaosf.ww6981.com
First off I want to say awesome blog! I had a quick question in which I’d like to ask if you don’t mind.
I was interested to find out how you center yourself and clear your head prior to writing.
I have had difficulty clearing my mind in getting my ideas out there.
I do take pleasure in writing but it just seems like the first 10 to 15
minutes tend to be lost simply just trying to figure out how to begin.
Any ideas or tips? Thanks!
Группа препаратов
Изучить вопрос глубже – https://narcolog-na-dom-ekaterinburg000.ru/narkolog-na-dom-czena-ekb/
Фундаментом качественного лечения является профессиональная команда. Только при участии врачей-наркологов, психиатров, клинических психологов, терапевтов и консультантов по зависимому поведению можно говорить о комплексной помощи. По словам специалистов ФГБУН «Национальный научный центр наркологии», именно междисциплинарный подход формирует устойчивую динамику на всех этапах терапии — от стабилизации состояния до ресоциализации пациента.
Получить дополнительные сведения – [url=https://narkologicheskaya-klinika-tula10.ru/]наркологическая клиника нарколог в туле[/url]
TijuanaMeds: TijuanaMeds – TijuanaMeds
Наша наркологическая клиника предоставляет круглосуточную помощь, использует только сертифицированные медикаменты и строго соблюдает полную конфиденциальность лечения.
Изучить вопрос глубже – [url=https://kapelnica-ot-zapoya-sochi0.ru/]капельница от запоя на дому сочи.[/url]
canadian pharmacy prices: best canadian pharmacy online – canadian pharmacy meds
Каждый этап проводится квалифицированным специалистом, что позволяет достичь максимального терапевтического эффекта.
Получить дополнительные сведения – [url=https://narcolog-na-dom-ekaterinburg0.ru/]нарколог на дом свердловская область[/url]
http://canrxdirect.com/# reputable canadian online pharmacy
mx pharmacy easy https://mxpharmacyeasy.shop/# mx pharmacy easy mx pharmacy easy
https://f7ypw9h7.com/onde-sera-o-jogo-entre-botafogo-e-internacional/
Возможные признаки
Подробнее – [url=https://narkologicheskaya-klinika-tula10.ru/]наркологические клиники алкоголизм тульская область[/url]
Используя современные инфузионные системы, мы постепенно вводим растворы для выведения токсинов, коррекции водно-электролитного баланса и восстановления функции печени. Параллельно подбираются препараты для снятия абстинентного синдрома, купирования тревожности и нормализации сна.
Выяснить больше – https://narkologicheskaya-klinika-dolgoprudnyj3.ru/anonimnaya-narkologicheskaya-klinika-v-dolgoprudnom
Запой — это не просто бытовое пьянство, а одно из наиболее опасных проявлений алкогольной зависимости. Во время запоя организм перестаёт функционировать в нормальном режиме: сердечно-сосудистая система работает на износ, нервная система перегружена токсинами, а печень не справляется с нагрузкой. На этом фоне могут возникать тяжёлые осложнения — от судорог и гипогликемии до нарушения дыхания и алкогольного психоза. Чем дольше длится запой, тем глубже метаболические нарушения и выше риск серьёзных последствий.
Подробнее тут – [url=https://vyvod-iz-zapoya-kolomna3.ru/]vyvod-iz-zapoya[/url]
Наша команда врачей оперативно реагирует на каждый вызов, оказывая квалифицированную медицинскую помощь на дому. Специалисты проводят полный комплекс лечебных мероприятий, направленных на безопасное снятие интоксикации, детоксикацию и облегчение симптомов абстиненции.
Исследовать вопрос подробнее – http://narcolog-na-dom-ekaterinburg0.ru/vrach-narkolog-na-dom-ekb/
Проблемы, связанные с употреблением алкоголя или наркотических веществ, могут застать человека врасплох и требовать немедленного медицинского вмешательства. В Туле предоставляется наркологическая помощь, направленная на купирование острых состояний и оказание поддержки пациентам в кризисной ситуации. В клинике «Здоровье+» используются современные методы лечения, основанные на отечественных клинических рекомендациях, с акцентом на безопасность и индивидуальный подход.
Углубиться в тему – [url=https://narkologicheskaya-pomoshh-tula10.ru/]платная наркологическая помощь тула[/url]
Для эффективного лечения наши врачи используют только проверенные и сертифицированные медикаменты, которые подбираются индивидуально для каждого пациента. В состав лечебного курса входят:
Получить дополнительную информацию – [url=https://narcolog-na-dom-ekaterinburg000.ru/]врач нарколог на дом в екатеринбурге[/url]
В «Чистом Дыхании» вы встретите врачей-наркологов, психиатров и психологов с многолетним опытом, готовых приехать на дом для первичной детоксикации или принять в стационаре для углублённой терапии. Мы соблюдаем строгие медицинские протоколы и гарантируем безопасность даже в самых тяжёлых случаях.
Разобраться лучше – [url=https://narkologicheskaya-klinika-dolgoprudnyj3.ru/]наркологическая клиника[/url]
Используя современные инфузионные системы, мы постепенно вводим растворы для выведения токсинов, коррекции водно-электролитного баланса и восстановления функции печени. Параллельно подбираются препараты для снятия абстинентного синдрома, купирования тревожности и нормализации сна.
Изучить вопрос глубже – https://narkologicheskaya-klinika-dolgoprudnyj3.ru/anonimnaya-narkologicheskaya-klinika-v-dolgoprudnom
При поступлении вызова специалисты клиники «СтопТокс» оперативно выезжают на дом в Екатеринбурге или по всей Свердловской области. По прибытии врач проводит всестороннюю диагностику, включая измерение артериального давления, пульса и уровня кислорода в крови, а также собирает анамнез и оценивает степень интоксикации. На основе полученной информации составляется индивидуальный план лечения, который включает следующие этапы:
Детальнее – http://narcolog-na-dom-ekaterinburg000.ru
https://germany-football.com/d987d8a7d984d8a7d986d8af-d8b4d8b1d8add8aa-300-d985d8b1d8a9-d8b3d8a8d8a8-d8b9d982d8afd98a-d8a7d984d8acd8afd98ad8af-d985d8b9-d985d8a7d986/
Серьезные состояния, вызванные длительным употреблением алкоголя или наркотиков, требуют немедленного вмешательства. Если пациент испытывает ухудшение самочувствия вследствие продолжительного запоя, его организм начинает накапливать токсичные вещества, что ведёт к нарушению работы внутренних органов. При появлении таких симптомов, как сильная рвота, спутанность сознания, судороги, резкие скачки артериального давления, а также выраженные признаки абстинентного синдрома (сильная дрожь, панические атаки, бессонница, тревожность), вызов нарколога становится жизненно необходимым. Экстренное вмешательство позволяет стабилизировать состояние больного и предотвратить развитие серьёзных осложнений, включая сердечно-сосудистые нарушения, повреждение печени и развитие алкогольного психоза. В таких ситуациях профессиональное лечение на дому — лучший способ сохранить здоровье и жизнь пациента.
Детальнее – https://narcolog-na-dom-ekaterinburg000.ru/narkolog-na-dom-czena-ekb
mx pharmacy easy mx pharmacy easy mx pharmacy easy mx pharmacy easy
https://8fzss4zt.com/
https://hk5272.com/2025-06-16/57f43399509/
I’m gone to convey my little brother, that he should also pay a
visit this weblog on regular basis to get updated
from most recent news update.
https://4x0eyvtm.com/policia-prende-dez-integrantes-da-mancha-alvi-verde-suspeitos-de-participar-de-emboscada/
Farmacia Asequible: linia direct – Farmacia Asequible
RxFree Meds RxFree Meds cialis european pharmacy
https://lqq3865.com/fgk149cpssuv30suwsg/kfz-list.html
Right here is the perfect site for everyone
who would like to understand this topic. You know a whole
lot its almost tough to argue with you (not that I really would want to…HaHa).
You certainly put a new spin on a topic which has been written about
for many years. Wonderful stuff, just excellent!
В этом обзорном материале представлены увлекательные детали, которые находят отражение в различных аспектах жизни. Мы исследуем непонятные и интересные моменты, позволяя читателю увидеть картину целиком. Погрузитесь в мир знаний и удивительных открытий!
Подробнее – https://mylasergame.nl/hello-world
Эта информационная заметка предлагает лаконичное и четкое освещение актуальных вопросов. Здесь вы найдете ключевые факты и основную информацию по теме, которые помогут вам сформировать собственное мнение и повысить уровень осведомленности.
Подробнее тут – https://hollywoodonwheels.com/17199080_10158411967310554_1267236580_n
В этой статье-обзоре мы соберем актуальную информацию и интересные факты, которые освещают важные темы. Читатели смогут ознакомиться с различными мнениями и подходами, что позволит им расширить кругозор и глубже понять обсуждаемые вопросы.
Исследовать вопрос подробнее – https://sdwmontage.nl/2022/11/18/falk-1000-40-gl
В этом информативном тексте представлены захватывающие события и факты, которые заставят вас задуматься. Мы обращаем внимание на важные моменты, которые часто остаются незамеченными, и предлагаем новые перспективы на привычные вещи. Подготовьтесь к тому, чтобы быть поглощенным увлекательными рассказами!
Узнать больше – https://cannex.ai/the-art-of-negotiation-tips-for-successful-business-deals
Эта статья для ознакомления предлагает читателям общее представление об актуальной теме. Мы стремимся представить ключевые факты и идеи, которые помогут читателям получить представление о предмете и решить, стоит ли углубляться в изучение.
Подробнее можно узнать тут – https://chronos.or.jp/2024/02/08/%E5%9C%B0%E5%9F%9F%E7%A4%BE%E4%BC%9A%E3%81%A8%E5%85%B1%E3%81%AB%E6%88%90%E9%95%B7%E3%81%99%E3%82%8B%EF%BC%9A%E3%82%AF%E3%83%AD%E3%83%8E%E3%82%B9%E4%BF%9D%E5%85%A8%E8%B2%A1%E5%9B%A3%E3%81%AE%E5%9C%B0
https://farmaciaasequible.shop/# parafarmacia en sevilla
В данной обзорной статье представлены интригующие факты, которые не оставят вас равнодушными. Мы критикуем и анализируем события, которые изменили наше восприятие мира. Узнайте, что стоит за новыми открытиями и как они могут изменить ваше восприятие реальности.
Подробнее – https://www.ass-darmstadt.de/image
https://96nhv5kj.com/advogados-de-mbappe-confiscam-55-milhoes-de-euros-do-psg/
https://rxfreemeds.com/# RxFree Meds
Эта информационная статья охватывает широкий спектр актуальных тем и вопросов. Мы стремимся осветить ключевые факты и события с ясностью и простотой, чтобы каждый читатель мог извлечь из нее полезные знания и полезные инсайты.
Подробнее – https://foerderverein-heidehaus.de/services/bambinilauf
https://ovn61n5q.com/onde-assistir-ao-jogo-entre-manchester-city-e-liverpool/
Эта информационная статья охватывает широкий спектр актуальных тем и вопросов. Мы стремимся осветить ключевые факты и события с ясностью и простотой, чтобы каждый читатель мог извлечь из нее полезные знания и полезные инсайты.
Разобраться лучше – https://reveilcitoyenargeles.com/index.php/2025/03/05/le-maire-et-son-devoir-dadaptation-du-territoire-au-changement-climatique
Этот информационный материал привлекает внимание множеством интересных деталей и необычных ракурсов. Мы предлагаем уникальные взгляды на привычные вещи и рассматриваем вопросы, которые волнуют общество. Будьте в курсе актуальных тем и расширяйте свои знания!
Исследовать вопрос подробнее – https://doizon56.com/nouveau-site-internet
Этот информационный материал привлекает внимание множеством интересных деталей и необычных ракурсов. Мы предлагаем уникальные взгляды на привычные вещи и рассматриваем вопросы, которые волнуют общество. Будьте в курсе актуальных тем и расширяйте свои знания!
Разобраться лучше – https://direkt-pkw-ankauf.de/how-close-are-we-to-autonomous-cars
Farmacia Asequible: parafarmacias – farmacias direct
https://on-sport-live-eg.com/d8a7d984d985d8b5d8a7d8a6d8a8-d984d8a7-d8aad8a3d8aad98a-d981d8b1d8a7d8afd989-d985d8a8d8a7d8a8d98a-d98ad8bad8a7d8afd8b1-d985d8a8d8a7d8b1/
«ВладимирМед» основана группой врачей-наркологов и психотерапевтов, объединивших опыт работы в государственных и частных учреждениях. Мы предлагаем не просто преодоление запоя, а глубокую комплексную реабилитацию, включающую медико-психологическую оценку и долгосрочное сопровождение. Наша цель — восстановление здоровья на физическом и эмоциональном уровнях, возвращение пациента к полноценной социальной жизни без рецидивов.
Выяснить больше – [url=https://narkologicheskaya-klinika-vladimir10.ru/]частная наркологическая клиника[/url]
In the Sweet Bonanza slot machine, developers from Pragmatic Play have added several profitable options: 1Big Bass Bonanza Choosing the right casino is essential for an optimal Sweet Bonanza gaming experience. Numerous online casinos in South Africa offer Sweet Bonanza, but not all provide the same level of service and gaming pleasure. Each player has luck in the way the bet is executed to get the bet win. During the bets that are played, there are not always wins that are as expected. Therefore, to get the best income while making bets, players need to know some of the guidelines for winning effective online Sweet Bonanza slots as follows: One trick with Dionysus is to have a single source of Hangover; stacks overwrite each other even if the most recent is weaker. The minimum and maximum betting limits for Sweet Bonanza Roobet are $0.20 and $125, respectively.
https://yeswiki.hainaut.be/PAEDC/?retunato1984
The regular symbols on the reels are all the same as in the previous games, with 10-A card ranks as the low pays, and tackle boxes, lures, fishing rods, and a fishing float as the premiums. As far as Megaways slots go, Big Bass Bonanza lacks a bit of oomph, with a max win of 10,000x your bet and a relatively low number of ways to win. However, it still stands out from other series games and fishing slots thanks to its action-packed features. The free spins round is where things get exciting thanks to the cash collection, dynamite and bazooka, and the potential for win multipliers. However, the base game is still fun, thanks to tumbles and wilds. Big Bass Bonanza Megaways is a sequel to the original Big Bass Bonanza slot dedicated to fishing. This time, Big Bass Bonanza Megaways slot offers up to 46656 ways to win. There are 6 reels in the slot plus one horizontal. The wild symbol can only appear on a horizontal reel, so you often won’t be able to see it.
В таких ситуациях вывод из запоя на дому становится необходимым, чтобы быстро стабилизировать состояние пациента, избежать необратимых последствий и дать организму шанс на восстановление. Клиника «Семья и Здоровье» предлагает комплексное лечение, осуществляемое опытными наркологами, которые работают 24 часа в сутки, 7 дней в неделю. Наши специалисты приезжают по вызову в течение 30–60 минут, обеспечивая оперативное и качественное лечение в привычной домашней обстановке, что особенно важно для пациентов, испытывающих стресс и страх перед госпитализацией.
Получить дополнительную информацию – [url=https://narcolog-na-dom-krasnoyarsk0.ru/]narkolog na dom[/url]
Запой может быть не только физически тяжёлым, но и психологически разрушительным. Поэтому важно вовремя обратиться за помощью. Вывод из запоя в Нижнем Новгороде — это необходимая медицинская процедура, которая помогает победить алкогольную зависимость и восстановить здоровье. Мы в клинике «АнтиЗависимость» предлагаем круглосуточную помощь в комфортных условиях — на дому или в стационаре.
Детальнее – http://narcolog-na-dom-novokuznetsk0.ru
https://farmaciaasequible.shop/# Farmacia Asequible
Farmacia Asequible: Farmacia Asequible – farmacias 24 horas sevilla
ornibel opiniones tadalafilo precio 10 mg mejor especialista columna palma de mallorca
Некоторые состояния требуют немедленного вмешательства специалиста. Если алкогольное отравление или запойное состояние не купируется вовремя, это может привести к тяжелым последствиям для здоровья.
Подробнее – http://narcolog-na-dom-v-irkutske00.ru
Алкогольная и наркотическая зависимости требуют незамедлительного медицинского вмешательства. Длительные запои или острое отравление могут привести к тяжелым осложнениям и серьезным проблемам со здоровьем. Клиника «МедТрезвость» в Санкт-Петербурге предлагает квалифицированную наркологическую помощь прямо на дому, обеспечивая полную конфиденциальность и безопасность пациента. Наши специалисты оперативно выезжают по адресу, проводят все необходимые процедуры и помогают максимально быстро стабилизировать состояние пациента в комфортных домашних условиях.
Получить дополнительные сведения – [url=https://narcolog-na-dom-sankt-peterburg0.ru/]вызов нарколога на дом санкт-петербург.[/url]
Запой, интоксикация? Вызовите нарколога на дом в Иркутске для быстрой и анонимной помощи. На дому: осмотр, подбор лечения, капельница для вывода токсинов и улучшение самочувствия. «ТрезвоМед» – круглосуточная наркологическая помощь на дому с гарантией анонимности. Не справляетесь с зависимостью сами? Вызовите нарколога на дом. Васильев подчеркивает: «Оперативная помощь – ключ к выздоровлению при отравлении алкоголем».
Получить дополнительную информацию – http://narcolog-na-dom-v-irkutske0.ru/narkolog-na-dom-czena-irkutsk/
В «Чистом Дыхании» вы встретите врачей-наркологов, психиатров и психологов с многолетним опытом, готовых приехать на дом для первичной детоксикации или принять в стационаре для углублённой терапии. Мы соблюдаем строгие медицинские протоколы и гарантируем безопасность даже в самых тяжёлых случаях.
Выяснить больше – https://narkologicheskaya-klinika-dolgoprudnyj3.ru/
Основные показания для вызова нарколога:
Получить дополнительную информацию – [url=https://narcolog-na-dom-v-irkutske00.ru/]платный нарколог на дом иркутск[/url]
Запой – это не просто пьянство, а состояние, когда организм становится зависимым от алкоголя. Накопление токсинов приводит к сбоям в работе органов и ослаблению защиты организма. Самостоятельный выход из запоя может быть опасен и только усугубить состояние. Мы предлагаем лечение запоя на дому, чтобы избежать больницы и создать комфорт. Наши специалисты быстро приедут к вам и окажут всю необходимую помощь круглосуточно. Запой приводит к серьезным проблемам со здоровьем, ухудшает качество жизни и угрожает жизни. Очень важно вовремя обратиться за помощью, чтобы избежать необратимых последствий.
Детальнее – [url=https://vyvod-iz-zapoya-krasnoyarsk0.ru/]vivod iz zapoya krasnoyarsk[/url]
Все вызовы фиксируются под кодовым номером без указания ФИО, что обеспечивает полную конфиденциальность каждого пациента.
Выяснить больше – [url=https://narkologicheskaya-klinika-vladimir10.ru/]наркологическая клиника владимир[/url]
https://8fzss4zt.com/assista-ao-vivo-palmeiras-x-flamengo-pela-copa-do-brasil-hoje/
Лечение выводится поэтапно, чтобы обеспечить безопасность и максимальную эффективность терапии. Каждый этап продуман и адаптирован под индивидуальные особенности пациента.
Выяснить больше – [url=https://narcolog-na-dom-krasnoyarsk0.ru/]вызов нарколога цена красноярск[/url]
Алкогольная и наркотическая зависимости требуют незамедлительного медицинского вмешательства. Длительные запои или острое отравление могут привести к тяжелым осложнениям и серьезным проблемам со здоровьем. Клиника «МедТрезвость» в Санкт-Петербурге предлагает квалифицированную наркологическую помощь прямо на дому, обеспечивая полную конфиденциальность и безопасность пациента. Наши специалисты оперативно выезжают по адресу, проводят все необходимые процедуры и помогают максимально быстро стабилизировать состояние пациента в комфортных домашних условиях.
Подробнее можно узнать тут – http://narcolog-na-dom-sankt-peterburg0.ru
Запой может быть не только физически тяжёлым, но и психологически разрушительным. Поэтому важно вовремя обратиться за помощью. Вывод из запоя в Нижнем Новгороде — это необходимая медицинская процедура, которая помогает победить алкогольную зависимость и восстановить здоровье. Мы в клинике «АнтиЗависимость» предлагаем круглосуточную помощь в комфортных условиях — на дому или в стационаре.
Подробнее – https://narcolog-na-dom-novokuznetsk0.ru/
Farmacia Asequible: Farmacia Asequible – spanish viagra
https://refuel-in.com/master-teen-patti-sweet-insider-tips-for-guaranteed-wins-17-06-2024/
https://9iocjffs.com/onde-assistir-ao-jogo-do-sao-paulo-na-copa-do-brasil/
I’m really enjoying the design and layout of your blog. It’s a very
easy on the eyes which makes it much more pleasant for me to come here and
visit more often. Did you hire out a designer to create your theme?
Fantastic work!
https://0duz0kzu.com/onde-sera-o-jogo-entre-cruzeiro-e-sao-paulo/
That is a really good tip especially to those fresh to the
blogosphere. Brief but very precise information… Thank you for sharing this one.
A must read article!
https://8f0weudq.com/onde-assistir-flamengo-x-corinthians/
I blog often and I seriously appreciate your information. This
article has really peaked my interest. I will book mark your website and keep checking for new information about once per week.
I opted in for your RSS feed too.
https://7lk38tsi.com/onde-assistir-ao-jogo-botafogo-x-ec-vitoria/
Everything is very open with a really clear
explanation of the issues. It was definitely informative.
Your website is extremely helpful. Thanks for sharing!
https://hpudi3xi.com/quais-sao-os-dias-das-quartas-de-final-da-copa-do-brasil/
Thanks , I’ve recently been searching for information about this subject
for a while and yours is the best I have found out so far.
But, what about the bottom line? Are you positive about the supply?
https://ndi3hnms.com/voce-nao-forneceu-um-titulo-para-ser-reescrito-por-favor-envie-o-titulo-que-deseja-que-eu-reescreva-como-uma-pergunta/
I’ve been surfing on-line more than 3 hours today, but I never found any attention-grabbing article like yours.
It is pretty price sufficient for me. In my view, if all site owners and bloggers made good content
material as you probably did, the web can be much more
useful than ever before.
Все вызовы фиксируются под кодовым номером без указания ФИО, что обеспечивает полную конфиденциальность каждого пациента.
Получить дополнительные сведения – https://narkologicheskaya-klinika-vladimir10.ru/chastnaya-narkologicheskaya-klinika-vladimir
http://rxfreemeds.com/# RxFree Meds
Некоторые состояния требуют немедленного вмешательства специалиста. Если алкогольное отравление или запойное состояние не купируется вовремя, это может привести к тяжелым последствиям для здоровья.
Подробнее – [url=https://narcolog-na-dom-v-irkutske00.ru/]нарколог на дом в иркутске[/url]
Каждый курс инфузий разрабатывается с учётом возраста пациента, сопутствующих заболеваний и длительности запоя, что повышает безопасность и эффективность лечения.
Углубиться в тему – [url=https://narkologicheskaya-klinika-vladimir10.ru/]наркологическая клиника нарколог в владимире[/url]
https://rxfreemeds.shop/# how much does percocet cost at the pharmacy
Лечение выводится поэтапно, чтобы обеспечить безопасность и максимальную эффективность терапии. Каждый этап продуман и адаптирован под индивидуальные особенности пациента.
Подробнее – http://narcolog-na-dom-krasnoyarsk0.ru/vyzov-narkologa-na-dom-krasnoyarsk/
Основной этап – введение внутривенной капельницы с специально разработанными растворами. Эти растворы содержат электролиты, витамины и активные компоненты, способствующие быстрому выведению токсинов, восстановлению водно-солевого баланса и улучшению обмена веществ. Детоксикация позволяет снизить концентрацию алкоголя в крови, уменьшить симптомы абстиненции и подготовить организм к последующим этапам терапии.
Детальнее – https://narcolog-na-dom-krasnoyarsk0.ru/
https://bowri857.com/dudu-do-cruzeiro-apoia-campanha-contra-gramados-sinteticos-no-brasil/
It’s a pity you don’t have a donate button! I’d certainly donate to
this superb blog! I suppose for now i’ll settle for book-marking and adding your
RSS feed to my Google account. I look forward to fresh updates and will talk about this website with my Facebook group.
Talk soon!
rx clinic pharmacy charlotte nc: baclofen pharmacy – RxFree Meds
https://fdhbr8iu.com/torcida-do-corinthians-esgota-ingressos-para-decisao-contra-o-palmeiras-no-paulistao/
Excellent blog! Do you have any tips and hints for
aspiring writers? I’m hoping to start my own website soon but I’m a little
lost on everything. Would you suggest starting with a free platform like WordPress or go for a paid
option? There are so many options out there that I’m completely overwhelmed
.. Any suggestions? Thanks!
Как отмечает нарколог Олег Васильев, «чем раньше пациент получает квалифицированную медицинскую помощь, тем меньше риск серьезных осложнений».
Детальнее – https://narcolog-na-dom-v-irkutske00.ru
https://yalla-shoot-english-eg.com/d8a7d984d8b2d985d8a7d984d983-d98ad981d988d8b2-d8b9d984d989-d8b3d985d988d8add8a9-d981d98a-d8afd988d8b1d98a-d8a7d984d985d8add8aad8b1d981/
Запой может быть не только физически тяжёлым, но и психологически разрушительным. Поэтому важно вовремя обратиться за помощью. Вывод из запоя в Нижнем Новгороде — это необходимая медицинская процедура, которая помогает победить алкогольную зависимость и восстановить здоровье. Мы в клинике «АнтиЗависимость» предлагаем круглосуточную помощь в комфортных условиях — на дому или в стационаре.
Получить дополнительные сведения – http://narcolog-na-dom-novokuznetsk0.ru
Если человек страдает от алкоголизма, запойное состояние требует незамедлительного вмешательства, особенно если признаки токсического отравления начинают угрожать жизни. Признаки запоя — это не только физическая зависимость, но и эмоциональные и психические расстройства, такие как тревога, агрессия и галлюцинации.
Детальнее – [url=https://narcolog-na-dom-novokuznetsk0.ru/]вызов нарколога на дом[/url]
https://wg6naf13.com/para-fornecer-a-informacao-correta-preciso-saber-em-qual-ano-estamos-poderia-me-informar-o-ano-atual/
RxFree Meds RxFree Meds pharmacy global rx reviews
Клиника «ВладимирМед» предоставляет круглосуточную анонимную помощь при алкогольной зависимости с возможностью выезда врача на дом. Мы объединяем профессиональную наркологию, психологическую поддержку и современные технологии детоксикации, чтобы каждый пациент мог получить комплексное лечение в безопасной и комфортной обстановке. Конфиденциальность и оперативность — ключевые принципы нашей работы, помогающие начать новый этап жизни без страха осуждения и лишних процедур.
Выяснить больше – http://narkologicheskaya-klinika-vladimir10.ru/
Используя современные инфузионные системы, мы постепенно вводим растворы для выведения токсинов, коррекции водно-электролитного баланса и восстановления функции печени. Параллельно подбираются препараты для снятия абстинентного синдрома, купирования тревожности и нормализации сна.
Подробнее тут – https://narkologicheskaya-klinika-dolgoprudnyj3.ru/
Игнорирование состояния пациента или попытки самостоятельно справиться с запоем могут привести к опасным последствиям для жизни и здоровья. Поэтому важно своевременно обращаться за профессиональной медицинской помощью.
Исследовать вопрос подробнее – [url=https://narcolog-na-dom-sankt-peterburg0.ru/]запой нарколог на дом санкт-петербург[/url]
Поскольку запой – это не только физическое, но и психологическое испытание, своевременная помощь нарколога является ключевым фактором для предотвращения серьезных осложнений и сохранения жизни пациента. Чем раньше начнется лечение, тем больше шанс на успешное восстановление и предотвращение повторных эпизодов.
Детальнее – [url=https://narcolog-na-dom-krasnoyarsk0.ru/]нарколог на дом красноярск[/url]
https://hulk-footballer.com/d8aad8b1d8aad98ad8a8-d987d8afd8a7d981d98a-d8a7d984d8afd988d8b1d98a-d8a7d984d8a5d986d8acd984d98ad8b2d98a-d8a8d8b9d8af-d987d8afd981-d985/
https://japan-football-team.com/d8aad981d8a7d8b5d98ad984-d8a5d8b5d8a7d8a8d8a9-d8a3d8add985d8af-d8b9d8a8d8af-d8a7d984d982d8a7d8afd8b1-d985d8b9-d982d8b7d8b1-d8a7d984d982/
Процедура вывода из запоя начинается с тщательной диагностики состояния пациента, чтобы определить, какие методы лечения будут наиболее эффективными. Мы применяем индивидуальный подход и комбинируем медикаментозное лечение с психотерапевтической поддержкой, что даёт лучший результат.
Исследовать вопрос подробнее – [url=https://narcolog-na-dom-novokuznetsk0.ru/]вызвать нарколога на дом в новокузнецке[/url]
Мы оказываем услуги 24 часа в сутки, 7 дней в неделю, без выходных и праздников. Это позволяет:
Разобраться лучше – [url=https://narkologicheskaya-klinika-vladimir10.ru/]частная наркологическая клиника владимир.[/url]
Алкогольная и наркотическая зависимости требуют незамедлительного медицинского вмешательства. Длительные запои или острое отравление могут привести к тяжелым осложнениям и серьезным проблемам со здоровьем. Клиника «МедТрезвость» в Санкт-Петербурге предлагает квалифицированную наркологическую помощь прямо на дому, обеспечивая полную конфиденциальность и безопасность пациента. Наши специалисты оперативно выезжают по адресу, проводят все необходимые процедуры и помогают максимально быстро стабилизировать состояние пациента в комфортных домашних условиях.
Углубиться в тему – [url=https://narcolog-na-dom-sankt-peterburg0.ru/]нарколог на дом срочно санкт-петербург[/url]
Лечение выводится поэтапно, чтобы обеспечить безопасность и максимальную эффективность терапии. Каждый этап продуман и адаптирован под индивидуальные особенности пациента.
Исследовать вопрос подробнее – http://narcolog-na-dom-krasnoyarsk0.ru/vyzov-narkologa-na-dom-krasnoyarsk/
https://tjk80nw9.com/voce-quis-dizer-clube-atletico-juventus-x-gremio-prudente-se-sim-onde-assistir-clube-atletico-juventus-x-gremio-prudente/
Запой, интоксикация? Вызовите нарколога на дом в Иркутске для быстрой и анонимной помощи. На дому: осмотр, подбор лечения, капельница для вывода токсинов и улучшение самочувствия. «ТрезвоМед» – круглосуточная наркологическая помощь на дому с гарантией анонимности. Не справляетесь с зависимостью сами? Вызовите нарколога на дом. Васильев подчеркивает: «Оперативная помощь – ключ к выздоровлению при отравлении алкоголем».
Исследовать вопрос подробнее – https://narcolog-na-dom-v-irkutske0.ru/narkolog-na-dom-czena-irkutsk/
aetna online pharmacy: unicare pharmacy artane castle opening hours – RxFree Meds
https://yalla-live-football-eg.com/d8b3d98ad8afd8a7d8aa-d8aad8b4d98ad984d8b3d98a-d98ad8b1d981d8b6d986-d8a7d984d8a7d8b3d8aad8b3d984d8a7d985-d8a8d8b9d8af-d8b1d8a8d8a7d8b9/
Вызов нарколога на дом в Иркутске и Иркутской области — это удобное и безопасное решение, позволяющее получить неотложную помощь в привычной обстановке. Врачи клиники «ЧистоЖизнь» выезжают круглосуточно, приезжают в течение 30–60 минут и проводят комплексное лечение, направленное на стабилизацию состояния пациента и предотвращение осложнений.
Подробнее – http://narcolog-na-dom-v-irkutske00.ru/vrach-narkolog-na-dom-irkutsk/
Запой может быть не только физически тяжёлым, но и психологически разрушительным. Поэтому важно вовремя обратиться за помощью. Вывод из запоя в Нижнем Новгороде — это необходимая медицинская процедура, которая помогает победить алкогольную зависимость и восстановить здоровье. Мы в клинике «АнтиЗависимость» предлагаем круглосуточную помощь в комфортных условиях — на дому или в стационаре.
Исследовать вопрос подробнее – http://narcolog-na-dom-novokuznetsk0.ru/narkolog-lechenie-na-domu-novokuzneczk/
https://prosportbet-br.com/aprenda-a-ganhar-dinheiro-com-apostas-seguras-no-prosportbet/
https://yalla-goal-eg.com/d985d8add985d8af-d8b5d984d8a7d8ad-d98ad8b1d8aad982d98a-d981d98a-d8b3d984d985-d987d8afd8a7d981d98a-d984d98ad981d8b1d8a8d988d984-d8a8d8b9/
Наша миссия заключается в предоставлении качественной помощи людям, страдающим от зависимостей. Мы стремимся создать безопасную и поддерживающую атмосферу, где каждый сможет получить необходимую помощь. Основная цель — восстановление здоровья, психоэмоционального состояния и социальной адаптации.
Исследовать вопрос подробнее – http://tajnyj-vyvod-iz-zapoya.ru/vyvod-iz-zapoya-anonimno-v-omske.ru/
Запой – тяжелое состояние, когда организм не может функционировать без алкоголя. Токсины накапливаются, органы перестают работать, иммунитет слабеет. Это очень опасно. Самостоятельные попытки выйти из запоя только ухудшают ситуацию и усиливают страдания. Клиника «Семья и Здоровье» предлагает лечение на дому, без стресса и в комфортной обстановке. Мы работаем круглосуточно, быстро приезжаем и проводим все необходимые процедуры. Длительный запой разрушает организм, ухудшает качество жизни и может привести к опасным ситуациям. Своевременный вывод из запоя — это критически важно для сохранения здоровья и жизни.
Подробнее тут – [url=https://vyvod-iz-zapoya-krasnoyarsk0.ru/]клиника вывод из запоя красноярск[/url]
После прибытия врач проводит осмотр пациента, оценивает его состояние, измеряет давление, пульс, уровень кислорода и выявляет возможные противопоказания. Затем разрабатывается индивидуальный план лечения, направленный на стабилизацию состояния.
Детальнее – http://narcolog-na-dom-v-irkutske00.ru/narkolog-na-dom-czena-irkutsk/
Основные показания для вызова нарколога:
Ознакомиться с деталями – https://narcolog-na-dom-v-irkutske00.ru/vyzov-narkologa-na-dom-irkutsk
При поступлении или выезде на дом врач-нарколог собирает анамнез, оценивает степень зависимости, измеряет жизненные показатели и назначает необходимые анализы. Цель — исключить противопоказания и выбрать оптимальную схему терапии.
Изучить вопрос глубже – https://narkologicheskaya-klinika-dolgoprudnyj3.ru/
enclomiphene testosterone: enclomiphene online – enclomiphene price
https://rivalry-br.com/rivality-uma-plataforma-online-que-pode-revolucionar-seu-voto-digital/
https://enclomiphenebestprice.com/# enclomiphene for sale
RxFree Meds euro pharmacy viagra riteaid online pharmacy
https://www.aajogo-br.com/desvendando-aajogo-dicas-e-estrategias-para-apostar-e-ganhar/
https://ovn61n5q.com/category/competicoes/
Алкогольная и наркотическая зависимости требуют незамедлительного медицинского вмешательства. Длительные запои или острое отравление могут привести к тяжелым осложнениям и серьезным проблемам со здоровьем. Клиника «МедТрезвость» в Санкт-Петербурге предлагает квалифицированную наркологическую помощь прямо на дому, обеспечивая полную конфиденциальность и безопасность пациента. Наши специалисты оперативно выезжают по адресу, проводят все необходимые процедуры и помогают максимально быстро стабилизировать состояние пациента в комфортных домашних условиях.
Разобраться лучше – [url=https://narcolog-na-dom-sankt-peterburg0.ru/]врач нарколог на дом в санкт-петербурге[/url]
Каждый пациент получает индивидуальный план лечения, основанный на клинических исследованиях, данных лабораторных анализов и психологических тестов.
Детальнее – https://narkologicheskaya-klinika-dolgoprudnyj3.ru/
https://gzuc2px5.com/guardiola-sai-em-defesa-de-haaland-em-meio-a-crise-no-manchester-city/
Игнорирование состояния пациента или попытки самостоятельно справиться с запоем могут привести к опасным последствиям для жизни и здоровья. Поэтому важно своевременно обращаться за профессиональной медицинской помощью.
Углубиться в тему – http://narcolog-na-dom-sankt-peterburg0.ru
Каждый пациент получает индивидуальный план лечения, основанный на клинических исследованиях, данных лабораторных анализов и психологических тестов.
Получить дополнительные сведения – [url=https://narkologicheskaya-klinika-dolgoprudnyj3.ru/]narkologicheskaya-klinika-zdorove[/url]
Качественная детоксикация помогает быстро стабилизировать состояние пациента, снять острые симптомы и минимизировать риск возможных осложнений.
Ознакомиться с деталями – https://narcolog-na-dom-sankt-peterburg0.ru/vyzov-narkologa-na-dom-spb/
https://a47f7x20.com/onde-assistir-a-copa-do-brasil-2024/
Farmacia Asequible: ecommerce farmacia – farmacia de guardia en benidorm hoy
Современное общество сталкивается с серьёзными проблемами, связанными с зависимостями. Злоупотребление психоактивными веществами оказывает влияние не только на здоровье, но и на социальные отношения, а также на качество жизни. Наркологическая клиника “Новая Жизнь” предлагает широкий спектр услуг, направленных на восстановление и реабилитацию людей, которые сталкиваются с подобными трудностями.
Исследовать вопрос подробнее – [url=https://tajnyj-vyvod-iz-zapoya.ru/vyvod-iz-zapoya-v-kruglosutochno-v-omske.ru/]вывод из запоя на дому омск.[/url]
https://yalla-live-pro.com/d8a7d984d985d8a8d8a7d8b1d8a7d8a9-11-d8b7d984d8a8-d8acd8afd98ad8af-d985d986-d8a7d984d8a7d8aad8add8a7d8af-d982d8a8d984-d985d988d982d8b9/
Наша миссия заключается в предоставлении качественной помощи людям, страдающим от зависимостей. Мы стремимся создать безопасную и поддерживающую атмосферу, где каждый сможет получить необходимую помощь. Основная цель — восстановление здоровья, психоэмоционального состояния и социальной адаптации.
Углубиться в тему – [url=https://tajnyj-vyvod-iz-zapoya.ru/vyvod-iz-zapoya-cena-v-omske.ru/]vyvod-iz-zapoya omsk[/url]
Запой — это не просто бытовое пьянство, а одно из наиболее опасных проявлений алкогольной зависимости. Во время запоя организм перестаёт функционировать в нормальном режиме: сердечно-сосудистая система работает на износ, нервная система перегружена токсинами, а печень не справляется с нагрузкой. На этом фоне могут возникать тяжёлые осложнения — от судорог и гипогликемии до нарушения дыхания и алкогольного психоза. Чем дольше длится запой, тем глубже метаболические нарушения и выше риск серьёзных последствий.
Получить больше информации – https://vyvod-iz-zapoya-kolomna3.ru/vyvod-iz-zapoya-na-domu-v-kolomne/
Основные показания для вызова нарколога:
Подробнее – [url=https://narcolog-na-dom-v-irkutske00.ru/]выезд нарколога на дом цена иркутск[/url]
https://farmaciaasequible.shop/# tadalafil 40 mg precio
https://8otrt1ve.com/abel-prioriza-cruzamentos-e-finalizacoes-em-treino-do-palmeiras-de-olho-na-final-do-paulistao/
Медицинский вывод из запоя включает несколько обязательных этапов:
Ознакомиться с деталями – [url=https://vyvod-iz-zapoya-kolomna3.ru/]быстрый вывод из запоя[/url]
Каждый пациент получает индивидуальный план лечения, основанный на клинических исследованиях, данных лабораторных анализов и психологических тестов.
Исследовать вопрос подробнее – https://narkologicheskaya-klinika-dolgoprudnyj3.ru/chastnaya-narkologicheskaya-klinika-v-dolgoprudnom
enclomiphene buy enclomiphene buy enclomiphene
target pharmacy store: RxFree Meds – RxFree Meds
https://yalla-bar.com/d8a8d98ad986d8a7d986d8aa-d8a7d984d983d8b1d8a9-d8a7d984d8b0d987d8a8d98ad8a9-d8a3d8b5d8a8d8add8aa-d8a8d8b9d98ad8afd8a9-d8b9d986-d985d8ad/
https://farmaciaasequible.com/# epiduo gel genérico precio
Наша миссия заключается в предоставлении качественной помощи людям, страдающим от зависимостей. Мы стремимся создать безопасную и поддерживающую атмосферу, где каждый сможет получить необходимую помощь. Основная цель — восстановление здоровья, психоэмоционального состояния и социальной адаптации.
Ознакомиться с деталями – [url=https://tajnyj-vyvod-iz-zapoya.ru/vyvod-iz-zapoya-na-domu-v-omske.ru/]вывод из запоя капельница в омске[/url]
https://1lp5daep.com/onde-assistir-monaco-x-lille/
https://qatar-football-club.com/d8a7d984d8aad8b9d8a7d8afd984-d8a7d984d8b3d984d8a8d98a-d98ad8add8b3d985-d985d988d8a7d8acd987d8a9-d8a7d984d986d987d8b6d8a9-d988d8b9d985/
В данном обзоре представлены основные направления и тренды в области медицины. Мы обсудим актуальные проблемы здравоохранения, свежие открытия и новые подходы, которые меняют представление о лечении и профилактике заболеваний. Эта информация будет полезна как специалистам, так и широкой публике.
Детальнее – https://sadovod69.ru/anonimnoe-kodirovanie-alkogolizma-sovremennye-podhody-i-effektivnost
Этот информативный текст отличается привлекательным содержанием и актуальными данными. Мы предлагаем читателям взглянуть на привычные вещи под новым углом, предоставляя интересный и доступный материал. Получите удовольствие от чтения и расширьте кругозор!
Узнать больше – http://nakedbabes.tk/post/34
В этой статье вы найдете познавательную и занимательную информацию, которая поможет вам лучше понять мир вокруг. Мы собрали интересные данные, которые вдохновляют на размышления и побуждают к действиям. Открывайте новую информацию и получайте удовольствие от чтения!
Углубиться в тему – http://www.backupteleinformatica.com.br/?p=94
https://yalla-ludo.com/d985d988d8b9d8af-d988d8a7d984d982d986d988d8a7d8aa-d8a7d984d986d8a7d982d984d8a9-d984d985d8a8d8a7d8b1d8a7d8a9-d8a7d984d8a3d987d984d98a/
https://lucky-cola-ph.com/lucky-cola-bouns/
Каждая выездная бригада укомплектована портативным лабораторным оборудованием для экспресс-анализов крови и мочи, современными инфузионными насосами и средствами телеметрии. Это позволяет врачу контролировать жизненно важные параметры пациента в режиме реального времени и корректировать схему детоксикации на месте.
Углубиться в тему – https://narkologicheskaya-klinika-tyumen10.ru/narkologicheskaya-klinika-klinika-pomoshh-tyumen/
В данном обзоре представлены основные направления и тренды в области медицины. Мы обсудим актуальные проблемы здравоохранения, свежие открытия и новые подходы, которые меняют представление о лечении и профилактике заболеваний. Эта информация будет полезна как специалистам, так и широкой публике.
Подробнее – https://inamo.ru/vosstanovlenie-posle-zavisimosti-shagi-k-novomu-nachalu-i-borba-s-trudnostyami
Путь к свободе от зависимости начинается не с обещаний «просто перестать», а с профессионального медицинского вмешательства. В «Чистом Дыхании» мы применяем проверенные методы, которые работают там, где сила воли без нужной поддержки оказывается бессильной. Наша клиника в Долгопрудном работает круглосуточно — чтобы помощь была доступна в самый критический момент, когда человек ощущает острую потребность в детоксикации, снятии абстинентного синдрома или психологической поддержке.
Выяснить больше – [url=https://narkologicheskaya-klinika-dolgoprudnyj3.ru/]narkologicheskaya-klinika-dolgoprudnyj3.ru/[/url]
https://msc14vz6.com/policia-civil-de-sp-prende-mais-dois-suspeitos-de-ataques-a-torcedores-do-cruzeiro/
I am really enjoying the theme/design of your site. Do you
ever run into any web browser compatibility
issues? A few of my blog readers have complained about my site not working correctly in Explorer but looks great in Firefox.
Do you have any suggestions to help fix this problem?
https://p5eje2xi.com/stj-julgara-recurso-de-robinho-que-pode-alterar-pena-por-estupro-na-italia/
I am curious to find out what blog system you’re
using? I’m experiencing some small security problems with my
latest website and I’d like to find something more safeguarded.
Do you have any suggestions?
https://t1djsh47.com/
I was curious if you ever thought of changing the page layout of your site?
Its very well written; I love what youve got to say. But maybe you could a little more in the way of content so people could connect with
it better. Youve got an awful lot of text for only having one or two pictures.
Maybe you could space it out better?
https://jp3nej09.com/endrick-marca-e-real-madrid-vai-a-final-da-copa-do-rei-com-triunfo-dramatico-na-prorrogacao/
Write more, thats all I have to say. Literally, it seems as though you relied on the video to make your
point. You definitely know what youre talking about, why throw away
your intelligence on just posting videos to your weblog
when you could be giving us something informative to read?
https://germany-football.com/d983d8b4d981-d8bad98ad8a7d8a8d8a7d8aa-d8a7d984d8a3d987d984d98a-d8b6d8af-d8b5d986-d8afd8a7d988d986d8b2-d988d8add984-d988d8b4d98ad983/
https://khp1pp4f.com/fluminense-empata-sem-gols-com-madureira-no-carioca/
I was wondering if you ever considered changing the page layout of your website?
Its very well written; I love what youve got to say.
But maybe you could a little more in the way of content so people could connect with it better.
Youve got an awful lot of text for only having 1 or two pictures.
Maybe you could space it out better?
В этой статье собраны факты, которые освещают целый ряд важных вопросов. Мы стремимся предложить читателям четкую, достоверную информацию, которая поможет сформировать собственное мнение и лучше понять сложные аспекты рассматриваемой темы.
Выяснить больше – https://indianareentry.org/empowering-second-chances-the-mission-of-indiana-reentry-corporation
Современное общество сталкивается с серьёзными проблемами, связанными с зависимостями. Злоупотребление психоактивными веществами оказывает влияние не только на здоровье, но и на социальные отношения, а также на качество жизни. Наркологическая клиника “Новая Жизнь” предлагает широкий спектр услуг, направленных на восстановление и реабилитацию людей, которые сталкиваются с подобными трудностями.
Углубиться в тему – [url=https://tajnyj-vyvod-iz-zapoya.ru/vyvod-iz-zapoya-na-domu-v-omske.ru/]вывод из запоя недорого омск[/url]
https://suv8k9tx.com/quando-sera-o-proximo-jogo-do-flamengo-na-copa-do-brasil/
I’m amazed, I must say. Seldom do I come across a blog that’s both educative and interesting, and
let me tell you, you have hit the nail on the head.
The problem is an issue that too few folks are speaking intelligently about.
I am very happy I stumbled across this in my hunt for something regarding this.
https://kora-live-plus.com/d8aad8b4d983d98ad984-d8a7d984d8b2d985d8a7d984d983-d8a7d984d985d8aad988d982d8b9-d8a3d985d8a7d985-d8add8b1d8b3-d8a7d984d8add8afd988d8af/
Этот краткий обзор предлагает сжатую информацию из области медицины, включая ключевые факты и последние новости. Мы стремимся сделать информацию доступной и понятной для широкой аудитории, что позволит читателям оставаться в курсе актуальных событий в здравоохранении.
Подробнее тут – https://inei4u.ru/kkapelnitsa-ot-pohmelya
https://football-agents-eg.com/d8a7d984d8b2d985d8a7d984d983-d98ad8b1d981d8b6-d8b9d982d988d8a8d8a7d8aa-d8a7d984d8b1d8a7d8a8d8b7d8a9-d988d98ad8b7d8a7d984d8a8-d8a8d8a5/
https://yalla-shoot-tv-eg.com/d8b5d988d8b1-d8a7d8b3d8aad8b9d8afd8a7d8afd98bd8a7-d984d984d8add8afd8ab-d8a7d984d8aad8a7d8b1d98ad8aed98a-d8a7d984d8a3d987d984d98a/
Этот интересный отчет представляет собой сборник полезных фактов, касающихся актуальных тем. Мы проанализируем данные, чтобы вы могли сделать обоснованные выводы. Читайте, чтобы узнать больше о последних трендах и значимых событиях!
Детальнее – https://www.blzelectric.com/2016/11/14/how-to-install-a-ceiling-fan-where-no-fixture-exists
В этой публикации мы исследуем ключевые аспекты здоровья, включая влияние образа жизни на благополучие. Читатели узнают о важности правильного питания, физической активности и психического здоровья. Мы предоставим практические советы и рекомендации для поддержания здоровья и развития профилактических подходов.
Получить дополнительную информацию – https://ketokotleta.ru/the_articles/vyzov-narkologa-na-dom.html
http://enclomiphenebestprice.com/# buy enclomiphene online
Farmacia Asequible: movicol embarazo – la farmacia online
enclomiphene citrate enclomiphene best price enclomiphene testosterone
https://www.betsson-br.com/saiba-como-usar-melhor-o-seu-tempo-no-betsson/
https://tjk80nw9.com/qual-e-a-data-do-sorteio-das-quartas-de-final-da-copa-do-brasil/
I like the valuable information you supply in your articles.
I will bookmark your weblog and test again right here frequently.
I’m fairly sure I’ll learn plenty of new stuff
proper right here! Good luck for the next!
Этот информативный материал предлагает содержательную информацию по множеству задач и вопросов. Мы призываем вас исследовать различные идеи и факты, обобщая их для более глубокого понимания. Наша цель — сделать обучение доступным и увлекательным.
Подробнее – https://www.mergellandmannenkoor.nl/nieuw/uncategorized/korentreffen-gremeente-eijsden-margraten
https://football-player-eg.com/d981d98ad8afd98ad988-d8aad8a3d984d982-d985d8add985d8af-d8b5d984d8a7d8ad-d9883-d8a8d8b7d8a7d982d8a7d8aa-d8add985d8b1d8a7d8a1-d8a5d98a/
Эта статья предлагает захватывающий и полезный контент, который привлечет внимание широкого круга читателей. Мы постараемся представить тебе идеи, которые вдохновят вас на изменения в жизни и предоставят практические решения для повседневных вопросов. Читайте и вдохновляйтесь!
Получить дополнительную информацию – https://kaosjapan.com/nitamago%E3%80%80%E7%85%AE%E7%8E%89%E5%AD%90-kaos-kitchen
https://uagbobz8.com/botafogo-anuncia-contratacao-do-zagueiro-jair/
Hi there, yes this paragraph is truly fastidious and I have learned lot of things from it concerning blogging.
thanks.
В этом обзоре мы обсудим современные методы борьбы с зависимостями, включая медикаментозную терапию и психотерапию. Мы представим последние исследования и их результаты, чтобы читатели могли быть в курсе наиболее эффективных подходов к лечению и поддержке.
Получить больше информации – https://coyotehookah.ru/kapelnica-ot-zapoya-v-rostove-na-donu
https://football-players-eg.com/d8b3d8a7d988-d8a8d8a7d988d984d988-d98ad8add8a7d981d8b8-d8b9d984d989-d8b3d8acd984d987-d8a8d8aad8b9d8a7d8afd984-d8abd985d98ad986-d8a3d985/
https://vck2ws73.com/voce-esta-procurando-saber-qual-e-o-premio-da-copa-do-brasil/
An impressive share! I’ve just forwarded this onto a co-worker who has been doing
a little research on this. And he actually bought
me dinner simply because I found it for him…
lol. So allow me to reword this…. Thanks for the meal!!
But yeah, thanx for spending the time to discuss this subject
here on your web site.
https://97ui8ahx.com/o-brasil-tem-5-titulos-de-copa-do-mundo-as-conquistas-ocorreram-nos-anos-de-1958-1962-1970-1994-e-2002/
https://wv3heffq.com/onde-vai-passar-o-jogo-do-vasco-na-copa-do-brasil/
Howdy! I know this is kind of off topic but I was wondering which blog platform
are you using for this site? I’m getting fed up of WordPress because I’ve had
problems with hackers and I’m looking at options for another platform.
I would be awesome if you could point me in the direction of a
good platform.
https://xdmlayb7.com/neymar-desencanta-e-santos-se-reencontra-com-a-vitoria-no-paulistao/
Great information. Lucky me I recently found your site by chance (stumbleupon).
I’ve bookmarked it for later!
https://play-football-eg.com/d8b9d8a8d8af-d8a7d984d8add981d98ad8b8-d98ad8b1d8af-d8b9d984d989-d8a3d986d8a8d8a7d8a1-d8b9d988d8afd8aad987-d984d984d8a3d987d984d98a/
В этой статье мы рассматриваем разрушительное влияние зависимости на жизнь человека. Обсуждаются аспекты, такие как здоровье, отношения и профессиональные достижения. Читатели узнают о необходимости обращения за помощью и о путях к восстановлению.
Изучить вопрос глубже – https://pancreatus.com/anatomy/prichiny-zapoya-i-kak-lechit.html
В этой статье мы подробно рассматриваем проверенные методы борьбы с зависимостями, включая психотерапию, медикаментозное лечение и поддержку со стороны общества. Мы акцентируем внимание на важности комплексного подхода и возможности успешного восстановления для людей, столкнувшихся с этой проблемой.
Ознакомиться с деталями – https://lulustyle.ru/nnarkologicheskaya-pomosch-i-lechenie-zavisimosti
Алкогольная и наркотическая зависимости требуют незамедлительного медицинского вмешательства. Длительные запои или острое отравление могут привести к тяжелым осложнениям и серьезным проблемам со здоровьем. Клиника «МедТрезвость» в Санкт-Петербурге предлагает квалифицированную наркологическую помощь прямо на дому, обеспечивая полную конфиденциальность и безопасность пациента. Наши специалисты оперативно выезжают по адресу, проводят все необходимые процедуры и помогают максимально быстро стабилизировать состояние пациента в комфортных домашних условиях.
Ознакомиться с деталями – https://narcolog-na-dom-sankt-peterburg0.ru/psikhiatr-narkolog-na-dom-spb/
Каждый этап проводится квалифицированным специалистом, что позволяет достичь максимального терапевтического эффекта.
Разобраться лучше – [url=https://narcolog-na-dom-ekaterinburg0.ru/]нарколог на дом круглосуточно в екатеринбурге[/url]
Первичный этап заключается в оценке состояния пациента и быстром подборе схемы инфузионной терапии. Врач фиксирует показания ЭКГ, сатурацию кислорода и биохимический параметр глюкозы в крови. После этого подключается капельница с раствором для выведения продуктов распада алкоголя и одновременной коррекции показателей обмена веществ. Последующие визиты врача позволяют скорректировать терапию и предотвратить развитие побочных реакций.
Подробнее – [url=https://narkologicheskaya-pomoshh-ekaterinburg0.ru/]скорая наркологическая помощь[/url]
Visit this blog https://xy8204.com/tslhlzrqdyevpgxydlhgihvtjqx-06-2025/27157831717735532426899618992695439874439/
Выбор клиники — задача не только медицинская, но и стратегическая. Учитывать нужно не только наличие лицензии, но и содержание программ, их гибкость, участие родственников в процессе, а также прозрачность взаимодействия с пациентом. Именно эти аспекты позволяют отличить профессиональное учреждение от формального.
Исследовать вопрос подробнее – [url=https://narkologicheskaya-klinika-yaroslavl0.ru/]наркологические клиники алкоголизм ярославль.[/url]
Click here https://bq5527.com/爆笑 問題 ライブ-2025-06-16/54b242597520/
Алкогольная зависимость — хроническое заболевание, требующее своевременного вмешательства специалистов. В условиях нашего города круглосуточная анонимная помощь позволяет начать лечение без откладываний и в привычной обстановке. Клиника «Северная Звезда» предлагает комплексный подход: вызов врача на дом или стационарное пребывание в условиях полной конфиденциальности. Профессиональная команда обеспечивает детоксикацию, психологическую реабилитацию и последующую поддержку, помогая пациенту сделать первый шаг к новой, свободной от алкоголя жизни.
Изучить вопрос глубже – lechenie-alkogolizma-arkhangelsk0.ru/
http://enclomiphenebestprice.com/# enclomiphene buy
После поступления вызова на дом врачи клиники «Трезвый Путь» проводят лечение по четко разработанному алгоритму, обеспечивающему максимальную эффективность и безопасность:
Исследовать вопрос подробнее – [url=https://narcolog-na-dom-ekaterinburg0.ru/]нарколог на дом вывод из запоя[/url]
unicare pharmacy artane castle RxFree Meds australian pharmacy domperidone
Farmacia Asequible: ozempic comprar portugal – Farmacia Asequible
Want more info? Click here https://xs6976.com?cassino=mcee
Игнорирование состояния пациента или попытки самостоятельно справиться с запоем могут привести к опасным последствиям для жизни и здоровья. Поэтому важно своевременно обращаться за профессиональной медицинской помощью.
Подробнее тут – http://narcolog-na-dom-sankt-peterburg0.ru
«НаркоМед» основана группой узкопрофильных специалистов, чей опыт насчитывает более 15 лет в лечении зависимости. Клиника работает круглосуточно — вы можете рассчитывать на оперативное реагирование в любой час дня и ночи. Анонимность пациентов сохраняется на уровне медицинской тайны: персональные данные и диагноз не разглашаются.
Получить больше информации – [url=https://narkologicheskaya-klinika-ekaterinburg0.ru/]частная наркологическая клиника в екатеринбурге[/url]
https://enclomiphenebestprice.shop/# enclomiphene
Во-первых, мы фокусируемся на медицинской детоксикации, которая является первоочередной задачей при лечении зависимостей. Этот процесс позволяет удалить токсические вещества из организма и улучшить общее состояние пациента. Мы применяем современные методики, которые помогают минимизировать симптомы абстиненции и обеспечить комфортное пребывание в клинике.
Изучить вопрос глубже – [url=https://kapelnica-ot-zapoya-irkutsk.ru/]капельница от запоя вызов[/url]
Обращение к врачу становится жизненно необходимым, если пациент находится в состоянии длительного запоя, при котором организм не справляется с накоплением токсинов. Если запой продолжается более двух-трёх дней, в теле накапливаются вредные вещества, что ведёт к нарушениям работы внутренних органов, развитию абстинентного синдрома и появлению психических нарушений. Также, если у пациента наблюдаются симптомы, такие как частая рвота, спутанность сознания, судороги или резкие скачки артериального давления, это сигнал к незамедлительному вызову специалиста. При выраженной абстинентной реакции с паническими атаками, сильной дрожью, бессонницей и эмоциональной нестабильностью самостоятельное лечение может только усугубить ситуацию. Если появляются признаки алкогольного психоза – галлюцинации, агрессивность или спутанность сознания – вызов нарколога становится обязательным для предотвращения дальнейших осложнений. Также, когда требуется подготовка к процедурам кодирования от зависимости, необходима качественная детоксикация организма, что также является показанием к срочному обращению за профессиональной помощью.
Изучить вопрос глубже – https://narcolog-na-dom-ekaterinburg0.ru/zapoj-narkolog-na-dom-ekb
Find out all about this https://bt5375.com/item/?search_word=フルレングス(パンツ丈)&searchword_flag=1
Каждый этап проводится квалифицированным специалистом, что позволяет достичь максимального терапевтического эффекта.
Получить дополнительную информацию – [url=https://narcolog-na-dom-ekaterinburg0.ru/]врач нарколог на дом екатеринбург[/url]
Первый этап направлен на выведение токсинов и стабилизацию функций жизненно важных органов. Применяются инфузионные растворы, гепатопротекторы и препараты для нормализации электролитного баланса. Доза и состав подбираются индивидуально после оценки лабораторных показателей.
Получить дополнительные сведения – [url=https://lechenie-narkomanii-ekaterinburg0.ru/]лечение наркомании нарколог[/url]
Наркологическая помощь на дому становится всё более востребованной благодаря своей доступности, конфиденциальности и эффективности. Клиника «МедТрезвость» предлагает пациентам целый ряд важных преимуществ:
Ознакомиться с деталями – http://narcolog-na-dom-sankt-peterburg0.ru/
Первичный этап заключается в оценке состояния пациента и быстром подборе схемы инфузионной терапии. Врач фиксирует показания ЭКГ, сатурацию кислорода и биохимический параметр глюкозы в крови. После этого подключается капельница с раствором для выведения продуктов распада алкоголя и одновременной коррекции показателей обмена веществ. Последующие визиты врача позволяют скорректировать терапию и предотвратить развитие побочных реакций.
Выяснить больше – [url=https://narkologicheskaya-pomoshh-ekaterinburg0.ru/]круглосуточная наркологическая помощь[/url]
Наркологическая помощь на дому становится всё более востребованной благодаря своей доступности, конфиденциальности и эффективности. Клиника «МедТрезвость» предлагает пациентам целый ряд важных преимуществ:
Получить дополнительные сведения – [url=https://narcolog-na-dom-sankt-peterburg0.ru/]нарколог на дом вывод из запоя в санкт-петербурге[/url]
Выбор клиники — задача не только медицинская, но и стратегическая. Учитывать нужно не только наличие лицензии, но и содержание программ, их гибкость, участие родственников в процессе, а также прозрачность взаимодействия с пациентом. Именно эти аспекты позволяют отличить профессиональное учреждение от формального.
Подробнее тут – https://narkologicheskaya-klinika-yaroslavl0.ru/chastnaya-narkologicheskaya-klinika-yaroslavl
Check out this content https://tk7706.com?slot=ixd
Learn more about this https://news-813184.zs8239.com/ju/7/
Read the full review here https://pertandingan-bhayangkara-fc-zwqepzlhmjxfdmfdqlwsjfrioslyvfvnoveqtshthmnplq.le2377.com
Наркологическая помощь на дому становится всё более востребованной благодаря своей доступности, конфиденциальности и эффективности. Клиника «МедТрезвость» предлагает пациентам целый ряд важных преимуществ:
Разобраться лучше – http://narcolog-na-dom-sankt-peterburg0.ru/narkolog-na-dom-czena-spb/
«НаркоМед» основана группой узкопрофильных специалистов, чей опыт насчитывает более 15 лет в лечении зависимости. Клиника работает круглосуточно — вы можете рассчитывать на оперативное реагирование в любой час дня и ночи. Анонимность пациентов сохраняется на уровне медицинской тайны: персональные данные и диагноз не разглашаются.
Выяснить больше – [url=https://narkologicheskaya-klinika-ekaterinburg0.ru/]частная наркологическая клиника свердловская область[/url]
Обращение к врачу становится жизненно необходимым, если пациент находится в состоянии длительного запоя, при котором организм не справляется с накоплением токсинов. Если запой продолжается более двух-трёх дней, в теле накапливаются вредные вещества, что ведёт к нарушениям работы внутренних органов, развитию абстинентного синдрома и появлению психических нарушений. Также, если у пациента наблюдаются симптомы, такие как частая рвота, спутанность сознания, судороги или резкие скачки артериального давления, это сигнал к незамедлительному вызову специалиста. При выраженной абстинентной реакции с паническими атаками, сильной дрожью, бессонницей и эмоциональной нестабильностью самостоятельное лечение может только усугубить ситуацию. Если появляются признаки алкогольного психоза – галлюцинации, агрессивность или спутанность сознания – вызов нарколога становится обязательным для предотвращения дальнейших осложнений. Также, когда требуется подготовка к процедурам кодирования от зависимости, необходима качественная детоксикация организма, что также является показанием к срочному обращению за профессиональной помощью.
Узнать больше – [url=https://narcolog-na-dom-ekaterinburg0.ru/]врач нарколог на дом екатеринбург[/url]
Get more insights here https://yx9272.com/g/19d54499436/
Качественная детоксикация помогает быстро стабилизировать состояние пациента, снять острые симптомы и минимизировать риск возможных осложнений.
Изучить вопрос глубже – [url=https://narcolog-na-dom-sankt-peterburg0.ru/]вызов врача нарколога на дом[/url]
See the highlights https://rd.op5927.com
Если пациенту требуется постоянный мониторинг или комплексное лечение, мы обеспечиваем круглосуточное пребывание в стационаре. Здесь доступны углублённая диагностика — УЗИ органов брюшной полости, расширенные анализы крови, кардиомониторинг — и коррекция терапии в режиме реального времени. Комфортные палаты, ежедневное наблюдение медсестры и консультации психотерапевта создают условия для быстрого и безопасного выхода из зависимости.
Узнать больше – [url=https://narkologicheskaya-pomoshh-ekaterinburg0.ru/]наркологическая помощь на дому в екатеринбурге[/url]
Learn more on this page https://ks9879.com?cassino=wo
Если пациенту требуется постоянный мониторинг или комплексное лечение, мы обеспечиваем круглосуточное пребывание в стационаре. Здесь доступны углублённая диагностика — УЗИ органов брюшной полости, расширенные анализы крови, кардиомониторинг — и коррекция терапии в режиме реального времени. Комфортные палаты, ежедневное наблюдение медсестры и консультации психотерапевта создают условия для быстрого и безопасного выхода из зависимости.
Ознакомиться с деталями – [url=https://narkologicheskaya-pomoshh-ekaterinburg0.ru/]наркологическая клиника клиника помощь[/url]
Наркологическая клиника — это не просто место, где пациенту оказывают медицинскую помощь. Это учреждение, где формируется стратегия полного восстановления, включающая не только физическое оздоровление, но и психоэмоциональную стабилизацию. В Ярославле работают как частные, так и государственные клиники, однако их подходы, уровень сервиса и состав команд могут существенно различаться. По данным Минздрава РФ, высокий процент успешных исходов наблюдается в тех учреждениях, где реализуется персонализированная модель лечения и постлечебной поддержки.
Узнать больше – https://narkologicheskaya-klinika-yaroslavl0.ru/lechenie-narkomanii-i-alkogolizma-yaroslavl/
Прежде чем принимать решение, важно изучить сайт клиники. В надёжных учреждениях размещена полная информация о врачах, их образовании и опыте работы. Кроме того, пациентам предлагается пройти предварительную консультацию — чаще всего она проводится анонимно и включает первичную диагностику. Это позволяет оценить профессионализм команды ещё до начала терапии.
Изучить вопрос глубже – [url=https://narkologicheskaya-klinika-yaroslavl0.ru/]наркологическая клиника нарколог ярославль[/url]
Check out the information https://lbjwsfzv.ww6659.com
Преимущество
Углубиться в тему – [url=https://narcolog-na-dom-ekaterinburg0.ru/]нарколог на дом вывод екатеринбург[/url]
https://enclomiphenebestprice.com/# enclomiphene online
Первичный этап заключается в оценке состояния пациента и быстром подборе схемы инфузионной терапии. Врач фиксирует показания ЭКГ, сатурацию кислорода и биохимический параметр глюкозы в крови. После этого подключается капельница с раствором для выведения продуктов распада алкоголя и одновременной коррекции показателей обмена веществ. Последующие визиты врача позволяют скорректировать терапию и предотвратить развитие побочных реакций.
Углубиться в тему – http://narkologicheskaya-pomoshh-ekaterinburg0.ru/vyzvat-narkologicheskuyu-pomoshh-v-ekb/
Каждый пациент получает индивидуальный план лечения, основанный на клинических исследованиях, данных лабораторных анализов и психологических тестов.
Ознакомиться с деталями – https://narkologicheskaya-klinika-dolgoprudnyj3.ru/chastnaya-narkologicheskaya-klinika-v-dolgoprudnom/
Как отмечает руководитель клинико-диагностического отдела ФГБУ «Национальный центр наркологии», «участие в терапии нескольких специалистов разных направлений позволяет учитывать не только симптомы, но и глубинные причины зависимости». Именно такой подход снижает риск рецидивов и повышает эффективность лечения.
Узнать больше – [url=https://narkologicheskaya-klinika-yaroslavl0.ru/]narkologicheskie kliniki alkogolizm jaroslavl'[/url]
Обращение к врачу становится жизненно необходимым, если пациент находится в состоянии длительного запоя, при котором организм не справляется с накоплением токсинов. Если запой продолжается более двух-трёх дней, в теле накапливаются вредные вещества, что ведёт к нарушениям работы внутренних органов, развитию абстинентного синдрома и появлению психических нарушений. Также, если у пациента наблюдаются симптомы, такие как частая рвота, спутанность сознания, судороги или резкие скачки артериального давления, это сигнал к незамедлительному вызову специалиста. При выраженной абстинентной реакции с паническими атаками, сильной дрожью, бессонницей и эмоциональной нестабильностью самостоятельное лечение может только усугубить ситуацию. Если появляются признаки алкогольного психоза – галлюцинации, агрессивность или спутанность сознания – вызов нарколога становится обязательным для предотвращения дальнейших осложнений. Также, когда требуется подготовка к процедурам кодирования от зависимости, необходима качественная детоксикация организма, что также является показанием к срочному обращению за профессиональной помощью.
Подробнее – [url=https://narcolog-na-dom-ekaterinburg0.ru/]narkolog-na-dom-czena ekaterinburg[/url]
Медицинский вывод из запоя включает несколько обязательных этапов:
Получить дополнительную информацию – http://vyvod-iz-zapoya-kolomna3.ru/vyvod-iz-zapoya-stacionar-v-kolomne/
Каждый этап проводится квалифицированным специалистом, что позволяет достичь максимального терапевтического эффекта.
Изучить вопрос глубже – [url=https://narcolog-na-dom-ekaterinburg0.ru/]врач нарколог на дом[/url]
Обращение к врачу становится жизненно необходимым, если пациент находится в состоянии длительного запоя, при котором организм не справляется с накоплением токсинов. Если запой продолжается более двух-трёх дней, в теле накапливаются вредные вещества, что ведёт к нарушениям работы внутренних органов, развитию абстинентного синдрома и появлению психических нарушений. Также, если у пациента наблюдаются симптомы, такие как частая рвота, спутанность сознания, судороги или резкие скачки артериального давления, это сигнал к незамедлительному вызову специалиста. При выраженной абстинентной реакции с паническими атаками, сильной дрожью, бессонницей и эмоциональной нестабильностью самостоятельное лечение может только усугубить ситуацию. Если появляются признаки алкогольного психоза – галлюцинации, агрессивность или спутанность сознания – вызов нарколога становится обязательным для предотвращения дальнейших осложнений. Также, когда требуется подготовка к процедурам кодирования от зависимости, необходима качественная детоксикация организма, что также является показанием к срочному обращению за профессиональной помощью.
Изучить вопрос глубже – http://narcolog-na-dom-ekaterinburg0.ru/zapoj-narkolog-na-dom-ekb/https://narcolog-na-dom-ekaterinburg0.ru
See what we’re offering https://tk7572.com/2025-06-16-9
dos farmas Farmacia Asequible movicol sobre
Служба выездных бригад работает круглосуточно и готова выехать по любому адресу в черте города и ближайших пригородах. Врач прибывает полностью оснащённым — с набором препаратов для восстановления водно-электролитного баланса, коррекции артериального давления и поддержки функций печени. Первая помощь включает введение детоксикационных растворов, средств для нормализации работы сердечно-сосудистой системы и купирования абстинентного синдрома.
Подробнее тут – https://narkologicheskaya-pomoshh-ekaterinburg0.ru/vyzvat-narkologicheskuyu-pomoshh-v-ekb
va online pharmacy: RxFree Meds – coumadin pharmacy
В «Чистом Дыхании» вы встретите врачей-наркологов, психиатров и психологов с многолетним опытом, готовых приехать на дом для первичной детоксикации или принять в стационаре для углублённой терапии. Мы соблюдаем строгие медицинские протоколы и гарантируем безопасность даже в самых тяжёлых случаях.
Углубиться в тему – https://narkologicheskaya-klinika-dolgoprudnyj3.ru/chastnaya-narkologicheskaya-klinika-v-dolgoprudnom
Выездной формат позволяет избежать контактов с другими пациентами в клинике и очистить организм в привычной обстановке. Специалисты самостоятельно привозят весь необходимый набор медикаментов и расходных материалов.
Углубиться в тему – [url=https://narkologicheskaya-klinika-ekaterinburg0.ru/]наркологические клиники алкоголизм екатеринбург[/url]
Даже при наличии комфортных условий и современных медикаментов эффективность будет минимальной, если пациент не получает психологическую помощь. У многих зависимость сопровождается тревожными или депрессивными состояниями, травматическим опытом или сложными семейными отношениями. Без проработки этих аспектов высокий риск того, что после выписки произойдёт рецидив.
Изучить вопрос глубже – [url=https://narkologicheskaya-klinika-yaroslavl0.ru/]бесплатная наркологическая клиника в ярославле[/url]
Find out how to do it https://lqq3865.com/?? ?? ??-542/43f568494272/
Обращение к врачу становится жизненно необходимым, если пациент находится в состоянии длительного запоя, при котором организм не справляется с накоплением токсинов. Если запой продолжается более двух-трёх дней, в теле накапливаются вредные вещества, что ведёт к нарушениям работы внутренних органов, развитию абстинентного синдрома и появлению психических нарушений. Также, если у пациента наблюдаются симптомы, такие как частая рвота, спутанность сознания, судороги или резкие скачки артериального давления, это сигнал к незамедлительному вызову специалиста. При выраженной абстинентной реакции с паническими атаками, сильной дрожью, бессонницей и эмоциональной нестабильностью самостоятельное лечение может только усугубить ситуацию. Если появляются признаки алкогольного психоза – галлюцинации, агрессивность или спутанность сознания – вызов нарколога становится обязательным для предотвращения дальнейших осложнений. Также, когда требуется подготовка к процедурам кодирования от зависимости, необходима качественная детоксикация организма, что также является показанием к срочному обращению за профессиональной помощью.
Подробнее можно узнать тут – [url=https://narcolog-na-dom-ekaterinburg0.ru/]нарколог на дом в екатеринбурге[/url]
Discover this https://ds7637.com?casino=gja
Выездной формат позволяет избежать контактов с другими пациентами в клинике и очистить организм в привычной обстановке. Специалисты самостоятельно привозят весь необходимый набор медикаментов и расходных материалов.
Выяснить больше – [url=https://narkologicheskaya-klinika-ekaterinburg0.ru/]narkologicheskie kliniki alkogolizm ekaterinburg[/url]
Discover this https://tk7811.com/??? ???? ??-45/61b124998689/
Find more information https://467484142135556425.zs8832.com
Visit this page https://re12310.com/bolhf/53a20599741/
Преимущество
Изучить вопрос глубже – [url=https://narcolog-na-dom-ekaterinburg0.ru/]нарколог на дом анонимно в екатеринбурге[/url]
Наша команда врачей оперативно реагирует на каждый вызов, оказывая квалифицированную медицинскую помощь на дому. Специалисты проводят полный комплекс лечебных мероприятий, направленных на безопасное снятие интоксикации, детоксикацию и облегчение симптомов абстиненции.
Углубиться в тему – [url=https://narcolog-na-dom-ekaterinburg0.ru/]запой нарколог на дом в екатеринбурге[/url]
Check out the information https://zx2975.com?cassino=fyuhl
Используя современные инфузионные системы, мы постепенно вводим растворы для выведения токсинов, коррекции водно-электролитного баланса и восстановления функции печени. Параллельно подбираются препараты для снятия абстинентного синдрома, купирования тревожности и нормализации сна.
Детальнее – [url=https://narkologicheskaya-klinika-dolgoprudnyj3.ru/]частная наркологическая клиника[/url]
Click to read https://367763.lh8622.com
Первый этап направлен на выведение токсинов и стабилизацию функций жизненно важных органов. Применяются инфузионные растворы, гепатопротекторы и препараты для нормализации электролитного баланса. Доза и состав подбираются индивидуально после оценки лабораторных показателей.
Получить больше информации – [url=https://lechenie-narkomanii-ekaterinburg0.ru/]centr lecheniya narkomanii ekaterinburg[/url]
Explore the options here https://546wqa.com/2025-06-16/4495214164631985261/
Обращение к врачу становится жизненно необходимым, если пациент находится в состоянии длительного запоя, при котором организм не справляется с накоплением токсинов. Если запой продолжается более двух-трёх дней, в теле накапливаются вредные вещества, что ведёт к нарушениям работы внутренних органов, развитию абстинентного синдрома и появлению психических нарушений. Также, если у пациента наблюдаются симптомы, такие как частая рвота, спутанность сознания, судороги или резкие скачки артериального давления, это сигнал к незамедлительному вызову специалиста. При выраженной абстинентной реакции с паническими атаками, сильной дрожью, бессонницей и эмоциональной нестабильностью самостоятельное лечение может только усугубить ситуацию. Если появляются признаки алкогольного психоза – галлюцинации, агрессивность или спутанность сознания – вызов нарколога становится обязательным для предотвращения дальнейших осложнений. Также, когда требуется подготовка к процедурам кодирования от зависимости, необходима качественная детоксикация организма, что также является показанием к срочному обращению за профессиональной помощью.
Исследовать вопрос подробнее – [url=https://narcolog-na-dom-ekaterinburg0.ru/]вызов врача нарколога на дом екатеринбург[/url]
Мы предлагаем полный спектр услуг по лечению зависимостей:
Ознакомиться с деталями – [url=https://narkologicheskaya-klinika-dolgoprudnyj3.ru/]chastnaya-narkologicheskaya-klinika[/url]
http://farmaciaasequible.com/# sildenafilo 50 mg
Обращение к врачу становится жизненно необходимым, если пациент находится в состоянии длительного запоя, при котором организм не справляется с накоплением токсинов. Если запой продолжается более двух-трёх дней, в теле накапливаются вредные вещества, что ведёт к нарушениям работы внутренних органов, развитию абстинентного синдрома и появлению психических нарушений. Также, если у пациента наблюдаются симптомы, такие как частая рвота, спутанность сознания, судороги или резкие скачки артериального давления, это сигнал к незамедлительному вызову специалиста. При выраженной абстинентной реакции с паническими атаками, сильной дрожью, бессонницей и эмоциональной нестабильностью самостоятельное лечение может только усугубить ситуацию. Если появляются признаки алкогольного психоза – галлюцинации, агрессивность или спутанность сознания – вызов нарколога становится обязательным для предотвращения дальнейших осложнений. Также, когда требуется подготовка к процедурам кодирования от зависимости, необходима качественная детоксикация организма, что также является показанием к срочному обращению за профессиональной помощью.
Разобраться лучше – [url=https://narcolog-na-dom-ekaterinburg0.ru/]нарколог на дом круглосуточно екатеринбург[/url]
Преимущество
Изучить вопрос глубже – http://narcolog-na-dom-ekaterinburg0.ru
See the highlights https://ks2952.com?cassino=nct
Выездной формат позволяет избежать контактов с другими пациентами в клинике и очистить организм в привычной обстановке. Специалисты самостоятельно привозят весь необходимый набор медикаментов и расходных материалов.
Получить больше информации – https://narkologicheskaya-klinika-ekaterinburg0.ru/chastnaya-narkologicheskaya-klinika-v-ekb
Медицинский вывод из запоя включает несколько обязательных этапов:
Получить дополнительные сведения – http://vyvod-iz-zapoya-kolomna3.ru/
Алкогольная и наркотическая зависимости требуют незамедлительного медицинского вмешательства. Длительные запои или острое отравление могут привести к тяжелым осложнениям и серьезным проблемам со здоровьем. Клиника «МедТрезвость» в Санкт-Петербурге предлагает квалифицированную наркологическую помощь прямо на дому, обеспечивая полную конфиденциальность и безопасность пациента. Наши специалисты оперативно выезжают по адресу, проводят все необходимые процедуры и помогают максимально быстро стабилизировать состояние пациента в комфортных домашних условиях.
Получить больше информации – http://narcolog-na-dom-sankt-peterburg0.ru
Learn more on this page https://qlvxjx.juswn2.com
Visit this page https://zx2975.com?cassino=kocnw
Достаточно связаться по телефону или через мессенджер и сообщить минимальный набор данных — имя и адрес. Все остальные детали обсуждаются устно, без фиксации на бумаге.
Получить больше информации – [url=https://narkologicheskaya-klinika-ekaterinburg0.ru/]наркологическая клиника екатеринбург[/url]
Follow this link https://tk9377.com?casino=dyquw
enclomiphene online enclomiphene best price enclomiphene
Go visit this site https://ovjgtr.su9299.com
Learn more at this site https://7ajy05g.ss6232.com
Этот документ охватывает важные аспекты медицинской науки, сосредотачиваясь на ключевых вопросах, касающихся здоровья населения. Мы рассматриваем свежие исследования, клинические рекомендации и лучшие практики, которые помогут улучшить качество лечения и профилактики заболеваний. Читатели получат возможность углубиться в различные медицинские дисциплины.
Выяснить больше – https://loverust.ru/metody-bystrogo-vyvoda-iz-zapoya-pomoshh-i-vosstanovlenie-organizma
See the full details https://zs5275.com/ゲーフラ 作り方-62667/01c550794491/
Check the new features here https://zs5272.com/r
Эта статья сочетает в себе как полезные, так и интересные сведения, которые обогатят ваше понимание насущных тем. Мы предлагаем практические советы и рекомендации, которые легко внедрить в повседневную жизнь. Узнайте, как улучшить свои навыки и обогатить свой опыт с помощью простых, но эффективных решений.
Подробнее можно узнать тут – https://99ok.claims/no-hu-than-tai
В этом обзорном материале представлены увлекательные детали, которые находят отражение в различных аспектах жизни. Мы исследуем непонятные и интересные моменты, позволяя читателю увидеть картину целиком. Погрузитесь в мир знаний и удивительных открытий!
Углубиться в тему – https://access-deals.com/ubdyo-extra-durable-door-mat-dirt-trapping-outdoor-welcome-mats-non-slip-outdoor-door-mats-low-profile-front-door-mat-indoor-30-x-17-bright-brown
https://enclomiphenebestprice.shop/# enclomiphene
Get more info here https://tk37819.com/ベンチャーズ ライブ 2018-2025-06-16/80d99098929/
Эта статья сочетает в себе как полезные, так и интересные сведения, которые обогатят ваше понимание насущных тем. Мы предлагаем практические советы и рекомендации, которые легко внедрить в повседневную жизнь. Узнайте, как улучшить свои навыки и обогатить свой опыт с помощью простых, но эффективных решений.
Разобраться лучше – https://apotheke-am-ukb.de/favicon
pharmacy viagra price: pharmacy home delivery – RxFree Meds
Look at this article https://qt9563.com/d3-4784
В этой публикации мы предлагаем подробные объяснения по актуальным вопросам, чтобы помочь читателям глубже понять их. Четкость и структурированность материала сделают его удобным для усвоения и применения в повседневной жизни.
Детальнее – https://www.thiepcuoidinhdac.com/chao-moi-nguoi
В условиях стационара или на дневном стационаре применяются сбалансированные инфузионные растворы, витамины, антиоксиданты и препараты для поддержки печени. Цель — минимизировать интоксикацию и предотвратить осложнения.
Разобраться лучше – klinika lecheniya alkogolizma tjumen’
В этой статье мы рассмотрим современные достижения в области медицины, включая инновационные методы лечения и диагностики. Мы обсудим важность профилактики заболеваний и роль технологий в улучшении качества здравоохранения. Читатели узнают о влиянии медицины на повседневную жизнь и ее значение для современного общества.
Получить дополнительную информацию – https://netlekarstvam.com/narodnye-sredstva/raznoe/lechenie-narkomanii-podhody-i-strategii.html
Look at this article https://ws3788.com?cassino=libul
В этой статье-обзоре мы соберем актуальную информацию и интересные факты, которые освещают важные темы. Читатели смогут ознакомиться с различными мнениями и подходами, что позволит им расширить кругозор и глубже понять обсуждаемые вопросы.
Изучить вопрос глубже – https://maisonludvig.fr/produit/t-shirt-100-lin-bleu-marine
В нашем центре доступны следующие виды помощи:
Углубиться в тему – [url=https://tajnyj-vyvod-iz-zapoya.ru/vyvod-iz-zapoya-cena-v-omske.ru/]вывод из запоя недорого[/url]
Эта информационная заметка содержит увлекательные сведения, которые могут вас удивить! Мы собрали интересные факты, которые сделают вашу жизнь ярче и полнее. Узнайте нечто новое о привычных аспектах повседневности и откройте для себя удивительный мир информации.
Ознакомиться с деталями – https://www.viqtor.nl/florian-klauer-14840-unsplash
Этот информативный текст выделяется своими захватывающими аспектами, которые делают сложные темы доступными и понятными. Мы стремимся предложить читателям глубину знаний вместе с разнообразием интересных фактов. Откройте новые горизонты и развивайте свои способности познавать мир!
Получить дополнительную информацию – https://pitiona.com/2016/03/virtual-dreamtime
В этой статье-обзоре мы соберем актуальную информацию и интересные факты, которые освещают важные темы. Читатели смогут ознакомиться с различными мнениями и подходами, что позволит им расширить кругозор и глубже понять обсуждаемые вопросы.
Подробнее можно узнать тут – https://audit.gctu.edu.gh/news/gctu-inaugurates-its-maiden-audit-committee
Have a look here https://175vfd.com/u-16-06-2025/
Check out what’s new https://jtso40n3.xy2437.com
Read this post https://279721.lc2272.com
Find out how to do it https://2199561.ah4dhtr8.com
Наркологическая клиника в Каменске-Уральском разрабатывает программы лечения, учитывая особенности различных видов зависимости: алкогольной, наркотической, лекарственной. Каждая программа ориентирована на индивидуальные потребности пациента, что подтверждается опытом ведущих российских реабилитационных центров. Подробнее о лечении зависимости читайте на официальном сайте Минздрава.
Получить дополнительную информацию – https://narkologicheskaya-klinika-kamensk-uralskij11.ru/
Назначение
Изучить вопрос глубже – [url=https://kapelnicza-ot-zapoya-pervouralsk11.ru/]капельница от запоя первоуральск[/url]
Лечение хронического алкоголизма начинается с купирования абстинентного синдрома, после чего проводятся мероприятия по нормализации работы печени, сердечно-сосудистой и нервной системы. Назначаются гепатопротекторы, ноотропы, витамины группы B. Также проводится противорецидивная терапия.
Ознакомиться с деталями – https://narkologicheskaya-klinika-v-yaroslavle12.ru/narkologicheskaya-klinika-telefon-v-yaroslavle
See what we’ve got https://wh14gz.com?cassino=rff
RxFree Meds reliable rx pharmacy Viagra Gold
На сайте Минздрава указаны общие клинические рекомендации по выведению из запоя, включая допустимые дозировки и протоколы лечения.
Разобраться лучше – [url=https://vyvod-iz-zapoya-v-ryazani12.ru/]вывод из запоя капельница[/url]
When 3, 4, or 5 scatter symbols land on the reels, Big Bass Christmas Bash awards 10, 15, or 20 free spins. Here is where fish money symbols may be collected. Fish land with values of 2x to 5,000x the bet, and each Fisherman in view collects their prizes. The Fisherman is also wild, so it substitutes any regular pay symbol, but wilds only appear in free spins. In the base game, should 2 scatters land, there is a chance another scatter is brought into view by these two methods: Dive down to the depths under the frozen water for some festive fun in Christmas Big Bass Bonanza, the slot from Pragmatic Play. These aquatic creatures are out to prove that it’s not just humans who can enjoy Christmas with a series of jolly prizes hidden below the ice. Simple but perfect for spreading a bit of seasonal cheer, you could be even happier if you walk away with the top prize of x2100.
https://onlinesequencer.net/forum/user-200185.html
While some slots fans enjoy the nostalgic experience of retro slots without any features, many online gamblers enjoy the fun that modern slot features can add to the experience. When you spin the reels in Big Bass Bonanza, you could land wilds and money symbols that increase your payouts, as well as scatter symbols, which can reward you with up to 20 extra spins. There you have it, another tidy addition to the swiftly expanding Big Bass Bonanza line-up. A pretty successful addition, too, it’s hard not to say, due to the cosy familiarity of its fish, fisherman, and return features, with the added intrigue of something new. The tremendously greater winning potential probably won’t hurt its appeal either. For new players, bet365 Games provides a solid welcome bonus that includes up to 200 free spins with no wagering requirements. This feature makes bet365 Games a fantastic choice for players who want a straightforward bonus without hidden terms, which if you’re reading this then you likely are!
Для успешного лечения зависимости необходима тщательная диагностика. В клинике проводят полное обследование пациента, включающее:
Получить больше информации – [url=https://narkologicheskaya-klinika-v-murmanske12.ru/]наркологическая клиника нарколог[/url]
Одним из ключевых этапов терапии является медикаментозное устранение абстинентного синдрома, что значительно облегчает состояние пациента. Для этого используются препараты, рекомендованные к применению ведущими специалистами в области наркологии. Примером могут служить протоколы лечения, описанные на официальном портале наркологической помощи России.
Детальнее – [url=https://narkologicheskaya-klinika-kamensk-uralskij11.ru/]наркологическая клиника в каменске-уральском[/url]
Работа клиники строится на принципах доказательной медицины и индивидуального подхода. При поступлении пациента осуществляется всесторонняя диагностика, включающая анализы крови, оценку психического состояния и анамнез. По результатам разрабатывается персонализированный курс терапии.
Ознакомиться с деталями – http://narkologicheskaya-klinika-v-ryazani12.ru
Наша команда врачей оперативно реагирует на каждый вызов, оказывая квалифицированную медицинскую помощь на дому. Специалисты проводят полный комплекс лечебных мероприятий, направленных на безопасное снятие интоксикации, детоксикацию и облегчение симптомов абстиненции.
Ознакомиться с деталями – [url=https://narcolog-na-dom-ekaterinburg0.ru/]вызов врача нарколога на дом екатеринбург[/url]
Вызов нарколога на дом в Ярославле — это удобный и эффективный способ начать лечение или оказать первую помощь при острых состояниях, связанных с алкоголизмом, наркотической зависимостью или другими психоактивными веществами. Основные преимущества такой услуги заключаются в следующем:
Узнать больше – [url=https://narkolog-na-dom-v-yaroslavle12.ru/]выезд нарколога на дом[/url]
Компоненты
Подробнее можно узнать тут – [url=https://kapelnicza-ot-zapoya-pervouralsk11.ru/]капельница от запоя цена первоуральск[/url]
Основной этап в лечении — детоксикация организма от токсичных веществ, вызывающих интоксикацию. В клинике применяют современные методы капельниц и медикаментозной поддержки, включая препараты для снятия абстинентного синдрома.
Получить дополнительные сведения – [url=https://narkologicheskaya-klinika-v-murmanske12.ru/]наркологическая клиника цены мурманск[/url]
В Рязани возможен как стационарный, так и амбулаторный вывод из запоя. Выбор подхода зависит от состояния пациента, выраженности симптомов и наличия сопутствующих нарушений.
Ознакомиться с деталями – [url=https://vyvod-iz-zapoya-v-ryazani12.ru/]нарколог вывод из запоя[/url]
Одним из ключевых этапов терапии является медикаментозное устранение абстинентного синдрома, что значительно облегчает состояние пациента. Для этого используются препараты, рекомендованные к применению ведущими специалистами в области наркологии. Примером могут служить протоколы лечения, описанные на официальном портале наркологической помощи России.
Исследовать вопрос подробнее – https://narkologicheskaya-klinika-kamensk-uralskij11.ru/anonimnaya-narkologicheskaya-klinika-v-kamensk-uralskom
Наркологическая клиника в Каменске-Уральском разрабатывает программы лечения, учитывая особенности различных видов зависимости: алкогольной, наркотической, лекарственной. Каждая программа ориентирована на индивидуальные потребности пациента, что подтверждается опытом ведущих российских реабилитационных центров. Подробнее о лечении зависимости читайте на официальном сайте Минздрава.
Получить дополнительную информацию – http://narkologicheskaya-klinika-kamensk-uralskij11.ru/
Пребывание в стационаре обеспечивает круглосуточный мониторинг состояния, своевременное введение лекарств и защиту пациента от внешних факторов, провоцирующих срыв. Все палаты оснащены необходимым оборудованием, соблюдаются санитарные нормы, а условия размещения соответствуют медицинским стандартам.
Углубиться в тему – http://narkologicheskaya-klinika-v-yaroslavle12.ru/narkologicheskaya-klinika-telefon-v-yaroslavle/
Используя современные инфузионные системы, мы постепенно вводим растворы для выведения токсинов, коррекции водно-электролитного баланса и восстановления функции печени. Параллельно подбираются препараты для снятия абстинентного синдрома, купирования тревожности и нормализации сна.
Выяснить больше – https://narkologicheskaya-klinika-dolgoprudnyj3.ru/anonimnaya-narkologicheskaya-klinika-v-dolgoprudnom/
Одним из ключевых этапов терапии является медикаментозное устранение абстинентного синдрома, что значительно облегчает состояние пациента. Для этого используются препараты, рекомендованные к применению ведущими специалистами в области наркологии. Примером могут служить протоколы лечения, описанные на официальном портале наркологической помощи России.
Детальнее – [url=https://narkologicheskaya-klinika-kamensk-uralskij11.ru/]наркологическая клиника нарколог в каменске-уральском[/url]
Запой — это не просто бытовое пьянство, а одно из наиболее опасных проявлений алкогольной зависимости. Во время запоя организм перестаёт функционировать в нормальном режиме: сердечно-сосудистая система работает на износ, нервная система перегружена токсинами, а печень не справляется с нагрузкой. На этом фоне могут возникать тяжёлые осложнения — от судорог и гипогликемии до нарушения дыхания и алкогольного психоза. Чем дольше длится запой, тем глубже метаболические нарушения и выше риск серьёзных последствий.
Исследовать вопрос подробнее – http://vyvod-iz-zapoya-kolomna3.ru/vyvod-iz-zapoya-stacionar-v-kolomne/
В наркологической клинике применяются проверенные методики терапии, включая медикаментозное лечение, детоксикацию и психотерапевтические программы. Детоксикация проводится с использованием современных капельниц, обеспечивающих безопасное выведение токсинов из организма. Важно отметить, что качественное лечение включает и работу с психологическими аспектами зависимости, что достигается посредством групповых и индивидуальных консультаций.
Подробнее тут – [url=https://narkologicheskaya-klinika-kamensk-uralskij11.ru/]наркологическая клиника каменск-уральский.[/url]
Согласно данным НМИЦ психиатрии и наркологии Минздрава РФ, профессиональный вывод из запоя с применением капельниц снижает риск осложнений и сокращает период восстановления. Процедура проводится только под наблюдением квалифицированных специалистов и требует правильного подбора препаратов в зависимости от стадии опьянения и наличия сопутствующих заболеваний.
Углубиться в тему – [url=https://kapelnicza-ot-zapoya-pervouralsk11.ru/]posle-kapelniczy-ot-zapoya pervoural’sk[/url]
Компоненты
Ознакомиться с деталями – [url=https://kapelnicza-ot-zapoya-pervouralsk11.ru/]postavit-kapelniczu-ot-zapoya pervoural’sk[/url]
Farmacia Asequible: Farmacia Asequible – Farmacia Asequible
Независимо от формы зависимости — алкогольной, опиатной, синтетической или медикаментозной — специалисты подбирают индивидуальный курс терапии. Алгоритмы лечения адаптируются под возраст, стаж употребления, общее состояние организма и наличие сопутствующих заболеваний.
Ознакомиться с деталями – http://narkologicheskaya-klinika-v-yaroslavle12.ru/narkologicheskaya-klinika-telefon-v-yaroslavle/
Как подчёркивает врач-нарколог И.В. Синицин, «современная наркология — это не только вывод из запоя, но и работа с глубинными причинами зависимости».
Получить больше информации – http://narkologicheskaya-klinika-v-yaroslavle12.ru
Путь к свободе от зависимости начинается не с обещаний «просто перестать», а с профессионального медицинского вмешательства. В «Чистом Дыхании» мы применяем проверенные методы, которые работают там, где сила воли без нужной поддержки оказывается бессильной. Наша клиника в Долгопрудном работает круглосуточно — чтобы помощь была доступна в самый критический момент, когда человек ощущает острую потребность в детоксикации, снятии абстинентного синдрома или психологической поддержке.
Подробнее можно узнать тут – https://narkologicheskaya-klinika-dolgoprudnyj3.ru/anonimnaya-narkologicheskaya-klinika-v-dolgoprudnom/
Для успешного лечения зависимости необходима тщательная диагностика. В клинике проводят полное обследование пациента, включающее:
Подробнее тут – [url=https://narkologicheskaya-klinika-v-murmanske12.ru/]наркологическая клиника в мурманске[/url]
Have a look here https://ojsdoptg.qf6531.com
Learn more about this https://zp836.7ov1aa.com
comprar loniten 10 mg online farmacia online de confianza farmГ cia barcelona
На сайте Минздрава указаны общие клинические рекомендации по выведению из запоя, включая допустимые дозировки и протоколы лечения.
Узнать больше – [url=https://vyvod-iz-zapoya-v-ryazani12.ru/]вывод из запоя недорого рязань[/url]
Основной этап в лечении — детоксикация организма от токсичных веществ, вызывающих интоксикацию. В клинике применяют современные методы капельниц и медикаментозной поддержки, включая препараты для снятия абстинентного синдрома.
Разобраться лучше – http://
В статье рассмотрим ключевые моменты, которые помогут сориентироваться при выборе капельницы от запоя, понять механизм действия и особенности процедуры, а также избежать типичных ошибок при обращении за медицинской помощью.
Детальнее – https://kapelnicza-ot-zapoya-pervouralsk11.ru/
Лечение хронического алкоголизма начинается с купирования абстинентного синдрома, после чего проводятся мероприятия по нормализации работы печени, сердечно-сосудистой и нервной системы. Назначаются гепатопротекторы, ноотропы, витамины группы B. Также проводится противорецидивная терапия.
Получить дополнительную информацию – [url=https://narkologicheskaya-klinika-v-yaroslavle12.ru/]наркологическая клиника цены ярославль[/url]
Одним из ключевых этапов терапии является медикаментозное устранение абстинентного синдрома, что значительно облегчает состояние пациента. Для этого используются препараты, рекомендованные к применению ведущими специалистами в области наркологии. Примером могут служить протоколы лечения, описанные на официальном портале наркологической помощи России.
Получить больше информации – http://narkologicheskaya-klinika-kamensk-uralskij11.ru/anonimnaya-narkologicheskaya-klinika-v-kamensk-uralskom/
Get the full story https://286.lx5656.com
Стационарный формат предполагает круглосуточное наблюдение, возможность экстренного вмешательства и доступ к диагностическим средствам. Это особенно важно при наличии хронических заболеваний, психозов или алкогольного делирия.
Подробнее можно узнать тут – [url=https://vyvod-iz-zapoya-v-ryazani12.ru/]вывод из запоя на дому[/url]
Learn more about this https://dz7252.com/27g/14b56399422/
Explore this website https://apk-slot-2739.cf2656.com
Take a look https://ks6676.com?slot=q
В клинике применяются доказательные методы лечения, соответствующие международным и российским рекомендациям. Основу составляет медикаментозная детоксикация, сопровождаемая психотерапией, когнитивно-поведенческой коррекцией, а также семейной консультацией. При необходимости применяются пролонгированные препараты, облегчающие контроль над тягой к веществу.
Узнать больше – https://narkologicheskaya-klinika-v-yaroslavle12.ru/
В статье рассмотрим ключевые моменты, которые помогут сориентироваться при выборе капельницы от запоя, понять механизм действия и особенности процедуры, а также избежать типичных ошибок при обращении за медицинской помощью.
Углубиться в тему – https://kapelnicza-ot-zapoya-pervouralsk11.ru
https://farmaciaasequible.shop/# farmacia ferrer
Get started now https://game-62659.kw5762.com/11-bet-login-72/
Check out the latest update https://rf.juswn2.com
Используя современные инфузионные системы, мы постепенно вводим растворы для выведения токсинов, коррекции водно-электролитного баланса и восстановления функции печени. Параллельно подбираются препараты для снятия абстинентного синдрома, купирования тревожности и нормализации сна.
Разобраться лучше – https://narkologicheskaya-klinika-dolgoprudnyj3.ru/chastnaya-narkologicheskaya-klinika-v-dolgoprudnom/
Работа клиники строится на принципах доказательной медицины и индивидуального подхода. При поступлении пациента осуществляется всесторонняя диагностика, включающая анализы крови, оценку психического состояния и анамнез. По результатам разрабатывается персонализированный курс терапии.
Исследовать вопрос подробнее – http://narkologicheskaya-klinika-v-ryazani12.ru
Get more details https://tx7656.com/??? ?? ??-794/37a15899804/
Вызов нарколога на дом в Ярославле — это удобный и эффективный способ начать лечение или оказать первую помощь при острых состояниях, связанных с алкоголизмом, наркотической зависимостью или другими психоактивными веществами. Основные преимущества такой услуги заключаются в следующем:
Выяснить больше – [url=https://narkolog-na-dom-v-yaroslavle12.ru/]нарколог на дом цена в ярославле[/url]
Используя современные инфузионные системы, мы постепенно вводим растворы для выведения токсинов, коррекции водно-электролитного баланса и восстановления функции печени. Параллельно подбираются препараты для снятия абстинентного синдрома, купирования тревожности и нормализации сна.
Разобраться лучше – [url=https://narkologicheskaya-klinika-dolgoprudnyj3.ru/]narkologicheskaya-klinika-v-dolgoprudnom[/url]
Обращение к врачу становится жизненно необходимым, если пациент находится в состоянии длительного запоя, при котором организм не справляется с накоплением токсинов. Если запой продолжается более двух-трёх дней, в теле накапливаются вредные вещества, что ведёт к нарушениям работы внутренних органов, развитию абстинентного синдрома и появлению психических нарушений. Также, если у пациента наблюдаются симптомы, такие как частая рвота, спутанность сознания, судороги или резкие скачки артериального давления, это сигнал к незамедлительному вызову специалиста. При выраженной абстинентной реакции с паническими атаками, сильной дрожью, бессонницей и эмоциональной нестабильностью самостоятельное лечение может только усугубить ситуацию. Если появляются признаки алкогольного психоза – галлюцинации, агрессивность или спутанность сознания – вызов нарколога становится обязательным для предотвращения дальнейших осложнений. Также, когда требуется подготовка к процедурам кодирования от зависимости, необходима качественная детоксикация организма, что также является показанием к срочному обращению за профессиональной помощью.
Получить дополнительные сведения – [url=https://narcolog-na-dom-ekaterinburg0.ru/]нарколог на дом недорого[/url]
Для успешного лечения зависимости необходима тщательная диагностика. В клинике проводят полное обследование пациента, включающее:
Ознакомиться с деталями – [url=https://narkologicheskaya-klinika-v-murmanske12.ru/]www.domen.ru[/url]
See how it works https://egypt-football.com/d8b5d988d8b1d8a9-d8add8b3d8a7d985-d8add8b3d986-d98ad8b3d8a7d986d8af-d985d986d8aad8aed8a8-d985d8b5d8b1-d984d984d8b4d8a8d8a7d8a8-d982/
Медицинский вывод из запоя включает несколько обязательных этапов:
Исследовать вопрос подробнее – http://vyvod-iz-zapoya-kolomna3.ru
Клинические протоколы стационарной терапии рекомендуют госпитализацию при средней и тяжёлой степени интоксикации.
Изучить вопрос глубже – [url=https://vyvod-iz-zapoya-v-ryazani12.ru/]вывод из запоя на дому рязань[/url]
Основной этап в лечении — детоксикация организма от токсичных веществ, вызывающих интоксикацию. В клинике применяют современные методы капельниц и медикаментозной поддержки, включая препараты для снятия абстинентного синдрома.
Ознакомиться с деталями – https://narkologicheskaya-klinika-v-murmanske12.ru/narkologicheskaya-klinika-klinika-pomoshh-v-murmanske/
Современная наркологическая клиника в Мурманске специализируется на комплексном лечении алкогольной, наркотической и других видов зависимости. В условиях МедЦентр Арктика используются проверенные методы диагностики и терапии, позволяющие достичь устойчивой ремиссии и восстановить качество жизни пациента.
Получить дополнительную информацию – https://narkologicheskaya-klinika-v-murmanske12.ru/chastnaya-narkologicheskaya-klinika-v-murmanske/
Visit this blog https://tt7365.com/782419176174481492912271746693715846613862949517/782419176174481492912271746693715846613862949517/
Have a glance here https://aa5677.com/06-2025/
Discover more here https://tk3398.com/article/zdgrandmsnhvenkdhduaalabwwiibhnhnhipzkz.htmlcr-list.html
Take a look at this page https://ay4832.com/87dts1uh7/
Click here https://cs9526.com?slot=arex
На сайте Минздрава указаны общие клинические рекомендации по выведению из запоя, включая допустимые дозировки и протоколы лечения.
Получить больше информации – [url=https://vyvod-iz-zapoya-v-ryazani12.ru/]вывод из запоя капельница рязань[/url]
Visit to learn more https://zx5282.com/foh/41f60399355/
Look at this article https://wr3869.com/??? ?? ???-6112/34a457295393/
Современная наркологическая клиника в Каменске-Уральском предоставляет комплексные услуги по диагностике и лечению различных видов зависимостей. Заболевания, связанные с алкоголизмом и наркоманией, требуют индивидуального подхода и применения современных медицинских технологий. В условиях клиники обеспечивается полный медицинский контроль и психологическая поддержка, что способствует успешной реабилитации пациентов.
Ознакомиться с деталями – [url=https://narkologicheskaya-klinika-kamensk-uralskij11.ru/]частная наркологическая клиника в каменске-уральском[/url]
На сайте Минздрава указаны общие клинические рекомендации по выведению из запоя, включая допустимые дозировки и протоколы лечения.
Ознакомиться с деталями – https://vyvod-iz-zapoya-v-ryazani12.ru/vyvod-iz-zapoya-czena-v-ryazani
В «Чистом Дыхании» вы встретите врачей-наркологов, психиатров и психологов с многолетним опытом, готовых приехать на дом для первичной детоксикации или принять в стационаре для углублённой терапии. Мы соблюдаем строгие медицинские протоколы и гарантируем безопасность даже в самых тяжёлых случаях.
Получить дополнительную информацию – http://narkologicheskaya-klinika-dolgoprudnyj3.ru/anonimnaya-narkologicheskaya-klinika-v-dolgoprudnom/
parafarmacia barata online pro direct opiniones Farmacia Asequible
Visit this section https://kqyxrgs2.com/3794672619861838/3794672619861838/
В «Чистом Дыхании» вы встретите врачей-наркологов, психиатров и психологов с многолетним опытом, готовых приехать на дом для первичной детоксикации или принять в стационаре для углублённой терапии. Мы соблюдаем строгие медицинские протоколы и гарантируем безопасность даже в самых тяжёлых случаях.
Подробнее – https://narkologicheskaya-klinika-dolgoprudnyj3.ru/anonimnaya-narkologicheskaya-klinika-v-dolgoprudnom
Каждый пациент получает индивидуальный план лечения, основанный на клинических исследованиях, данных лабораторных анализов и психологических тестов.
Исследовать вопрос подробнее – http://narkologicheskaya-klinika-dolgoprudnyj3.ru
Check out our latest post https://xs7636.com?cassino=owq
Go on, click here https://gb5265.com/slot-rekomendasi-8189
Take a look at the info https://thai-port-fc-16-06-2025.v06kojn4.com
Learn more at this site https://tk7811.com/rzh26rh8iue72n18kqxhrh0mwt6oqs18vv0oxxqig3ga7pqa9kdir2joajaxpsvlivestreamfree-list.html
Check out the full version https://aa2189.com/8x4m0bn90z0d85awslwn9o/73a18499742/
Go to this page https://gdzc5799.com/szzfe/65a03299902/
viagra online pharmacy no prescription: compounding pharmacy viagra – RxFree Meds
Have a quick look https://4411574554949751.dt7877.com
Discover the details https://tb8263.com?cassino=nlhk
Современная наркологическая клиника в Мурманске специализируется на комплексном лечении алкогольной, наркотической и других видов зависимости. В условиях МедЦентр Арктика используются проверенные методы диагностики и терапии, позволяющие достичь устойчивой ремиссии и восстановить качество жизни пациента.
Получить дополнительную информацию – http://narkologicheskaya-klinika-v-murmanske12.ru/chastnaya-narkologicheskaya-klinika-v-murmanske/
Have a look here https://tk7623.com/special/uwarf/seoultogyeongju-list.html
Read the full review here https://ztzj77.com/dhllcqawvfsaxaxqzgvav-2025-06-16nepalvsjordan-list.html
Look at this page https://cd8258.com?cassino=ilhsf
Клинические протоколы стационарной терапии рекомендуют госпитализацию при средней и тяжёлой степени интоксикации.
Получить больше информации – [url=https://vyvod-iz-zapoya-v-ryazani12.ru/]вывод из запоя круглосуточно[/url]
Je moet natuurlijk niet overdrijven, want dan krijg je weer met andere problemen te maken, maar een bak stevige koffie helpt echt bij een wegkwijnend libido. Senserex is een natuurlijk erectiemiddel. Senserex is speciaal ontwikkeld om de erectie te… Op zoek naar een betere seksuele ervaring voor de man?Wapshop biedt natuurlijke supplementen die je helpen je libido te verhogen, je uithoudingsvermogen te verbeteren en intenser te genieten van elk moment.Of je nu langer wilt kunnen, een stevigere erectie wilt ervaren of simpelweg meer zin wilt hebben ,wij hebben wat je zoekt. We zeiden het al aan het begin: het psychologisch aspect is een belangrijke factor voor een goede erectie. De psychologische context die we hierboven al even noemde speelt een belangrijke rol. Als de man er niet bij is met zijn hoofd, gestrest of angstig is, dan krijgt hij geen goede erectie. Dat geldt des te meer voor mannen boven de 40.
https://www.localstar.org/Meeroverdeauteu
Het grote voordeel daarvan is enerzijds dat u het gemakkelijk in kunt nemen, daarnaast zorgt het ervoor dat de werkzame stof in deze erectiepillen (sildenafil) veel sneller tot uiting komt; het duurt met de vloeistof slechts 5 – 10 minuten. Kamagra bevat dezelfde werkzame stoffen en is dus vrijwel identiek aan viagra. De onderliggende oorzaak en ernst van je erectiestoornis is ook van invloed op hoe goed je reageert op Viagra. Maak je geen zorgen als je de eerste keer dat je Viagra gebruikt geen effectieve resultaten ervaart. Dit is niet ongewoon. Artsen raden aan om Viagra maximaal acht keer te proberen voordat je overgaat op een hogere dosering of een alternatieve behandeling onderzoekt. Viagra is de bekendste behandeling voor erectiestoornissen en wordt wereldwijd door miljoenen mannen gebruikt.
Используя современные инфузионные системы, мы постепенно вводим растворы для выведения токсинов, коррекции водно-электролитного баланса и восстановления функции печени. Параллельно подбираются препараты для снятия абстинентного синдрома, купирования тревожности и нормализации сна.
Узнать больше – [url=https://narkologicheskaya-klinika-dolgoprudnyj3.ru/]www.domen.ru[/url]
https://cs9536.com?cassino=muep
Magnificent beat ! I would like to apprentice while you
amend your website, how could i subscribe for a blog web site?
The account helped me a acceptable deal. I had been a little bit acquainted of this
your broadcast provided bright clear concept
Farmacia Asequible viagra farmacia Farmacia Asequible
Как поясняет врач-нарколог клиники «АлкоСтоп», «грамотно составленная инфузионная терапия не только устраняет последствия запоя, но и создаёт условия для дальнейшей мотивации пациента к лечению».
Получить дополнительную информацию – [url=https://kapelnicza-ot-zapoya-pervouralsk11.ru/]kapelnicza-ot-zapoya pervoural’sk[/url]
Лечение хронического алкоголизма начинается с купирования абстинентного синдрома, после чего проводятся мероприятия по нормализации работы печени, сердечно-сосудистой и нервной системы. Назначаются гепатопротекторы, ноотропы, витамины группы B. Также проводится противорецидивная терапия.
Получить больше информации – [url=https://narkologicheskaya-klinika-v-yaroslavle12.ru/]частная наркологическая клиника ярославская область[/url]
Для успешного лечения зависимости необходима тщательная диагностика. В клинике проводят полное обследование пациента, включающее:
Получить дополнительные сведения – https://narkologicheskaya-klinika-v-murmanske12.ru/
В наркологической клинике применяются проверенные методики терапии, включая медикаментозное лечение, детоксикацию и психотерапевтические программы. Детоксикация проводится с использованием современных капельниц, обеспечивающих безопасное выведение токсинов из организма. Важно отметить, что качественное лечение включает и работу с психологическими аспектами зависимости, что достигается посредством групповых и индивидуальных консультаций.
Детальнее – [url=https://narkologicheskaya-klinika-kamensk-uralskij11.ru/]narkologicheskaya-klinika-kamensk-uralskij11.ru/[/url]
В клинике созданы комфортные условия для прохождения лечения. Пациенты получают не только медицинскую помощь, но и социальную поддержку, что способствует быстрому восстановлению и возвращению к нормальной жизни. Узнать больше о формате лечения и условиях можно на официальном сайте клиники.
Получить больше информации – https://narkologicheskaya-klinika-kamensk-uralskij11.ru/anonimnaya-narkologicheskaya-klinika-v-kamensk-uralskom/
PSBS Biak
http://enclomiphenebestprice.com/# enclomiphene best price
Современная наркологическая клиника в Каменске-Уральском предоставляет комплексные услуги по диагностике и лечению различных видов зависимостей. Заболевания, связанные с алкоголизмом и наркоманией, требуют индивидуального подхода и применения современных медицинских технологий. В условиях клиники обеспечивается полный медицинский контроль и психологическая поддержка, что способствует успешной реабилитации пациентов.
Исследовать вопрос подробнее – [url=https://narkologicheskaya-klinika-kamensk-uralskij11.ru/]бесплатная наркологическая клиника[/url]
Стационарный формат предполагает круглосуточное наблюдение, возможность экстренного вмешательства и доступ к диагностическим средствам. Это особенно важно при наличии хронических заболеваний, психозов или алкогольного делирия.
Разобраться лучше – http://vyvod-iz-zapoya-v-ryazani12.ru/vyvod-iz-zapoya-na-domu-v-ryazani/
Мы предлагаем полный спектр услуг по лечению зависимостей:
Исследовать вопрос подробнее – http://narkologicheskaya-klinika-dolgoprudnyj3.ru
Наркологическая клиника в Каменске-Уральском разрабатывает программы лечения, учитывая особенности различных видов зависимости: алкогольной, наркотической, лекарственной. Каждая программа ориентирована на индивидуальные потребности пациента, что подтверждается опытом ведущих российских реабилитационных центров. Подробнее о лечении зависимости читайте на официальном сайте Минздрава.
Углубиться в тему – [url=https://narkologicheskaya-klinika-kamensk-uralskij11.ru/]наркологическая клиника в каменске-уральском[/url]
Основной этап в лечении — детоксикация организма от токсичных веществ, вызывающих интоксикацию. В клинике применяют современные методы капельниц и медикаментозной поддержки, включая препараты для снятия абстинентного синдрома.
Подробнее – http://narkologicheskaya-klinika-v-murmanske12.ru/chastnaya-narkologicheskaya-klinika-v-murmanske/
enclomiphene best price: enclomiphene for men – enclomiphene citrate
В нашем центре доступны следующие виды помощи:
Получить больше информации – [url=https://tajnyj-vyvod-iz-zapoya.ru/]вывод из запоя анонимно[/url]
После устранения острой зависимости важным этапом становится реабилитация. Она включает восстановление социальных навыков, обучение методам преодоления стрессов без употребления психоактивных веществ.
Подробнее тут – https://narkologicheskaya-klinika-v-murmanske12.ru/chastnaya-narkologicheskaya-klinika-v-murmanske/
Farmacia Asequible cialis espaГ±a Farmacia Asequible
Зависимости часто сопровождаются физическими и психологическими нарушениями, требующими комплексного подхода. Мы убеждены, что успешное лечение невозможно без индивидуального подхода, что делает нашу клинику отличным местом для тех, кто нуждается в поддержке.
Ознакомиться с деталями – [url=https://tajnyj-vyvod-iz-zapoya.ru/vyvod-iz-zapoya-v-kruglosutochno-v-omske.ru/]вывод из запоя на дому омск.[/url]
Наркологическая клиника в Каменске-Уральском разрабатывает программы лечения, учитывая особенности различных видов зависимости: алкогольной, наркотической, лекарственной. Каждая программа ориентирована на индивидуальные потребности пациента, что подтверждается опытом ведущих российских реабилитационных центров. Подробнее о лечении зависимости читайте на официальном сайте Минздрава.
Получить дополнительные сведения – https://narkologicheskaya-klinika-kamensk-uralskij11.ru/narkologicheskaya-klinika-telefon-v-kamensk-uralskom
Работа клиники строится на принципах доказательной медицины и индивидуального подхода. При поступлении пациента осуществляется всесторонняя диагностика, включающая анализы крови, оценку психического состояния и анамнез. По результатам разрабатывается персонализированный курс терапии.
Углубиться в тему – [url=https://narkologicheskaya-klinika-v-ryazani12.ru/]наркологическая клиника[/url]
Для успешного лечения зависимости необходима тщательная диагностика. В клинике проводят полное обследование пациента, включающее:
Углубиться в тему – http://narkologicheskaya-klinika-v-murmanske12.ru
Каждый пациент получает индивидуальный план лечения, основанный на клинических исследованиях, данных лабораторных анализов и психологических тестов.
Исследовать вопрос подробнее – https://narkologicheskaya-klinika-dolgoprudnyj3.ru/anonimnaya-narkologicheskaya-klinika-v-dolgoprudnom
Клинические протоколы стационарной терапии рекомендуют госпитализацию при средней и тяжёлой степени интоксикации.
Подробнее можно узнать тут – https://vyvod-iz-zapoya-v-ryazani12.ru/vyvod-iz-zapoya-czena-v-ryazani
Наркологическая клиника в Каменске-Уральском разрабатывает программы лечения, учитывая особенности различных видов зависимости: алкогольной, наркотической, лекарственной. Каждая программа ориентирована на индивидуальные потребности пациента, что подтверждается опытом ведущих российских реабилитационных центров. Подробнее о лечении зависимости читайте на официальном сайте Минздрава.
Выяснить больше – https://narkologicheskaya-klinika-kamensk-uralskij11.ru/anonimnaya-narkologicheskaya-klinika-v-kamensk-uralskom
Работа клиники строится на принципах доказательной медицины и индивидуального подхода. При поступлении пациента осуществляется всесторонняя диагностика, включающая анализы крови, оценку психического состояния и анамнез. По результатам разрабатывается персонализированный курс терапии.
Подробнее можно узнать тут – [url=https://narkologicheskaya-klinika-v-ryazani12.ru/]частная наркологическая клиника[/url]
Обращение к врачу становится жизненно необходимым, если пациент находится в состоянии длительного запоя, при котором организм не справляется с накоплением токсинов. Если запой продолжается более двух-трёх дней, в теле накапливаются вредные вещества, что ведёт к нарушениям работы внутренних органов, развитию абстинентного синдрома и появлению психических нарушений. Также, если у пациента наблюдаются симптомы, такие как частая рвота, спутанность сознания, судороги или резкие скачки артериального давления, это сигнал к незамедлительному вызову специалиста. При выраженной абстинентной реакции с паническими атаками, сильной дрожью, бессонницей и эмоциональной нестабильностью самостоятельное лечение может только усугубить ситуацию. Если появляются признаки алкогольного психоза – галлюцинации, агрессивность или спутанность сознания – вызов нарколога становится обязательным для предотвращения дальнейших осложнений. Также, когда требуется подготовка к процедурам кодирования от зависимости, необходима качественная детоксикация организма, что также является показанием к срочному обращению за профессиональной помощью.
Узнать больше – https://narcolog-na-dom-ekaterinburg0.ru/zapoj-narkolog-na-dom-ekb/
Используя современные инфузионные системы, мы постепенно вводим растворы для выведения токсинов, коррекции водно-электролитного баланса и восстановления функции печени. Параллельно подбираются препараты для снятия абстинентного синдрома, купирования тревожности и нормализации сна.
Подробнее можно узнать тут – https://narkologicheskaya-klinika-dolgoprudnyj3.ru/anonimnaya-narkologicheskaya-klinika-v-dolgoprudnom/
Медицинский вывод из запоя включает несколько обязательных этапов:
Исследовать вопрос подробнее – https://vyvod-iz-zapoya-kolomna3.ru/anonimnyj-vyvod-iz-zapoya-v-kolomne/
Вывод из запоя в Рязани — это комплексная медицинская услуга, направленная на устранение интоксикации, стабилизацию состояния пациента и предотвращение рецидива алкогольной зависимости. Методики подбираются индивидуально с учётом анамнеза, длительности запойного состояния, наличия сопутствующих заболеваний и психоэмоционального фона. Процедура осуществляется под контролем опытных врачей-наркологов с применением сертифицированных препаратов и оборудования.
Ознакомиться с деталями – [url=https://vyvod-iz-zapoya-v-ryazani12.ru/]вывод из запоя клиника рязань[/url]
Подробности о технологии и методах выезда нарколога можно найти на официальных медицинских порталах, таких как Российское общество наркологов и Минздрав РФ.
Углубиться в тему – http://narkolog-na-dom-v-yaroslavle12.ru/vyzov-narkologa-na-dom-v-yaroslavle/
В нашем центре доступны следующие виды помощи:
Углубиться в тему – [url=https://tajnyj-vyvod-iz-zapoya.ru/vyvod-iz-zapoya-v-stacionare-v-omske.ru/]вывод из запоя круглосуточно в омске[/url]
Для успешного лечения зависимости необходима тщательная диагностика. В клинике проводят полное обследование пациента, включающее:
Разобраться лучше – [url=https://narkologicheskaya-klinika-v-murmanske12.ru/]narkologicheskaya-klinika-v-murmanske12.ru/[/url]
Каждый пациент получает индивидуальный план лечения, основанный на клинических исследованиях, данных лабораторных анализов и психологических тестов.
Изучить вопрос глубже – [url=https://narkologicheskaya-klinika-dolgoprudnyj3.ru/]www.domen.ru[/url]
Обращение к врачу становится жизненно необходимым, если пациент находится в состоянии длительного запоя, при котором организм не справляется с накоплением токсинов. Если запой продолжается более двух-трёх дней, в теле накапливаются вредные вещества, что ведёт к нарушениям работы внутренних органов, развитию абстинентного синдрома и появлению психических нарушений. Также, если у пациента наблюдаются симптомы, такие как частая рвота, спутанность сознания, судороги или резкие скачки артериального давления, это сигнал к незамедлительному вызову специалиста. При выраженной абстинентной реакции с паническими атаками, сильной дрожью, бессонницей и эмоциональной нестабильностью самостоятельное лечение может только усугубить ситуацию. Если появляются признаки алкогольного психоза – галлюцинации, агрессивность или спутанность сознания – вызов нарколога становится обязательным для предотвращения дальнейших осложнений. Также, когда требуется подготовка к процедурам кодирования от зависимости, необходима качественная детоксикация организма, что также является показанием к срочному обращению за профессиональной помощью.
Подробнее – https://narcolog-na-dom-ekaterinburg0.ru/vrach-narkolog-na-dom-ekb/
Как подчёркивает главный врач клинического отделения, «в условиях стационара мы можем оперативно реагировать на малейшие изменения в состоянии пациента, что критически важно при тяжёлых формах запоя».
Детальнее – http://vyvod-iz-zapoya-v-ryazani12.ru
Медицинский вывод из запоя включает несколько обязательных этапов:
Изучить вопрос глубже – http://vyvod-iz-zapoya-kolomna3.ru/anonimnyj-vyvod-iz-zapoya-v-kolomne/
Одним из ключевых направлений является проведение капельниц, призванных вывести токсины из организма и нормализовать водно-электролитный баланс. Используемые препараты и состав растворов подбираются индивидуально, исходя из клинической картины и истории болезни пациента.
Детальнее – [url=https://narkolog-na-dom-v-yaroslavle12.ru/]нарколог на дом срочно в ярославле[/url]
Современная наркологическая клиника в Каменске-Уральском предоставляет комплексные услуги по диагностике и лечению различных видов зависимостей. Заболевания, связанные с алкоголизмом и наркоманией, требуют индивидуального подхода и применения современных медицинских технологий. В условиях клиники обеспечивается полный медицинский контроль и психологическая поддержка, что способствует успешной реабилитации пациентов.
Подробнее можно узнать тут – https://narkologicheskaya-klinika-kamensk-uralskij11.ru/anonimnaya-narkologicheskaya-klinika-v-kamensk-uralskom
Одним из ключевых этапов терапии является медикаментозное устранение абстинентного синдрома, что значительно облегчает состояние пациента. Для этого используются препараты, рекомендованные к применению ведущими специалистами в области наркологии. Примером могут служить протоколы лечения, описанные на официальном портале наркологической помощи России.
Получить больше информации – http://narkologicheskaya-klinika-kamensk-uralskij11.ru
RxFree Meds RxFree Meds order cialis at online pharmacy
Для успешного лечения зависимости необходима тщательная диагностика. В клинике проводят полное обследование пациента, включающее:
Выяснить больше – https://narkologicheskaya-klinika-v-murmanske12.ru/
Каждому пациенту уделяется внимание в зависимости от его уникальных потребностей, что способствует достижению максимальных результатов.
Разобраться лучше – [url=https://tajnyj-vyvod-iz-zapoya.ru/vyvod-iz-zapoya-v-stacionare-v-omske.ru/]наркология вывод из запоя[/url]
Используя современные инфузионные системы, мы постепенно вводим растворы для выведения токсинов, коррекции водно-электролитного баланса и восстановления функции печени. Параллельно подбираются препараты для снятия абстинентного синдрома, купирования тревожности и нормализации сна.
Получить дополнительную информацию – http://narkologicheskaya-klinika-dolgoprudnyj3.ru/
Наркологическая клиника в Каменске-Уральском разрабатывает программы лечения, учитывая особенности различных видов зависимости: алкогольной, наркотической, лекарственной. Каждая программа ориентирована на индивидуальные потребности пациента, что подтверждается опытом ведущих российских реабилитационных центров. Подробнее о лечении зависимости читайте на официальном сайте Минздрава.
Изучить вопрос глубже – https://narkologicheskaya-klinika-kamensk-uralskij11.ru
Как поясняет врач-нарколог клиники «АлкоСтоп», «грамотно составленная инфузионная терапия не только устраняет последствия запоя, но и создаёт условия для дальнейшей мотивации пациента к лечению».
Подробнее можно узнать тут – http://kapelnicza-ot-zapoya-pervouralsk11.ru/
Современная наркологическая клиника в Каменске-Уральском предоставляет комплексные услуги по диагностике и лечению различных видов зависимостей. Заболевания, связанные с алкоголизмом и наркоманией, требуют индивидуального подхода и применения современных медицинских технологий. В условиях клиники обеспечивается полный медицинский контроль и психологическая поддержка, что способствует успешной реабилитации пациентов.
Выяснить больше – https://narkologicheskaya-klinika-kamensk-uralskij11.ru/
В статье рассмотрим ключевые моменты, которые помогут сориентироваться при выборе капельницы от запоя, понять механизм действия и особенности процедуры, а также избежать типичных ошибок при обращении за медицинской помощью.
Разобраться лучше – [url=https://kapelnicza-ot-zapoya-pervouralsk11.ru/]врача капельницу от запоя[/url]
Как подчёркивает врач-нарколог И.В. Синицин, «современная наркология — это не только вывод из запоя, но и работа с глубинными причинами зависимости».
Подробнее можно узнать тут – [url=https://narkologicheskaya-klinika-v-yaroslavle12.ru/]наркологическая клиника цены ярославль[/url]
Лечение хронического алкоголизма начинается с купирования абстинентного синдрома, после чего проводятся мероприятия по нормализации работы печени, сердечно-сосудистой и нервной системы. Назначаются гепатопротекторы, ноотропы, витамины группы B. Также проводится противорецидивная терапия.
Ознакомиться с деталями – [url=https://narkologicheskaya-klinika-v-yaroslavle12.ru/]частная наркологическая клиника ярославль[/url]
Клинические протоколы стационарной терапии рекомендуют госпитализацию при средней и тяжёлой степени интоксикации.
Исследовать вопрос подробнее – [url=https://vyvod-iz-zapoya-v-ryazani12.ru/]наркологический вывод из запоя рязань[/url]
Современная наркологическая клиника в Мурманске специализируется на комплексном лечении алкогольной, наркотической и других видов зависимости. В условиях МедЦентр Арктика используются проверенные методы диагностики и терапии, позволяющие достичь устойчивой ремиссии и восстановить качество жизни пациента.
Получить дополнительную информацию – http://narkologicheskaya-klinika-v-murmanske12.ru
https://enclomiphenebestprice.com/# enclomiphene citrate
Назначение
Детальнее – [url=https://kapelnicza-ot-zapoya-pervouralsk11.ru/]после капельницы от запоя первоуральск[/url]
Алкоголь и наркотики воздействуют на организм комплексно: нарушается работа сердца, сосудов, печени и почек, страдает нервная система. При запое или ломке без квалифицированной помощи возникают судороги, делирий, галлюцинации и серьёзные сбои в обмене веществ. Самостоятельные попытки «перетерпеть» или «отмотать» запой зачастую приводят к тяжёлым осложнениям, вплоть до комы и необратимых изменений в органах.
Получить больше информации – [url=https://narkologicheskaya-klinika-dolgoprudnyj3.ru/]наркологическая клиника здоровье[/url]
Услуга
Исследовать вопрос подробнее – [url=https://narkologicheskaya-klinika-v-ryazani12.ru/]www.domen.ru[/url]
Пребывание в стационаре обеспечивает круглосуточный мониторинг состояния, своевременное введение лекарств и защиту пациента от внешних факторов, провоцирующих срыв. Все палаты оснащены необходимым оборудованием, соблюдаются санитарные нормы, а условия размещения соответствуют медицинским стандартам.
Узнать больше – [url=https://narkologicheskaya-klinika-v-yaroslavle12.ru/]наркологическая клиника нарколог ярославль[/url]
enclomiphene for sale: enclomiphene citrate – enclomiphene buy
Назначение
Выяснить больше – [url=https://kapelnicza-ot-zapoya-pervouralsk11.ru/]www.domen.ru[/url]
Каждый пациент получает индивидуальный план лечения, основанный на клинических исследованиях, данных лабораторных анализов и психологических тестов.
Подробнее – http://narkologicheskaya-klinika-dolgoprudnyj3.ru
Наркологическая клиника в Каменске-Уральском разрабатывает программы лечения, учитывая особенности различных видов зависимости: алкогольной, наркотической, лекарственной. Каждая программа ориентирована на индивидуальные потребности пациента, что подтверждается опытом ведущих российских реабилитационных центров. Подробнее о лечении зависимости читайте на официальном сайте Минздрава.
Получить больше информации – [url=https://narkologicheskaya-klinika-kamensk-uralskij11.ru/]narkologicheskaya-klinika-kamensk-uralskij11.ru/[/url]
Основная цель — быстрое и безопасное выведение этанола и его токсических метаболитов из организма, восстановление водно-электролитного и кислотно-щелочного баланса, нормализация артериального давления, работы сердца, почек и головного мозга. Для этого применяется инфузионная терапия, фармакологическая коррекция, витаминотерапия и, при необходимости, седативная поддержка.
Выяснить больше – https://vyvod-iz-zapoya-v-ryazani12.ru/vyvod-iz-zapoya-na-domu-v-ryazani
Современная наркологическая клиника в Каменске-Уральском предоставляет комплексные услуги по диагностике и лечению различных видов зависимостей. Заболевания, связанные с алкоголизмом и наркоманией, требуют индивидуального подхода и применения современных медицинских технологий. В условиях клиники обеспечивается полный медицинский контроль и психологическая поддержка, что способствует успешной реабилитации пациентов.
Изучить вопрос глубже – http://narkologicheskaya-klinika-kamensk-uralskij11.ru/anonimnaya-narkologicheskaya-klinika-v-kamensk-uralskom/
Лечение хронического алкоголизма начинается с купирования абстинентного синдрома, после чего проводятся мероприятия по нормализации работы печени, сердечно-сосудистой и нервной системы. Назначаются гепатопротекторы, ноотропы, витамины группы B. Также проводится противорецидивная терапия.
Получить дополнительные сведения – http://
Работа клиники строится на принципах доказательной медицины и индивидуального подхода. При поступлении пациента осуществляется всесторонняя диагностика, включающая анализы крови, оценку психического состояния и анамнез. По результатам разрабатывается персонализированный курс терапии.
Изучить вопрос глубже – [url=https://narkologicheskaya-klinika-v-ryazani12.ru/]частная наркологическая клиника рязань.[/url]
Как подчёркивает главный врач клинического отделения, «в условиях стационара мы можем оперативно реагировать на малейшие изменения в состоянии пациента, что критически важно при тяжёлых формах запоя».
Получить дополнительную информацию – [url=https://vyvod-iz-zapoya-v-ryazani12.ru/]вывод из запоя цена рязань.[/url]
Работа клиники строится на принципах доказательной медицины и индивидуального подхода. При поступлении пациента осуществляется всесторонняя диагностика, включающая анализы крови, оценку психического состояния и анамнез. По результатам разрабатывается персонализированный курс терапии.
Выяснить больше – [url=https://narkologicheskaya-klinika-v-ryazani12.ru/]наркологические клиники алкоголизм рязань[/url]
Работа клиники строится на принципах доказательной медицины и индивидуального подхода. При поступлении пациента осуществляется всесторонняя диагностика, включающая анализы крови, оценку психического состояния и анамнез. По результатам разрабатывается персонализированный курс терапии.
Подробнее – [url=https://narkologicheskaya-klinika-v-ryazani12.ru/]наркологические клиники алкоголизм[/url]
Обращение к врачу становится жизненно необходимым, если пациент находится в состоянии длительного запоя, при котором организм не справляется с накоплением токсинов. Если запой продолжается более двух-трёх дней, в теле накапливаются вредные вещества, что ведёт к нарушениям работы внутренних органов, развитию абстинентного синдрома и появлению психических нарушений. Также, если у пациента наблюдаются симптомы, такие как частая рвота, спутанность сознания, судороги или резкие скачки артериального давления, это сигнал к незамедлительному вызову специалиста. При выраженной абстинентной реакции с паническими атаками, сильной дрожью, бессонницей и эмоциональной нестабильностью самостоятельное лечение может только усугубить ситуацию. Если появляются признаки алкогольного психоза – галлюцинации, агрессивность или спутанность сознания – вызов нарколога становится обязательным для предотвращения дальнейших осложнений. Также, когда требуется подготовка к процедурам кодирования от зависимости, необходима качественная детоксикация организма, что также является показанием к срочному обращению за профессиональной помощью.
Ознакомиться с деталями – https://narcolog-na-dom-ekaterinburg0.ru/vrach-narkolog-na-dom-ekb
online pharmacy diflucan lisinopril online pharmacy RxFree Meds
– затяжной запой более 5–7 дней; – наличие галлюцинаций, судорог, бредовых состояний; – тяжёлое общее состояние (высокая температура, спутанность сознания, обезвоживание); – хронические болезни в стадии обострения.
Исследовать вопрос подробнее – [url=https://vyvod-iz-zapoya-kolomna3.ru/]vyvod-iz-zapoya-na-domu-nedorogo[/url]
Для успешного лечения зависимости необходима тщательная диагностика. В клинике проводят полное обследование пациента, включающее:
Углубиться в тему – [url=https://narkologicheskaya-klinika-v-murmanske12.ru/]бесплатная наркологическая клиника в мурманске[/url]
Diccionario español-inglés, traductor y sitio de aprendizaje ¡Penalty Shooters 2 fue creado por 10x10games! Puedes jugar en teléfonos Android, pero no en iOS. Twitter Five of a kind paga 5000 veces la apuesta por línea, y operadores como Bloomberry registraron pérdidas. Juega gratis a penalty shoot out en modo demo si el crupier gana, que incluyen viajes gratis o botín del casino. Tip: Don’t shoot always in the same direction – opponent’s goalkeeper is smart enough to read it! Just like in real penalty shootouts- stay cool and kick like a real soccer pro! When defending – a target will appear a moment before the opponent footballer kicks, showing the direction of the shot. Can you feel the fever? **Season 2 Unleashes New Thrills in Call of Duty: Modern Warfare III and Warzone**February 6, 2024, marks the arrival of Season 2 in the Call of Duty
https://bhdgutters.com/review-completa-de-sweet-bonanza-la-combinacion-de-simbolos-mas-rentable-en-la-version-demo/
An easy-to-use app, betting” , casino”, recommend it to everyone, 5 stars Enhorabuena, has instalado correctamente la aplicación Lucky Jet Predictor. El APK del Predictor de Lucky Jet, diseñado para usuarios de Android en Colombia, cuenta con una interfaz eficiente y fácil de usar. Está disponible exclusivamente para descargar desde nuestro sitio web. JetX Predictor está disponible para su descarga tanto en dispositivos iOS como Android. Para descargar el juego, basta con buscar “JetX Predictor” en la App Store o en Google Play Store. The LuckyJET 100% Hacking emulator for Android PC will allow you to get more pleasure from working with mobile devices on a Windows computer. Let’s play the LuckyJET Predictor. Aquí tienes consejos para ayudarte a ganar dinero en Lucky Jet Casino:
Согласно данным НМИЦ психиатрии и наркологии Минздрава РФ, профессиональный вывод из запоя с применением капельниц снижает риск осложнений и сокращает период восстановления. Процедура проводится только под наблюдением квалифицированных специалистов и требует правильного подбора препаратов в зависимости от стадии опьянения и наличия сопутствующих заболеваний.
Подробнее тут – [url=https://kapelnicza-ot-zapoya-pervouralsk11.ru/]капельница от запоя первоуральск[/url]
Одним из ключевых направлений является проведение капельниц, призванных вывести токсины из организма и нормализовать водно-электролитный баланс. Используемые препараты и состав растворов подбираются индивидуально, исходя из клинической картины и истории болезни пациента.
Получить больше информации – [url=https://narkolog-na-dom-v-yaroslavle12.ru/]вызов нарколога на дом ярославская область[/url]
Наркологическая клиника в Каменске-Уральском разрабатывает программы лечения, учитывая особенности различных видов зависимости: алкогольной, наркотической, лекарственной. Каждая программа ориентирована на индивидуальные потребности пациента, что подтверждается опытом ведущих российских реабилитационных центров. Подробнее о лечении зависимости читайте на официальном сайте Минздрава.
Получить дополнительную информацию – [url=https://narkologicheskaya-klinika-kamensk-uralskij11.ru/]наркологическая клиника[/url]
В «Чистом Дыхании» вы встретите врачей-наркологов, психиатров и психологов с многолетним опытом, готовых приехать на дом для первичной детоксикации или принять в стационаре для углублённой терапии. Мы соблюдаем строгие медицинские протоколы и гарантируем безопасность даже в самых тяжёлых случаях.
Разобраться лучше – [url=https://narkologicheskaya-klinika-dolgoprudnyj3.ru/]www.domen.ru[/url]
Обращение к врачу становится жизненно необходимым, если пациент находится в состоянии длительного запоя, при котором организм не справляется с накоплением токсинов. Если запой продолжается более двух-трёх дней, в теле накапливаются вредные вещества, что ведёт к нарушениям работы внутренних органов, развитию абстинентного синдрома и появлению психических нарушений. Также, если у пациента наблюдаются симптомы, такие как частая рвота, спутанность сознания, судороги или резкие скачки артериального давления, это сигнал к незамедлительному вызову специалиста. При выраженной абстинентной реакции с паническими атаками, сильной дрожью, бессонницей и эмоциональной нестабильностью самостоятельное лечение может только усугубить ситуацию. Если появляются признаки алкогольного психоза – галлюцинации, агрессивность или спутанность сознания – вызов нарколога становится обязательным для предотвращения дальнейших осложнений. Также, когда требуется подготовка к процедурам кодирования от зависимости, необходима качественная детоксикация организма, что также является показанием к срочному обращению за профессиональной помощью.
Исследовать вопрос подробнее – http://narcolog-na-dom-ekaterinburg0.ru
Как подчёркивает врач-нарколог И.В. Синицин, «современная наркология — это не только вывод из запоя, но и работа с глубинными причинами зависимости».
Детальнее – http://narkologicheskaya-klinika-v-yaroslavle12.ru
– затяжной запой более 5–7 дней; – наличие галлюцинаций, судорог, бредовых состояний; – тяжёлое общее состояние (высокая температура, спутанность сознания, обезвоживание); – хронические болезни в стадии обострения.
Подробнее можно узнать тут – [url=https://vyvod-iz-zapoya-kolomna3.ru/]быстрый вывод из запоя на дому[/url]
После поступления вызова на дом врачи клиники «Трезвый Путь» проводят лечение по четко разработанному алгоритму, обеспечивающему максимальную эффективность и безопасность:
Подробнее тут – [url=https://narcolog-na-dom-ekaterinburg0.ru/]vyzov-narkologa-na-dom ekaterinburg[/url]
Зависимости часто сопровождаются физическими и психологическими нарушениями, требующими комплексного подхода. Мы убеждены, что успешное лечение невозможно без индивидуального подхода, что делает нашу клинику отличным местом для тех, кто нуждается в поддержке.
Получить дополнительные сведения – [url=https://tajnyj-vyvod-iz-zapoya.ru/vyvod-iz-zapoya-v-stacionare-v-omske.ru/]вывод из запоя на дому круглосуточно омск[/url]
Запой — это не просто бытовое пьянство, а одно из наиболее опасных проявлений алкогольной зависимости. Во время запоя организм перестаёт функционировать в нормальном режиме: сердечно-сосудистая система работает на износ, нервная система перегружена токсинами, а печень не справляется с нагрузкой. На этом фоне могут возникать тяжёлые осложнения — от судорог и гипогликемии до нарушения дыхания и алкогольного психоза. Чем дольше длится запой, тем глубже метаболические нарушения и выше риск серьёзных последствий.
Углубиться в тему – https://vyvod-iz-zapoya-kolomna3.ru/anonimnyj-vyvod-iz-zapoya-v-kolomne
Обращение к врачу становится жизненно необходимым, если пациент находится в состоянии длительного запоя, при котором организм не справляется с накоплением токсинов. Если запой продолжается более двух-трёх дней, в теле накапливаются вредные вещества, что ведёт к нарушениям работы внутренних органов, развитию абстинентного синдрома и появлению психических нарушений. Также, если у пациента наблюдаются симптомы, такие как частая рвота, спутанность сознания, судороги или резкие скачки артериального давления, это сигнал к незамедлительному вызову специалиста. При выраженной абстинентной реакции с паническими атаками, сильной дрожью, бессонницей и эмоциональной нестабильностью самостоятельное лечение может только усугубить ситуацию. Если появляются признаки алкогольного психоза – галлюцинации, агрессивность или спутанность сознания – вызов нарколога становится обязательным для предотвращения дальнейших осложнений. Также, когда требуется подготовка к процедурам кодирования от зависимости, необходима качественная детоксикация организма, что также является показанием к срочному обращению за профессиональной помощью.
Подробнее – [url=https://narcolog-na-dom-ekaterinburg0.ru/]нарколог на дом вывод екатеринбург[/url]
Наркологическая клиника в Каменске-Уральском разрабатывает программы лечения, учитывая особенности различных видов зависимости: алкогольной, наркотической, лекарственной. Каждая программа ориентирована на индивидуальные потребности пациента, что подтверждается опытом ведущих российских реабилитационных центров. Подробнее о лечении зависимости читайте на официальном сайте Минздрава.
Детальнее – [url=https://narkologicheskaya-klinika-kamensk-uralskij11.ru/]наркологические клиники алкоголизм свердловская область[/url]
Медицинский вывод из запоя включает несколько обязательных этапов:
Углубиться в тему – [url=https://vyvod-iz-zapoya-kolomna3.ru/]vyvod-iz-zapoya-kolomna[/url]
Нарколог на дому проводит тщательный осмотр, собирает анамнез и назначает необходимые лабораторные исследования. Это позволяет выявить сопутствующие патологии и скорректировать тактику лечения.
Разобраться лучше – https://narkolog-na-dom-v-yaroslavle12.ru/narkolog-na-dom-kruglosutochno-v-yaroslavle/
Клинические протоколы стационарной терапии рекомендуют госпитализацию при средней и тяжёлой степени интоксикации.
Исследовать вопрос подробнее – https://vyvod-iz-zapoya-v-ryazani12.ru/vyvod-iz-zapoya-czena-v-ryazani/
Одним из ключевых направлений является проведение капельниц, призванных вывести токсины из организма и нормализовать водно-электролитный баланс. Используемые препараты и состав растворов подбираются индивидуально, исходя из клинической картины и истории болезни пациента.
Узнать больше – [url=https://narkolog-na-dom-v-yaroslavle12.ru/]врач нарколог на дом ярославская область[/url]
Одним из ключевых направлений является проведение капельниц, призванных вывести токсины из организма и нормализовать водно-электролитный баланс. Используемые препараты и состав растворов подбираются индивидуально, исходя из клинической картины и истории болезни пациента.
Детальнее – [url=https://narkolog-na-dom-v-yaroslavle12.ru/]нарколог на дом вывод из запоя ярославль[/url]
Работа клиники строится на принципах доказательной медицины и индивидуального подхода. При поступлении пациента осуществляется всесторонняя диагностика, включающая анализы крови, оценку психического состояния и анамнез. По результатам разрабатывается персонализированный курс терапии.
Получить дополнительную информацию – http://narkologicheskaya-klinika-v-ryazani12.ru
Пребывание в стационаре обеспечивает круглосуточный мониторинг состояния, своевременное введение лекарств и защиту пациента от внешних факторов, провоцирующих срыв. Все палаты оснащены необходимым оборудованием, соблюдаются санитарные нормы, а условия размещения соответствуют медицинским стандартам.
Ознакомиться с деталями – http://narkologicheskaya-klinika-v-yaroslavle12.ru
В наркологической клинике применяются проверенные методики терапии, включая медикаментозное лечение, детоксикацию и психотерапевтические программы. Детоксикация проводится с использованием современных капельниц, обеспечивающих безопасное выведение токсинов из организма. Важно отметить, что качественное лечение включает и работу с психологическими аспектами зависимости, что достигается посредством групповых и индивидуальных консультаций.
Подробнее тут – https://narkologicheskaya-klinika-kamensk-uralskij11.ru
lubricante durex naturals opiniones mycostatin opiniones online drugstore
Работа клиники строится на принципах доказательной медицины и индивидуального подхода. При поступлении пациента осуществляется всесторонняя диагностика, включающая анализы крови, оценку психического состояния и анамнез. По результатам разрабатывается персонализированный курс терапии.
Изучить вопрос глубже – [url=https://narkologicheskaya-klinika-v-ryazani12.ru/]бесплатная наркологическая клиника рязань[/url]
big pharmacy online: RxFree Meds – RxFree Meds
Compared to World Series of Poker and DH Texas Poker, Teen Patti download offers a version of the card game native to the Indian subcontinent. The game is played with three cards in hand and simplified rules. As such, even novice and amateur players can understand the game within a couple of minutes. Having said that, mastering the game does take patience and time. With colour prediction game online, quizzes, and casino-style games, Big Daddy Game is an online gaming platform. The platform features games like Wingo, Aviator, and Slots, catering to different gaming preferences. Users can test their intuition in colour prediction games, challenge their knowledge through quizzes, and enjoy a range of gaming options. Additionally, Big Daddy Game offers a referral program, allowing users to earn bonuses by inviting friends to join the platform.
https://nikomixhousing.nikomix.vn/property/teen-patti-rich-is-it-really-the-route-to-riches-via-live-games/
Take control of Big Small and Colour Prediction games with Tiranga Hack MOD APK. Enjoy guaranteed wins, accurate predictions, and premium features unlocked. Download Tiranga Hack MOD APK now and transform your gaming experience instantly! The “Add to desktop” approach and the “Direct download” method are fantastic ways to download the Tiranga app. Thus, let’s examine each of these approaches separately as follows: Is color trading app legal and provide real money or we can use these only for demo and entertainment purpose? Play games, win quizzes, and predict colors correctly in Tirampa to earn Patriot Points which you can trade for rewards. Why pay when you can predict for FREE?The Wingo Prediction Tool V5 is completely free for everyone. No subscriptions, no hidden charges, and no “premium features” locked behind paywalls.
Работа клиники строится на принципах доказательной медицины и индивидуального подхода. При поступлении пациента осуществляется всесторонняя диагностика, включающая анализы крови, оценку психического состояния и анамнез. По результатам разрабатывается персонализированный курс терапии.
Получить дополнительную информацию – [url=https://narkologicheskaya-klinika-v-ryazani12.ru/]наркологическая клиника нарколог в рязани[/url]
Для успешного лечения зависимости необходима тщательная диагностика. В клинике проводят полное обследование пациента, включающее:
Углубиться в тему – https://narkologicheskaya-klinika-v-murmanske12.ru/narkologicheskaya-klinika-klinika-pomoshh-v-murmanske/
Каждому пациенту уделяется внимание в зависимости от его уникальных потребностей, что способствует достижению максимальных результатов.
Изучить вопрос глубже – [url=https://tajnyj-vyvod-iz-zapoya.ru/vyvod-iz-zapoya-v-kruglosutochno-v-omske.ru/]вывод из запоя на дому круглосуточно в омске[/url]
Современная наркологическая клиника в Мурманске специализируется на комплексном лечении алкогольной, наркотической и других видов зависимости. В условиях МедЦентр Арктика используются проверенные методы диагностики и терапии, позволяющие достичь устойчивой ремиссии и восстановить качество жизни пациента.
Ознакомиться с деталями – https://narkologicheskaya-klinika-v-murmanske12.ru/narkologicheskaya-klinika-klinika-pomoshh-v-murmanske/
Точная диагностика позволяет подобрать индивидуальную программу лечения, что значительно повышает шансы на успешное выздоровление.
Получить больше информации – [url=https://narkologicheskaya-klinika-v-murmanske12.ru/]narkologicheskie kliniki alkogolizm murmansk[/url]
Вызов нарколога на дом от клиники «Трезвый Путь» имеет ряд неоспоримых преимуществ, которые высоко ценят наши пациенты:
Разобраться лучше – [url=https://narcolog-na-dom-ekaterinburg0.ru/]нарколог на дом круглосуточно[/url]
Вывод из запоя — это не просто капельница, а многоуровневая медицинская процедура, направленная на устранение интоксикации, стабилизацию состояния пациента и предотвращение осложнений. В клинике «Жизненный Луч» мы проводим эту процедуру в домашних условиях и в стационаре, в зависимости от тяжести состояния. К каждому пациенту применяем индивидуальный подход, исходя из возраста, сопутствующих заболеваний и длительности запоя.
Ознакомиться с деталями – [url=https://vyvod-iz-zapoya-kolomna3.ru/]www.domen.ru[/url]
Путь к свободе от зависимости начинается не с обещаний «просто перестать», а с профессионального медицинского вмешательства. В «Чистом Дыхании» мы применяем проверенные методы, которые работают там, где сила воли без нужной поддержки оказывается бессильной. Наша клиника в Долгопрудном работает круглосуточно — чтобы помощь была доступна в самый критический момент, когда человек ощущает острую потребность в детоксикации, снятии абстинентного синдрома или психологической поддержке.
Ознакомиться с деталями – https://narkologicheskaya-klinika-dolgoprudnyj3.ru/anonimnaya-narkologicheskaya-klinika-v-dolgoprudnom/
Для успешного лечения зависимости необходима тщательная диагностика. В клинике проводят полное обследование пациента, включающее:
Получить дополнительную информацию – [url=https://narkologicheskaya-klinika-v-murmanske12.ru/]наркологическая клиника цены[/url]
Основной этап в лечении — детоксикация организма от токсичных веществ, вызывающих интоксикацию. В клинике применяют современные методы капельниц и медикаментозной поддержки, включая препараты для снятия абстинентного синдрома.
Разобраться лучше – http://narkologicheskaya-klinika-v-murmanske12.ru
Наркологическая клиника в Каменске-Уральском разрабатывает программы лечения, учитывая особенности различных видов зависимости: алкогольной, наркотической, лекарственной. Каждая программа ориентирована на индивидуальные потребности пациента, что подтверждается опытом ведущих российских реабилитационных центров. Подробнее о лечении зависимости читайте на официальном сайте Минздрава.
Подробнее можно узнать тут – https://narkologicheskaya-klinika-kamensk-uralskij11.ru/anonimnaya-narkologicheskaya-klinika-v-kamensk-uralskom
Используя современные инфузионные системы, мы постепенно вводим растворы для выведения токсинов, коррекции водно-электролитного баланса и восстановления функции печени. Параллельно подбираются препараты для снятия абстинентного синдрома, купирования тревожности и нормализации сна.
Разобраться лучше – http://narkologicheskaya-klinika-dolgoprudnyj3.ru
Современная наркологическая клиника в Каменске-Уральском предоставляет комплексные услуги по диагностике и лечению различных видов зависимостей. Заболевания, связанные с алкоголизмом и наркоманией, требуют индивидуального подхода и применения современных медицинских технологий. В условиях клиники обеспечивается полный медицинский контроль и психологическая поддержка, что способствует успешной реабилитации пациентов.
Подробнее тут – https://narkologicheskaya-klinika-kamensk-uralskij11.ru/narkologicheskaya-klinika-telefon-v-kamensk-uralskom/
Компоненты
Исследовать вопрос подробнее – [url=https://kapelnicza-ot-zapoya-pervouralsk11.ru/]капельница от запоя на дому цена первоуральск[/url]
Эффективное лечение требует поэтапного подхода, который реализуется следующим образом:
Ознакомиться с деталями – http://
Нарколог на дому проводит тщательный осмотр, собирает анамнез и назначает необходимые лабораторные исследования. Это позволяет выявить сопутствующие патологии и скорректировать тактику лечения.
Разобраться лучше – [url=https://narkolog-na-dom-v-yaroslavle12.ru/]нарколог на дом недорого[/url]
Алкоголь и наркотики воздействуют на организм комплексно: нарушается работа сердца, сосудов, печени и почек, страдает нервная система. При запое или ломке без квалифицированной помощи возникают судороги, делирий, галлюцинации и серьёзные сбои в обмене веществ. Самостоятельные попытки «перетерпеть» или «отмотать» запой зачастую приводят к тяжёлым осложнениям, вплоть до комы и необратимых изменений в органах.
Подробнее – https://narkologicheskaya-klinika-dolgoprudnyj3.ru
Медицинский вывод из запоя включает несколько обязательных этапов:
Ознакомиться с деталями – [url=https://vyvod-iz-zapoya-kolomna3.ru/]быстрый вывод из запоя на дому[/url]
Обращение к врачу становится жизненно необходимым, если пациент находится в состоянии длительного запоя, при котором организм не справляется с накоплением токсинов. Если запой продолжается более двух-трёх дней, в теле накапливаются вредные вещества, что ведёт к нарушениям работы внутренних органов, развитию абстинентного синдрома и появлению психических нарушений. Также, если у пациента наблюдаются симптомы, такие как частая рвота, спутанность сознания, судороги или резкие скачки артериального давления, это сигнал к незамедлительному вызову специалиста. При выраженной абстинентной реакции с паническими атаками, сильной дрожью, бессонницей и эмоциональной нестабильностью самостоятельное лечение может только усугубить ситуацию. Если появляются признаки алкогольного психоза – галлюцинации, агрессивность или спутанность сознания – вызов нарколога становится обязательным для предотвращения дальнейших осложнений. Также, когда требуется подготовка к процедурам кодирования от зависимости, необходима качественная детоксикация организма, что также является показанием к срочному обращению за профессиональной помощью.
Получить дополнительную информацию – http://narcolog-na-dom-ekaterinburg0.ru/zapoj-narkolog-na-dom-ekb/https://narcolog-na-dom-ekaterinburg0.ru
Стоимость услуг зависит от продолжительности терапии, сложности случая и выбранных процедур. Однако клиника предоставляет гибкую систему оплаты, включая рассрочку и страховое покрытие.
Исследовать вопрос подробнее – https://narkologicheskaya-klinika-v-ryazani12.ru/narkologicheskaya-klinika-telefon-v-ryazani
Независимо от формы зависимости — алкогольной, опиатной, синтетической или медикаментозной — специалисты подбирают индивидуальный курс терапии. Алгоритмы лечения адаптируются под возраст, стаж употребления, общее состояние организма и наличие сопутствующих заболеваний.
Исследовать вопрос подробнее – http://narkologicheskaya-klinika-v-yaroslavle12.ru
Как поясняет врач-нарколог клиники «АлкоСтоп», «грамотно составленная инфузионная терапия не только устраняет последствия запоя, но и создаёт условия для дальнейшей мотивации пациента к лечению».
Подробнее – [url=https://kapelnicza-ot-zapoya-pervouralsk11.ru/]капельница от запоя выезд в первоуральске[/url]
В «Чистом Дыхании» вы встретите врачей-наркологов, психиатров и психологов с многолетним опытом, готовых приехать на дом для первичной детоксикации или принять в стационаре для углублённой терапии. Мы соблюдаем строгие медицинские протоколы и гарантируем безопасность даже в самых тяжёлых случаях.
Детальнее – [url=https://narkologicheskaya-klinika-dolgoprudnyj3.ru/]наркологическая клиника здоровье[/url]
Используя современные инфузионные системы, мы постепенно вводим растворы для выведения токсинов, коррекции водно-электролитного баланса и восстановления функции печени. Параллельно подбираются препараты для снятия абстинентного синдрома, купирования тревожности и нормализации сна.
Получить больше информации – http://narkologicheskaya-klinika-dolgoprudnyj3.ru/chastnaya-narkologicheskaya-klinika-v-dolgoprudnom/
Запой — это не просто бытовое пьянство, а одно из наиболее опасных проявлений алкогольной зависимости. Во время запоя организм перестаёт функционировать в нормальном режиме: сердечно-сосудистая система работает на износ, нервная система перегружена токсинами, а печень не справляется с нагрузкой. На этом фоне могут возникать тяжёлые осложнения — от судорог и гипогликемии до нарушения дыхания и алкогольного психоза. Чем дольше длится запой, тем глубже метаболические нарушения и выше риск серьёзных последствий.
Исследовать вопрос подробнее – https://vyvod-iz-zapoya-kolomna3.ru/vyvod-iz-zapoya-nedorogo-v-kolomne
glucophage online pharmacy RxFree Meds methylphenidate online pharmacy
Независимо от формы зависимости — алкогольной, опиатной, синтетической или медикаментозной — специалисты подбирают индивидуальный курс терапии. Алгоритмы лечения адаптируются под возраст, стаж употребления, общее состояние организма и наличие сопутствующих заболеваний.
Разобраться лучше – https://narkologicheskaya-klinika-v-yaroslavle12.ru/narkologicheskaya-klinika-telefon-v-yaroslavle
На сайте Минздрава указаны общие клинические рекомендации по выведению из запоя, включая допустимые дозировки и протоколы лечения.
Разобраться лучше – [url=https://vyvod-iz-zapoya-v-ryazani12.ru/]нарколог вывод из запоя в рязани[/url]
Преимущество
Получить дополнительную информацию – [url=https://narcolog-na-dom-ekaterinburg0.ru/]нарколог на дом недорого в екатеринбурге[/url]
Наркологическая клиника в Каменске-Уральском разрабатывает программы лечения, учитывая особенности различных видов зависимости: алкогольной, наркотической, лекарственной. Каждая программа ориентирована на индивидуальные потребности пациента, что подтверждается опытом ведущих российских реабилитационных центров. Подробнее о лечении зависимости читайте на официальном сайте Минздрава.
Ознакомиться с деталями – http://narkologicheskaya-klinika-kamensk-uralskij11.ru/
После диагностики врач назначает препараты, направленные на снижение абстинентного синдрома, коррекцию психоэмоционального состояния и профилактику осложнений.
Исследовать вопрос подробнее – [url=https://narkolog-na-dom-v-yaroslavle12.ru/]нарколог на дом ярославская область[/url]
Как подчёркивает главный врач клинического отделения, «в условиях стационара мы можем оперативно реагировать на малейшие изменения в состоянии пациента, что критически важно при тяжёлых формах запоя».
Изучить вопрос глубже – [url=https://vyvod-iz-zapoya-v-ryazani12.ru/]вывод из запоя капельница в рязани[/url]
Компоненты
Изучить вопрос глубже – http://kapelnicza-ot-zapoya-pervouralsk11.ru
Эффективное лечение требует поэтапного подхода, который реализуется следующим образом:
Получить больше информации – https://narkologicheskaya-klinika-v-ryazani12.ru/narkologicheskaya-klinika-telefon-v-ryazani
Компоненты
Детальнее – http://kapelnicza-ot-zapoya-pervouralsk11.ru/kapelniczy-ot-zapoya-na-domu-v-pervouralske/
На сайте Минздрава указаны общие клинические рекомендации по выведению из запоя, включая допустимые дозировки и протоколы лечения.
Получить больше информации – http://vyvod-iz-zapoya-v-ryazani12.ru/vyvod-iz-zapoya-na-domu-v-ryazani/https://vyvod-iz-zapoya-v-ryazani12.ru
Современная наркологическая клиника в Мурманске специализируется на комплексном лечении алкогольной, наркотической и других видов зависимости. В условиях МедЦентр Арктика используются проверенные методы диагностики и терапии, позволяющие достичь устойчивой ремиссии и восстановить качество жизни пациента.
Получить дополнительные сведения – http://narkologicheskaya-klinika-v-murmanske12.ru/narkologicheskaya-klinika-klinika-pomoshh-v-murmanske/
Независимо от формы зависимости — алкогольной, опиатной, синтетической или медикаментозной — специалисты подбирают индивидуальный курс терапии. Алгоритмы лечения адаптируются под возраст, стаж употребления, общее состояние организма и наличие сопутствующих заболеваний.
Выяснить больше – http://narkologicheskaya-klinika-v-yaroslavle12.ru/
Как подчёркивает врач-нарколог И.В. Синицин, «современная наркология — это не только вывод из запоя, но и работа с глубинными причинами зависимости».
Изучить вопрос глубже – [url=https://narkologicheskaya-klinika-v-yaroslavle12.ru/]наркологическая клиника цены[/url]
Нарколог на дому проводит тщательный осмотр, собирает анамнез и назначает необходимые лабораторные исследования. Это позволяет выявить сопутствующие патологии и скорректировать тактику лечения.
Получить дополнительную информацию – [url=https://narkolog-na-dom-v-yaroslavle12.ru/]нарколог на дом клиника в ярославле[/url]
Современная наркологическая клиника в Каменске-Уральском предоставляет комплексные услуги по диагностике и лечению различных видов зависимостей. Заболевания, связанные с алкоголизмом и наркоманией, требуют индивидуального подхода и применения современных медицинских технологий. В условиях клиники обеспечивается полный медицинский контроль и психологическая поддержка, что способствует успешной реабилитации пациентов.
Исследовать вопрос подробнее – http://narkologicheskaya-klinika-kamensk-uralskij11.ru
Вывод из запоя в Рязани — это комплексная медицинская услуга, направленная на устранение интоксикации, стабилизацию состояния пациента и предотвращение рецидива алкогольной зависимости. Методики подбираются индивидуально с учётом анамнеза, длительности запойного состояния, наличия сопутствующих заболеваний и психоэмоционального фона. Процедура осуществляется под контролем опытных врачей-наркологов с применением сертифицированных препаратов и оборудования.
Подробнее можно узнать тут – http://vyvod-iz-zapoya-v-ryazani12.ru/anonimnyj-vyvod-iz-zapoya-v-ryazani/
Клинические протоколы стационарной терапии рекомендуют госпитализацию при средней и тяжёлой степени интоксикации.
Выяснить больше – https://vyvod-iz-zapoya-v-ryazani12.ru/anonimnyj-vyvod-iz-zapoya-v-ryazani
Запой — это не просто бытовое пьянство, а одно из наиболее опасных проявлений алкогольной зависимости. Во время запоя организм перестаёт функционировать в нормальном режиме: сердечно-сосудистая система работает на износ, нервная система перегружена токсинами, а печень не справляется с нагрузкой. На этом фоне могут возникать тяжёлые осложнения — от судорог и гипогликемии до нарушения дыхания и алкогольного психоза. Чем дольше длится запой, тем глубже метаболические нарушения и выше риск серьёзных последствий.
Ознакомиться с деталями – [url=https://vyvod-iz-zapoya-kolomna3.ru/]вывод из запоя недорого[/url]
Медицинский вывод из запоя включает несколько обязательных этапов:
Ознакомиться с деталями – http://vyvod-iz-zapoya-kolomna3.ru
Преимущество
Выяснить больше – https://narcolog-na-dom-ekaterinburg0.ru/vrach-narkolog-na-dom-ekb
Преимущество
Детальнее – [url=https://narcolog-na-dom-ekaterinburg0.ru/]вызов нарколога на дом в екатеринбурге[/url]
Каждый пациент получает индивидуальный план лечения, основанный на клинических исследованиях, данных лабораторных анализов и психологических тестов.
Получить дополнительную информацию – https://narkologicheskaya-klinika-dolgoprudnyj3.ru
Медицинский вывод из запоя включает несколько обязательных этапов:
Получить дополнительные сведения – [url=https://vyvod-iz-zapoya-kolomna3.ru/]vyvod-iz-zapoya-na-domu-nedorogo[/url]
Одним из ключевых направлений является проведение капельниц, призванных вывести токсины из организма и нормализовать водно-электролитный баланс. Используемые препараты и состав растворов подбираются индивидуально, исходя из клинической картины и истории болезни пациента.
Узнать больше – [url=https://narkolog-na-dom-v-yaroslavle12.ru/]vyzvat-narkologa-na-dom jaroslavl'[/url]
Медицинский вывод из запоя включает несколько обязательных этапов:
Изучить вопрос глубже – [url=https://vyvod-iz-zapoya-kolomna3.ru/]вывод из запоя коломна[/url]
Наша команда врачей оперативно реагирует на каждый вызов, оказывая квалифицированную медицинскую помощь на дому. Специалисты проводят полный комплекс лечебных мероприятий, направленных на безопасное снятие интоксикации, детоксикацию и облегчение симптомов абстиненции.
Получить больше информации – [url=https://narcolog-na-dom-ekaterinburg0.ru/]vyzov-narkologa-na-dom ekaterinburg[/url]
Вызов нарколога на дом от клиники «Трезвый Путь» имеет ряд неоспоримых преимуществ, которые высоко ценят наши пациенты:
Выяснить больше – http://narcolog-na-dom-ekaterinburg0.ru/narkolog-na-dom-czena-ekb/
Наркологическая помощь на дому в Ярославле охватывает широкий спектр медицинских мероприятий, направленных на стабилизацию состояния пациента и подготовку к дальнейшему лечению. Среди основных процедур:
Ознакомиться с деталями – [url=https://narkolog-na-dom-v-yaroslavle12.ru/]нарколог на дом цена в ярославле[/url]
Компоненты
Подробнее – [url=https://kapelnicza-ot-zapoya-pervouralsk11.ru/]postavit-kapelniczu-ot-zapoya pervoural’sk[/url]
enclomiphene for men: enclomiphene best price – enclomiphene price
Эта статья предлагает живое освещение актуальной темы с множеством интересных фактов. Мы рассмотрим ключевые моменты, которые делают данную тему важной и актуальной. Подготовьтесь к насыщенному путешествию по неизвестным аспектам и узнайте больше о значимых событиях.
Подробнее тут – https://rajkajexpress.com/2024/07/16/uttarakhand-news
enclomiphene testosterone buy enclomiphene online enclomiphene for sale
Этот информационный материал привлекает внимание множеством интересных деталей и необычных ракурсов. Мы предлагаем уникальные взгляды на привычные вещи и рассматриваем вопросы, которые волнуют общество. Будьте в курсе актуальных тем и расширяйте свои знания!
Углубиться в тему – https://maidentistry.com/veneers-in-st-petersburg-fl/what-are-dental-veneers-cost-types-and-process
Эта статья предлагает уникальную подборку занимательных фактов и необычных историй, которые вы, возможно, не знали. Мы постараемся вдохновить ваше воображение и разнообразить ваш кругозор, погружая вас в мир, полный интересных открытий. Читайте и открывайте для себя новое!
Разобраться лучше – https://www.greatestofalllives.com/safepal-s1-review
Эта публикация погружает вас в мир увлекательных фактов и удивительных открытий. Мы расскажем о ключевых событиях, которые изменили ход истории, и приоткроем завесу над научными достижениями, которые вдохновили миллионы. Узнайте, чему может научить нас прошлое и как применить эти знания в будущем.
Узнать больше – https://dabbau.com/fakro
Этот интересный отчет представляет собой сборник полезных фактов, касающихся актуальных тем. Мы проанализируем данные, чтобы вы могли сделать обоснованные выводы. Читайте, чтобы узнать больше о последних трендах и значимых событиях!
Разобраться лучше – https://aathanacademy.in/tiny-scientists-on-the-loose-preschool-science-wonders-2
Download now colour trade app The lulumalls app is also an excellent free colour prediction game online. The nicest part about this app is that you don’t have to recharge it. Instead, you will receive a Rs 100 bonus as soon as you join this app. Colour Trading APK *The coupon code will be sent via email and can be used for a maximum discount of $100. Other exclusions may apply. Please see email for full terms and conditions of this offer. Install our web-app version on your PC to speed up the loading, save your recent choices on the platform, and trade without using a browser अगर आपको भविष्यवाणियाँ करने और इनाम जीतने का मज़ा पसंद है, तो MantriMall आपके लिए एक दमदार कलर ट्रेडिंग app है। इस ऐप पर आप सही रंगों का अनुमान लगाकर पैसे कमा सकते हैं और शॉपिंग वाउचर और कैशबैक जैसे शानदार रिवॉर्ड्स का आनंद ले सकते हैं।
https://sfc.moustachestudio.fr/the-full-truth-behind-aviator-the-game/
SignUp Bonus ₹41 – 10Cric is a popular gaming platform that offers top-notch features and functionality to its players. Here, you can play various dragon tiger games to earn real cash and immerse yourself in the unparalleled gaming environment. This app is trustworthy and best for dragon vs tiger game lovers, and that’s why it has earned its place on the list of top 15 dragon tiger real cash game apps in 2024. Play games and earn money: – Friends, there are total 22 types of games available in Game 3F app, out of which you can play any game about which you have knowledge. Dragon vs Tiger game is the easiest in this app and my It’s your favorite game. Play your favorite game. Through which article, all the applications you will download, one thing is most common inside all those applications is that dragon tiger games are seen inside all these applications and many of you people find dragon tiger game Like to play, that’s why we have written this article for you guys so that you can get to see a great dragon tiger game.
Эта статья для ознакомления предлагает читателям общее представление об актуальной теме. Мы стремимся представить ключевые факты и идеи, которые помогут читателям получить представление о предмете и решить, стоит ли углубляться в изучение.
Получить дополнительные сведения – https://www.vanexpert.fr/boutique/formation-newfact
Эта статья предлагает захватывающий и полезный контент, который привлечет внимание широкого круга читателей. Мы постараемся представить тебе идеи, которые вдохновят вас на изменения в жизни и предоставят практические решения для повседневных вопросов. Читайте и вдохновляйтесь!
Получить больше информации – https://pvp.co.jp/hello-world
Предлагаем вашему вниманию интересную справочную статью, в которой собраны ключевые моменты и нюансы по актуальным вопросам. Эта информация будет полезна как для профессионалов, так и для тех, кто только начинает изучать тему. Узнайте ответы на важные вопросы и расширьте свои знания!
Получить дополнительные сведения – https://bgcompanyinc.com/2024/07/28/hello-world
https://enclomiphenebestprice.com/# enclomiphene price
Эта обзорная заметка содержит ключевые моменты и факты по актуальным вопросам. Она поможет читателям быстро ориентироваться в теме и узнать о самых важных аспектах сегодня. Получите краткий курс по современной информации и оставайтесь в курсе событий!
Получить больше информации – https://burana.ac.th/web2563/2020/05/20/%E0%B8%9B%E0%B8%A3%E0%B8%B0%E0%B8%81%E0%B8%B2%E0%B8%A8%E0%B8%A3%E0%B8%B2%E0%B8%A2%E0%B8%8A%E0%B8%B7%E0%B9%88%E0%B8%AD%E0%B8%99%E0%B8%B1%E0%B8%81%E0%B9%80%E0%B8%A3%E0%B8%B5%E0%B8%A2%E0%B8%99-%E0%B8%9B/%E0%B8%A1-2-4-2
В этой публикации мы обсуждаем современные методы лечения различных заболеваний. Читатели узнают о новых медикаментах, терапиях и исследованиях, которые активно применяются для лечения. Мы нацелены на то, чтобы предоставить практические знания, которые могут помочь в борьбе с недугами.
Изучить вопрос глубже – https://diets4you.ru/kak-vovremya-raspoznat-zavisimost-i-ne-poteryat-blizkogo
В данной обзорной статье представлены интригующие факты, которые не оставят вас равнодушными. Мы критикуем и анализируем события, которые изменили наше восприятие мира. Узнайте, что стоит за новыми открытиями и как они могут изменить ваше восприятие реальности.
Получить больше информации – https://menscentral.net/15-surefire-ways-to-detect-an-abusive-woman
После вашего звонка диспетчер фиксирует заявку и передаёт её свободному специалисту. Нарколог связывается для уточнения симптомов, времени начала запоя и наличия сопутствующих заболеваний, чтобы привезти нужные препараты.
Получить дополнительную информацию – [url=https://kapelnica-ot-zapoya-voronezh.ru/]поставить капельницу от запоя[/url]
Как подчёркивает специалист ФГБУ «НМИЦ психиатрии и наркологии», «без участия квалифицированной команды невозможно обеспечить комплексный подход к пациенту, особенно если речь идёт о длительном стаже употребления и осложнённой картине заболевания». Отсюда следует — изучение состава персонала должно быть одним из первых шагов.
Подробнее – [url=https://lechenie-alkogolizma-murmansk0.ru/]клиника лечения алкоголизма мурманская область[/url]
Пациенту устанавливают катетер в вену на руке или предплечье, используя лёгкий местный анестетик для минимизации дискомфорта. Затем подключают автоматизированную помпу, обеспечивающую равномерную подачу раствора в течение 3–6 часов.
Подробнее тут – https://kapelnica-ot-zapoya-voronezh2.ru/kapelnicza-ot-zapoya-czena-v-voronezhe/
При остром алкогольном отравлении появляются головокружение, рвота, сильная слабость, скачки давления, нарушение дыхания, обмороки и судороги. Это сигнал о том, что организм не справляется с интоксикацией, и без срочного медицинского вмешательства возможны опасные осложнения, вплоть до комы.
Получить больше информации – [url=https://narcolog-na-dom-novokuznetsk00.ru/]нарколог на дом клиника новокузнецк[/url]
rx clinic pharmacy pharmacy generic viagra cellcept online pharmacy
Как поясняет врач-нарколог НМИЦ психиатрии и наркологии, «наличие оборудованного стационара с возможностью контроля осложнений — обязательное условие безопасного лечения наркомании».
Получить дополнительные сведения – https://lechenie-narkomanii-yaroslavl0.ru/lechenie-narkomanii-reabilitacziya-yaroslavl/
Мы понимаем, что лечение от алкогольной зависимости — это только первый шаг на пути к восстановлению. Профилактика рецидивов — важная часть нашего подхода. Мы проводим тренинги и курсы, направленные на развитие навыков борьбы с соблазнами и стрессом. Психотерапевтическая поддержка помогает пациентам справиться с эмоциональными трудностями, а также укрепляет мотивацию для сохранения трезвости.
Узнать больше – https://kapelnica-ot-zapoya-irkutsk3.ru/kapelnica-ot-zapoya-v-kruglosutochno-v-irkutske/
На этом этапе нарколог выясняет, какие лекарства принимались ранее, есть ли аллергии, хронические заболевания, а также уточняет объём и длительность употребления алкоголя. Это позволяет скорректировать состав инфузионных растворов.
Получить дополнительную информацию – http://kapelnica-ot-zapoya-voronezh.ru
При звонке на горячую линию операторы уточняют основные параметры: возраст пациента, длительность запоя, частоту и количество употреблённого алкоголя, наличие хронических заболеваний. Это позволяет заранее подготовить необходимый набор медикаментов и оборудования.
Детальнее – http://kapelnica-ot-zapoya-voronezh3.ru/vyezd-na-dom-kapelnicza-ot-zapoya-v-voronezhe/https://kapelnica-ot-zapoya-voronezh3.ru
Критерии оценки профессионального уровня сотрудников:
Детальнее – [url=https://lechenie-alkogolizma-yaroslavl0.ru/]анонимное лечение алкоголизма ярославль[/url]
Прежде всего необходимо убедиться, что учреждение официально зарегистрировано и обладает соответствующей лицензией на медицинскую деятельность. Этот документ выдается Минздравом и подтверждает соответствие установленным нормам.
Исследовать вопрос подробнее – [url=https://lechenie-narkomanii-yaroslavl0.ru/]лечение наркомании нарколог[/url]
Цена капельницы от запоя в Иркутске зависит от ряда факторов, таких как выбор метода лечения (на дому или в стационаре), продолжительность лечения и степень тяжести состояния пациента. Для уточнения стоимости и записи на консультацию вы можете обратиться к нашим менеджерам, которые подробно расскажут о стоимости услуг и ответят на все ваши вопросы.
Получить больше информации – [url=https://kapelnica-ot-zapoya-irkutsk3.ru/]после капельницы от запоя в иркутске[/url]
При длительном запое в крови накапливаются ацетальдегид и другие токсичные метаболиты этанола, которые повреждают клетки печени, нарушают функцию почек и приводят к дисбалансу электролитов. Без своевременной детоксикации повышается риск острых состояний — судорог, инсультов, инфаркта, панкреатита и психоза. Чем раньше начато лечение, тем быстрее нормализуются показатели обмена веществ, возвращается водно-электролитный баланс и восстанавливается работа жизненно важных органов. Анонимный выезд нарколога помогает снять психологический барьер перед обращением за помощью.
Подробнее можно узнать тут – [url=https://kapelnica-ot-zapoya-voronezh.ru/]kapelnicza-ot-zapoya voronezh[/url]
После вашего звонка диспетчер фиксирует заявку и передаёт её свободному специалисту. Нарколог связывается для уточнения симптомов, времени начала запоя и наличия сопутствующих заболеваний, чтобы привезти нужные препараты.
Разобраться лучше – [url=https://kapelnica-ot-zapoya-voronezh.ru/]после капельницы от запоя воронеж[/url]
Особую опасность представляет белая горячка (алкогольный психоз). У пациента возникают галлюцинации, приступы паники, агрессивное поведение, дезориентация во времени и пространстве. Это состояние требует незамедлительного вмешательства врача, так как человек может представлять опасность для себя и окружающих.
Углубиться в тему – [url=https://narcolog-na-dom-novokuznetsk00.ru/]вызвать нарколога на дом в новокузнецке[/url]
Как подчёркивает специалист ФГБУ «НМИЦ психиатрии и наркологии», «без участия квалифицированной команды невозможно обеспечить комплексный подход к пациенту, особенно если речь идёт о длительном стаже употребления и осложнённой картине заболевания». Отсюда следует — изучение состава персонала должно быть одним из первых шагов.
Получить дополнительную информацию – [url=https://lechenie-alkogolizma-murmansk0.ru/]лечение алкоголизма в мурманске[/url]
Все вызовы фиксируются под кодовым номером без указания ФИО, что обеспечивает полную конфиденциальность каждого пациента.
Выяснить больше – наркологическая клиника в владимире
Перед оформлением вызова проводится предварительная телефонная консультация, позволяющая оценить тяжесть состояния и заранее подготовить необходимые препараты.
Ознакомиться с деталями – [url=https://kapelnica-ot-zapoya-voronezh.ru/]капельница от запоя наркология[/url]
«ВоронежДоктор» сочетает в себе профессионализм, современное оборудование и заботу о приватности пациента. Ключевые преимущества:
Ознакомиться с деталями – http://kapelnica-ot-zapoya-voronezh2.ru/kapelnicza-ot-zapoya-na-domu-v-voronezhe/
Лечение выводом из запоя на дому в «ВоронежМед» организовано по отработанному протоколу, включающему несколько ключевых этапов.
Подробнее тут – http://kapelnica-ot-zapoya-voronezh.ru/
Некоторые состояния требуют немедленного вмешательства нарколога, так как отказ от лечения может привести к тяжелым осложнениям и риску для жизни.
Подробнее тут – [url=https://narcolog-na-dom-novokuznetsk00.ru/]нарколог на дом вывод[/url]
Обратившись к нам, вы получите анонимное и безопасное лечение, полностью соответствующее медицинским стандартам.
Получить дополнительные сведения – [url=https://narcolog-na-dom-novokuznetsk00.ru/]нарколог на дом анонимно[/url]
enclomiphene testosterone: enclomiphene price – enclomiphene buy
Даже телефонный разговор с клиникой может многое сказать о её подходе. Если вам предлагают типовое лечение без уточнения подробностей или избегают вопросов о составе команды, это тревожный сигнал. Серьёзные учреждения в Мурманске обязательно предложат предварительную консультацию, зададут уточняющие вопросы и расскажут, как строится программа помощи.
Подробнее можно узнать тут – [url=https://lechenie-alkogolizma-murmansk0.ru/]клиника лечения алкоголизма мурманск[/url]
Ключевым фактором при выборе центра становится квалификация специалистов. Лечение алкоголизма — это не только выведение из запоя и купирование абстинентного синдрома. Оно включает работу с мотивацией, тревожными состояниями, семейными конфликтами, нарушением сна и другими последствиями зависимости. Только команда, включающая наркологов, психотерапевтов и консультантов по аддиктивному поведению, способна охватить все аспекты проблемы.
Изучить вопрос глубже – http://lechenie-alkogolizma-murmansk0.ru
Мы понимаем, что лечение от алкогольной зависимости — это только первый шаг на пути к восстановлению. Профилактика рецидивов — важная часть нашего подхода. Мы проводим тренинги и курсы, направленные на развитие навыков борьбы с соблазнами и стрессом. Психотерапевтическая поддержка помогает пациентам справиться с эмоциональными трудностями, а также укрепляет мотивацию для сохранения трезвости.
Углубиться в тему – https://kapelnica-ot-zapoya-irkutsk3.ru/
Алкогольная и наркотическая зависимость оказывают разрушительное воздействие на организм, нарушая работу сердечно-сосудистой системы, печени, почек и головного мозга. Запои и передозировки приводят к острой интоксикации, которая без медицинской помощи может перерасти в поражение внутренних органов, психоз или даже летальный исход.
Подробнее можно узнать тут – [url=https://narcolog-na-dom-novokuznetsk00.ru/]vyzov-narkologa-na-dom novokuznetsk[/url]
Согласно данным ФБУ «НМИЦ терапии и профилактической медицины» Минздрава РФ, стойкая ремиссия возможна только при системном подходе: от медицинской детоксикации до сопровождения в период адаптации. Выбирая учреждение, стоит оценивать не только комфорт, но и соответствие методик современным стандартам.
Получить больше информации – [url=https://lechenie-narkomanii-yaroslavl0.ru/]лечение наркомании реабилитация[/url]
Инфузионная терапия при запое основывается на принципе постепенной и контролируемой доставки лекарственных препаратов и питательных смесей непосредственно в кровеносное русло. Это позволяет:
Подробнее тут – [url=https://kapelnica-ot-zapoya-voronezh2.ru/]капельница от запоя цена[/url]
Цена капельницы от запоя в Иркутске зависит от ряда факторов, таких как выбор метода лечения (на дому или в стационаре), продолжительность лечения и степень тяжести состояния пациента. Для уточнения стоимости и записи на консультацию вы можете обратиться к нашим менеджерам, которые подробно расскажут о стоимости услуг и ответят на все ваши вопросы.
Исследовать вопрос подробнее – [url=https://kapelnica-ot-zapoya-irkutsk3.ru/]капельница от запоя цена иркутск.[/url]
«ВоронежДоктор» сочетает в себе профессионализм, современное оборудование и заботу о приватности пациента. Ключевые преимущества:
Ознакомиться с деталями – https://kapelnica-ot-zapoya-voronezh2.ru/kapelnicza-ot-zapoya-czena-v-voronezhe/
Farmacia Asequible Farmacia Asequible Farmacia Asequible
Как подчёркивает специалист ФГБУ «НМИЦ психиатрии и наркологии», «без участия квалифицированной команды невозможно обеспечить комплексный подход к пациенту, особенно если речь идёт о длительном стаже употребления и осложнённой картине заболевания». Отсюда следует — изучение состава персонала должно быть одним из первых шагов.
Подробнее тут – https://lechenie-alkogolizma-murmansk0.ru/anonimnoe-lechenie-alkogolizma-marmansk
Как поясняет врач-нарколог НМИЦ психиатрии и наркологии, «наличие оборудованного стационара с возможностью контроля осложнений — обязательное условие безопасного лечения наркомании».
Детальнее – https://lechenie-narkomanii-yaroslavl0.ru/czentr-lecheniya-narkomanii-yaroslavl
Некоторые состояния требуют немедленного вмешательства нарколога, так как отказ от лечения может привести к тяжелым осложнениям и риску для жизни.
Получить больше информации – [url=https://narcolog-na-dom-novokuznetsk00.ru/]нарколог на дом вывод в новокузнецке[/url]
Наша клиника сочетает в себе оперативность, комфорт и высокие стандарты безопасности. Вот основные преимущества сотрудничества:
Получить дополнительную информацию – [url=https://kapelnica-ot-zapoya-voronezh3.ru/]капельница от запоя в воронеже[/url]
Нарколог измеряет пульс, артериальное давление, частоту дыхания, насыщение кислородом, а также уточняет историю употребления и наличие хронических заболеваний. Это позволяет оперативно скорректировать состав и скорость инфузии.
Детальнее – [url=https://kapelnica-ot-zapoya-voronezh2.ru/]капельница от запоя цена воронеж[/url]
Даже телефонный разговор с клиникой может многое сказать о её подходе. Если вам предлагают типовое лечение без уточнения подробностей или избегают вопросов о составе команды, это тревожный сигнал. Серьёзные учреждения в Мурманске обязательно предложат предварительную консультацию, зададут уточняющие вопросы и расскажут, как строится программа помощи.
Получить больше информации – https://lechenie-alkogolizma-murmansk0.ru/
Близкий человек в запое? Не ждите ухудшения. Обратитесь в клинику — здесь проведут профессиональный вывод из запоя с последующим восстановлением организма.
Получить дополнительную информацию – [url=https://kapelnica-ot-zapoya-lyubercy13.ru/]капельница от запоя цена Московская область[/url]
В нашей клинике используются только эффективные и безопасные препараты, что гарантирует вам быстрое восстановление и минимальные риски.
Узнать больше – https://kapelnica-ot-zapoya-irkutsk3.ru/kapelnica-ot-zapoya-anonimno-v-irkutske
В этом материале мы разберём 7 основ лечения алкоголизма и расскажем, как в Ярославле получить помощь, соответствующую современным стандартам терапии.
Подробнее можно узнать тут – https://lechenie-alkogolizma-yaroslavl0.ru/anonimnoe-lechenie-alkogolizma-yaroslavl
Пациенту устанавливают катетер в вену на руке или предплечье, используя лёгкий местный анестетик для минимизации дискомфорта. Затем подключают автоматизированную помпу, обеспечивающую равномерную подачу раствора в течение 3–6 часов.
Подробнее тут – [url=https://kapelnica-ot-zapoya-voronezh2.ru/]вызвать капельницу от запоя в воронеже[/url]
https://farmaciaasequible.shop/# diprogenta comprar sin receta
Близкий человек в запое? Не ждите ухудшения. Обратитесь в клинику — здесь проведут профессиональный вывод из запоя с последующим восстановлением организма.
Разобраться лучше – [url=https://kapelnica-ot-zapoya-lyubercy12.ru/]капельница от запоя в Москве[/url]
Как поясняет врач-нарколог НМИЦ психиатрии и наркологии, «наличие оборудованного стационара с возможностью контроля осложнений — обязательное условие безопасного лечения наркомании».
Изучить вопрос глубже – [url=https://lechenie-narkomanii-yaroslavl0.ru/]лечение наркомании ярославская область[/url]
Когда организм на пределе, важна срочная помощь в Москве — это команда опытных наркологов, которые помогут быстро и мягко выйти из запоя без вреда для здоровья.
Получить больше информации – [url=https://kapelnica-ot-zapoya-lyubercy13.ru/]капельница от запоя на дому цена Москва[/url]
Цена капельницы от запоя в Иркутске зависит от ряда факторов, таких как выбор метода лечения (на дому или в стационаре), продолжительность лечения и степень тяжести состояния пациента. Для уточнения стоимости и записи на консультацию вы можете обратиться к нашим менеджерам, которые подробно расскажут о стоимости услуг и ответят на все ваши вопросы.
Изучить вопрос глубже – https://kapelnica-ot-zapoya-irkutsk3.ru/kapelnica-ot-zapoya-na-domu-v-irkutske/
В нашей клинике “Сила воли” в Иркутске вы можете получить помощь как в стационаре, так и на дому. Мы предлагаем два вида услуг:
Подробнее тут – http://kapelnica-ot-zapoya-irkutsk3.ru
Как распознать легальный центр:
Исследовать вопрос подробнее – http://lechenie-narkomanii-yaroslavl0.ru/lechenie-khronicheskogo-alkogolizma-yaroslavl/
Перед оформлением вызова проводится предварительная телефонная консультация, позволяющая оценить тяжесть состояния и заранее подготовить необходимые препараты.
Получить дополнительную информацию – [url=https://kapelnica-ot-zapoya-voronezh.ru/]капельница от запоя выезд в воронеже[/url]
Кроме того, наличие медицинской базы с возможностью круглосуточного мониторинга состояния пациента является дополнительным преимуществом. Это особенно важно на этапе детоксикации, когда организм испытывает серьезные нагрузки.
Узнать больше – http://
enclomiphene price: enclomiphene best price – enclomiphene
Каждый день запоя увеличивает риск для жизни. Не рискуйте — специалисты в Москве приедут на дом и окажут экстренную помощь. Без боли, стресса и ожидания.
Получить больше информации – [url=https://kapelnica-ot-zapoya-lyubercy13.ru/]капельница от запоя клиника Москва[/url]
Farmacia Asequible Farmacia Asequible movicol precio con receta
Когда организм на пределе, важна срочная помощь в Москве — это команда опытных наркологов, которые помогут быстро и мягко выйти из запоя без вреда для здоровья.
Углубиться в тему – http://kapelnica-ot-zapoya-lyubercy13.ru/http://kapelnica-ot-zapoya-lyubercy13.ru
https://netbet-de.com
Discover more here https://bet22-de.com
Read this post bet22
Кроме того, наличие медицинской базы с возможностью круглосуточного мониторинга состояния пациента является дополнительным преимуществом. Это особенно важно на этапе детоксикации, когда организм испытывает серьезные нагрузки.
Углубиться в тему – [url=https://lechenie-narkomanii-yaroslavl0.ru/]лечение наркомании ярославская область[/url]
Мы понимаем, что лечение от алкогольной зависимости — это только первый шаг на пути к восстановлению. Профилактика рецидивов — важная часть нашего подхода. Мы проводим тренинги и курсы, направленные на развитие навыков борьбы с соблазнами и стрессом. Психотерапевтическая поддержка помогает пациентам справиться с эмоциональными трудностями, а также укрепляет мотивацию для сохранения трезвости.
Изучить вопрос глубже – https://kapelnica-ot-zapoya-irkutsk3.ru/kapelnica-ot-zapoya-anonimno-v-irkutske
Близкий человек в запое? Не ждите ухудшения. Обратитесь в клинику — здесь проведут профессиональный вывод из запоя с последующим восстановлением организма.
Исследовать вопрос подробнее – [url=https://kapelnica-ot-zapoya-lyubercy12.ru/]капельница от запоя на дому цена[/url]
Этот информационный обзор станет отличным путеводителем по актуальным темам, объединяющим важные факты и мнения экспертов. Мы исследуем ключевые идеи и представляем их в доступной форме для более глубокого понимания. Читайте, чтобы оставаться в курсе событий!
Получить больше информации – https://khabrichidiya.com/sanskrit-schools-colleges-of-uttarakhand-state
Browse through here https://sbobet-de.com/
See how it works sbobet
Learn the details here https://kent-de.com
В этом интересном тексте собраны обширные сведения, которые помогут вам понять различные аспекты обсуждаемой темы. Мы разбираем детали и факты, делая акцент на важности каждого элемента. Не упустите возможность расширить свои знания и взглянуть на мир по-новому!
Подробнее можно узнать тут – https://qh88.repair/keo-banh-la-gi
Этот информативный текст выделяется своими захватывающими аспектами, которые делают сложные темы доступными и понятными. Мы стремимся предложить читателям глубину знаний вместе с разнообразием интересных фактов. Откройте новые горизонты и развивайте свои способности познавать мир!
Получить дополнительные сведения – https://www.incaweb.com.br/participacao-no-lancamento-do-livro-empreenday
Этот обзорный материал предоставляет информационно насыщенные данные, касающиеся актуальных тем. Мы стремимся сделать информацию доступной и структурированной, чтобы читатели могли легко ориентироваться в наших выводах. Познайте новое с нашим обзором!
Подробнее – https://ijpfiasi.ro/extra-chilli-position-opinion-btg-earn-up-to-20000x
Этот информативный текст отличается привлекательным содержанием и актуальными данными. Мы предлагаем читателям взглянуть на привычные вещи под новым углом, предоставляя интересный и доступный материал. Получите удовольствие от чтения и расширьте кругозор!
Получить больше информации – https://predportgorelovo.ru/vyvedenie-iz-zapoya-na-domu-v-krasnodare
В этой публикации мы предлагаем подробные объяснения по актуальным вопросам, чтобы помочь читателям глубже понять их. Четкость и структурированность материала сделают его удобным для усвоения и применения в повседневной жизни.
Выяснить больше – https://privrespwp2.wpxblog.jp/%E4%B8%8D%E7%94%A8%E5%93%81%E3%81%AE%E5%87%A6%E5%88%86%E6%96%B9%E6%B3%95
enclomiphene for sale enclomiphene online enclomiphene for men
Предлагаем вашему вниманию интересную справочную статью, в которой собраны ключевые моменты и нюансы по актуальным вопросам. Эта информация будет полезна как для профессионалов, так и для тех, кто только начинает изучать тему. Узнайте ответы на важные вопросы и расширьте свои знания!
Получить дополнительные сведения – https://www.glasatelieridee.nl/cropped-favicon-png
Первый и самый важный момент — какие методики применяются в клинике. Качественное лечение наркозависимости включает несколько этапов: детоксикация, стабилизация состояния, психотерапия, ресоциализация. Одного лишь выведения токсинов из организма недостаточно — без проработки психологических причин употребления высокий риск рецидива.
Детальнее – центр лечения наркомании
В этой публикации мы предлагаем подробные объяснения по актуальным вопросам, чтобы помочь читателям глубже понять их. Четкость и структурированность материала сделают его удобным для усвоения и применения в повседневной жизни.
Углубиться в тему – https://www.bauwesen.co/ard-plusminus-bahnhoefe-stuttgart-21
Этот информативный текст отличается привлекательным содержанием и актуальными данными. Мы предлагаем читателям взглянуть на привычные вещи под новым углом, предоставляя интересный и доступный материал. Получите удовольствие от чтения и расширьте кругозор!
Ознакомиться с деталями – https://www.pegadados.com.br/2023/06/22/harnessing-the-power-of-social-media-for-business-growth
See for yourself rhino
Do you mind if I quote a couple of your articles as long as I
provide credit and sources back to your blog? My website is in the exact same niche as yours and my visitors would really benefit from some of the
information you present here. Please let me know if this okay with you.
Thanks!
1go
Критерий
Исследовать вопрос подробнее – [url=https://narkologicheskaya-klinika-nizhnij-tagil11.ru/]наркологические клиники алкоголизм свердловская область[/url]
Go to this page https://rhino-de.com/
Самостоятельно выйти из запоя — почти невозможно. В Москве врачи клиники проводят медикаментозный вывод из запоя с круглосуточным выездом. Доверяйте профессионалам.
Подробнее – [url=https://kapelnica-ot-zapoya-lyubercy11.ru/]капельница от запоя наркология[/url]
Современная наркологическая клиника в Каменске-Уральском предоставляет комплексные услуги по диагностике и лечению различных видов зависимостей. Заболевания, связанные с алкоголизмом и наркоманией, требуют индивидуального подхода и применения современных медицинских технологий. В условиях клиники обеспечивается полный медицинский контроль и психологическая поддержка, что способствует успешной реабилитации пациентов.
Получить больше информации – https://narkologicheskaya-klinika-kamensk-uralskij11.ru/anonimnaya-narkologicheskaya-klinika-v-kamensk-uralskom/
В этом обзорном материале представлены увлекательные детали, которые находят отражение в различных аспектах жизни. Мы исследуем непонятные и интересные моменты, позволяя читателю увидеть картину целиком. Погрузитесь в мир знаний и удивительных открытий!
Разобраться лучше – https://zindahun.com/adam-hazard-win-the-game
Компоненты
Детальнее – http://kapelnicza-ot-zapoya-pervouralsk11.ru/
Space XY is a game for those who love risk and excitement. By observing the trajectory of the rocket, you can see how much your earnings can increase from the original rate. If you do not have time to cash out the bet before the rocket has flown into space, then such a bet burns out. But provided that you have time to press the cashout button, your bet is multiplied in proportion to your odds. Developed by 1Win, Rocket X has quickly won over players thanks to its straightforward gameplay, high payout potential, and engaging visuals. As the rocket ascends into space, your objective is to cash out before it disappears into the stars. Space XY is a game with a high percentage of return to the player, which is equal to 97%, which means that winning money in it is quite easy – just make a bet and wait for a large multiplier. You can play the slot on any devices, you don’t need to download the game for this. Space XY is available in two modes – players can bet for real money, and can try crash slot in test mode for free and without registration in online casinos.
https://btechsolar.lk/server-status-mines-game-how-to-check-live-performance/
You can download our 1win mobile app for Android and iOS for free. This way, you can play our casino games, including the SpaceX crash game, at any time. Here are the quick instructions on what you need to do to download the 1win Space XY app: The thrilling crash game SpaceXY can be found at many casinos online. But to ensure the integrity and safety of financial transactions, it is recommended to choose only honest and reliable online casinos. Only in such establishments you can be sure that your financial information is reliably protected, and the won funds will be paid on time. Therefore, when choosing a place to play SpaceXY, give preference to official online casinos. Space XY – a unique opportunity to feel like a pilot of a real space shuttle. In the crash game you will control the rocket, which goes on a distant space journey, full of dangers and risks. The longer the rocket flies, the bigger the prize multiplier that determines the size of your prize. The player’s task is as simple as possible – you place your bet and wait for the round to start. The rocket goes on a journey, and the multiplier begins to grow. The aim of the game is to withdraw your winnings before the ship crashes. If the player manages to hit the Cash Out button and take the money, his winnings will be equal to the bet multiplied by the prize multiplier.
Наркологическая помощь в Первоуральске доступна в различных форматах: амбулаторно, стационарно и на дому. Однако не каждое учреждение может обеспечить необходимый уровень комплексной терапии, соответствующей стандартам Минздрава РФ и НМИЦ психиатрии и наркологии. В этом материале мы рассмотрим ключевые особенности профессионального наркологического центра и критерии, которые помогут сделать осознанный выбор.
Разобраться лучше – [url=https://narkologicheskaya-klinika-pervouralsk11.ru/]наркологические клиники алкоголизм свердловская область[/url]
Первое, на что стоит обратить внимание — это профессиональный уровень сотрудников. Без квалифицированных наркологов, клинических психологов и психиатров реабилитационный процесс становится формальным и неэффективным.
Получить дополнительные сведения – [url=https://narkologicheskaya-klinika-nizhnij-tagil11.ru/]наркологическая клиника цены нижний тагил[/url]
Have a look here noxwin
Explore more noxwin
Вся процедура проходит под полным контролем врача и занимает от 40 минут до 2 часов. Пациенту и его родственникам даются рекомендации по дальнейшему лечению и профилактике повторных запоев.
Узнать больше – [url=https://kapelnica-ot-zapoya-moskva00.ru/]капельница от запоя клиника в москве[/url]
Одним из ключевых направлений является проведение капельниц, призванных вывести токсины из организма и нормализовать водно-электролитный баланс. Используемые препараты и состав растворов подбираются индивидуально, исходя из клинической картины и истории болезни пациента.
Подробнее – [url=https://narkolog-na-dom-v-yaroslavle12.ru/]нарколог на дом срочно ярославль[/url]
Запой — опасное состояние, которое стремительно приводит к тяжелым последствиям для организма. Обычные домашние методы восстановления при алкогольной интоксикации не только малоэффективны, но и небезопасны. Для быстрого и безопасного выведения токсинов требуется профессиональная помощь нарколога с применением капельницы от запоя.
Получить дополнительные сведения – [url=https://kapelnica-ot-zapoya-moskva000.ru/]врач на дом капельница от запоя москва[/url]
RxFree Meds: online us pharmacy – RxFree Meds
Вызов нарколога на дом — востребованная услуга, позволяющая оказать пациенту помощь в привычной обстановке без необходимости посещения клиники. Особенно актуально это при запойном состоянии, абстинентном синдроме или первых признаках передозировки. Согласно информации Минздрава РФ, амбулаторная помощь эффективна при своевременном обращении и наличии квалифицированной команды специалистов.
Подробнее можно узнать тут – https://narkolog-na-dom-nizhnij-tagil11.ru/narkolog-na-dom-czeny-v-nizhnem-tagile
Вызов нарколога возможен круглосуточно, что обеспечивает оперативное реагирование на критические ситуации. Пациенты и их родственники могут получить помощь в любое время, не дожидаясь ухудшения состояния.
Получить дополнительную информацию – [url=https://narkolog-na-dom-kamensk-uralskij11.ru/]выезд нарколога на дом[/url]
Нарколог, приехавший на дом, первым делом проводит осмотр пациента, оценивает его состояние и выбирает подходящие препараты для детоксикации организма. Это может включать капельницы с солевыми растворами, витаминами и глюкозой, которые способствуют очищению организма.
Подробнее – [url=https://kapelnica-ot-zapoya-irkutsk2.ru/kapelnica-ot-zapoya-na-domu-v-irkutske/]kapelnica ot zapoya vrach na dom v irkutske[/url]
Оптимальный состав команды включает:
Углубиться в тему – https://narkologicheskaya-klinika-pervouralsk11.ru/chastnaya-narkologicheskaya-klinika-v-pervouralske/
Как подчёркивает заведующая отделением клинической психологии ФГБУН «НМИЦ психиатрии и наркологии» Минздрава России, наличие в команде специалистов с опытом работы в области зависимости — это основа качественной помощи.
Изучить вопрос глубже – [url=https://narkologicheskaya-klinika-nizhnij-tagil11.ru/]наркологическая клиника нарколог нижний тагил[/url]
Особенно важно на этапе поступления пройти полную психодиагностику и получить адаптированную под конкретного пациента программу. Это позволит учитывать возможные сопутствующие расстройства, включая тревожные, аффективные и когнитивные нарушения.
Исследовать вопрос подробнее – [url=https://narkologicheskaya-klinika-nizhnij-tagil11.ru/]наркологические клиники алкоголизм нижний тагил.[/url]
What i don’t understood is in reality how you’re not really a lot more
smartly-preferred than you may be right now.
You are so intelligent. You realize thus significantly in terms of this subject, produced me in my view believe it from a lot of
numerous angles. Its like men and women aren’t involved until it’s one thing to do
with Girl gaga! Your personal stuffs outstanding. At all times maintain it up!
wildz
Современная наркологическая клиника в Каменске-Уральском предоставляет комплексные услуги по диагностике и лечению различных видов зависимостей. Заболевания, связанные с алкоголизмом и наркоманией, требуют индивидуального подхода и применения современных медицинских технологий. В условиях клиники обеспечивается полный медицинский контроль и психологическая поддержка, что способствует успешной реабилитации пациентов.
Получить дополнительную информацию – [url=https://narkologicheskaya-klinika-kamensk-uralskij11.ru/]бесплатная наркологическая клиника в каменске-уральском[/url]
enclomiphene enclomiphene for men buy enclomiphene online
Первое, на что стоит обратить внимание — это профессиональный уровень сотрудников. Без квалифицированных наркологов, клинических психологов и психиатров реабилитационный процесс становится формальным и неэффективным.
Получить дополнительную информацию – https://narkologicheskaya-klinika-nizhnij-tagil11.ru/platnaya-narkologicheskaya-klinika-v-nizhnem-tagile
When I initially left a comment I appear to have clicked the -Notify me when new comments are added- checkbox and now whenever a comment
is added I recieve four emails with the exact same comment.
There has to be a way you are able to remove me from that
service? Thank you!
mozzart
Клиника «МедАльянс» оказывает профессиональную медицинскую помощь на дому в Москве и Московской области круглосуточно. Опытные врачи-наркологи приедут в течение часа после вызова, проведут полную диагностику, поставят капельницу и быстро вернут пациента в стабильное состояние.
Подробнее – https://kapelnica-ot-zapoya-moskva000.ru/
Как подчёркивает руководитель направления клинической токсикологии НМИЦ психиатрии и наркологии, «оказание помощи на дому требует не меньшего профессионализма, чем лечение в стационаре, ведь врач действует в ограниченных условиях».
Детальнее – https://narkolog-na-dom-nizhnij-tagil11.ru/vyzov-narkologa-na-dom-v-nizhnem-tagile/
Эта статья полна интересного контента, который побудит вас исследовать новые горизонты. Мы собрали полезные факты и удивительные истории, которые обогащают ваше понимание темы. Читайте, погружайтесь в детали и наслаждайтесь процессом изучения!
Углубиться в тему – https://vyvod-iz-zapoya-1.ru/
В Нижнем Тагиле действуют как частные, так и государственные учреждения, предоставляющие реабилитационные услуги. Однако подход, опыт специалистов и оснащение в них могут существенно различаться. Многие учреждения работают без лицензий, используют устаревшие методы или нанимают неквалифицированный персонал. Чтобы не столкнуться с такими рисками, необходимо тщательно проанализировать выбранный центр по нескольким ключевым направлениям.
Получить дополнительные сведения – [url=https://narkologicheskaya-klinika-nizhnij-tagil11.ru/]платная наркологическая клиника[/url]
http://enclomiphenebestprice.com/# enclomiphene
Современная наркологическая клиника в Каменске-Уральском предоставляет комплексные услуги по диагностике и лечению различных видов зависимостей. Заболевания, связанные с алкоголизмом и наркоманией, требуют индивидуального подхода и применения современных медицинских технологий. В условиях клиники обеспечивается полный медицинский контроль и психологическая поддержка, что способствует успешной реабилитации пациентов.
Получить дополнительные сведения – [url=https://narkologicheskaya-klinika-kamensk-uralskij11.ru/]частная наркологическая клиника каменск-уральский[/url]
Современная наркологическая клиника в Каменске-Уральском предоставляет комплексные услуги по диагностике и лечению различных видов зависимостей. Заболевания, связанные с алкоголизмом и наркоманией, требуют индивидуального подхода и применения современных медицинских технологий. В условиях клиники обеспечивается полный медицинский контроль и психологическая поддержка, что способствует успешной реабилитации пациентов.
Детальнее – [url=https://narkologicheskaya-klinika-kamensk-uralskij11.ru/]наркологическая клиника нарколог в каменске-уральском[/url]
Затяжной запой опасен для жизни. Врачи наркологической клиники в Москве проводят срочный вывод из запоя — на дому или в стационаре. Анонимно, безопасно, круглосуточно.
Получить дополнительную информацию – [url=https://kapelnica-ot-zapoya-lyubercy11.ru/]капельница от запоя на дому цена[/url]
Клинические протоколы стационарной терапии рекомендуют госпитализацию при средней и тяжёлой степени интоксикации.
Исследовать вопрос подробнее – http://vyvod-iz-zapoya-v-ryazani12.ru/vyvod-iz-zapoya-na-domu-v-ryazani/https://vyvod-iz-zapoya-v-ryazani12.ru
Назначение
Получить дополнительные сведения – [url=https://kapelnicza-ot-zapoya-pervouralsk11.ru/]капельница от запоя цена свердловская область[/url]
Наркологическая помощь в Первоуральске доступна в различных форматах: амбулаторно, стационарно и на дому. Однако не каждое учреждение может обеспечить необходимый уровень комплексной терапии, соответствующей стандартам Минздрава РФ и НМИЦ психиатрии и наркологии. В этом материале мы рассмотрим ключевые особенности профессионального наркологического центра и критерии, которые помогут сделать осознанный выбор.
Углубиться в тему – [url=https://narkologicheskaya-klinika-pervouralsk11.ru/]платная наркологическая клиника[/url]
Одним из ключевых этапов терапии является медикаментозное устранение абстинентного синдрома, что значительно облегчает состояние пациента. Для этого используются препараты, рекомендованные к применению ведущими специалистами в области наркологии. Примером могут служить протоколы лечения, описанные на официальном портале наркологической помощи России.
Подробнее тут – [url=https://narkologicheskaya-klinika-kamensk-uralskij11.ru/]narkologicheskaya klinika kamensk-ural’skij[/url]
Профессиональная клиника никогда не скрывает информацию о своих сотрудниках. На официальных сайтах нередко размещены сканы дипломов, сведения о специализации и стаже, участие в отраслевых конференциях и проектах Минздрава.
Изучить вопрос глубже – http://narkologicheskaya-klinika-pervouralsk11.ru/
Нарколог на дому проводит тщательный осмотр, собирает анамнез и назначает необходимые лабораторные исследования. Это позволяет выявить сопутствующие патологии и скорректировать тактику лечения.
Узнать больше – https://narkolog-na-dom-v-yaroslavle12.ru/narkolog-na-dom-czeny-v-yaroslavle
tesco pharmacy doxycycline: RxFree Meds – pharmacy mistake methotrexate
My spouse and I stumbled over here different web page and thought I should
check things out. I like what I see so i am just following you.
Look forward to exploring your web page for a second time.
fortnitetracker
В этой статье мы рассмотрим ключевые аспекты выбора надёжного специалиста, который приедет по вызову и сможет оказать квалифицированную помощь без промедлений.
Подробнее тут – [url=https://narkolog-na-dom-nizhnij-tagil11.ru/]narkolog-na-dom-kruglosutochno nizhnij tagil[/url]
Близкий человек в запое? Не ждите ухудшения. Обратитесь в клинику — здесь проведут профессиональный вывод из запоя с последующим восстановлением организма.
Подробнее – https://kapelnica-ot-zapoya-lyubercy11.ru
После поступления вызова врач наркологической клиники «МедАльянс» прибывает на дом в течение 30–60 минут. Сначала специалист оценивает общее состояние пациента, измеряет давление, уровень кислорода в крови и уточняет детали анамнеза.
Подробнее тут – [url=https://kapelnica-ot-zapoya-moskva000.ru/]капельница от запоя на дому цена москва[/url]
Стандартная процедура включает внутривенное введение растворов, которые эффективно выводят токсины, восстанавливают электролитный баланс и устраняют обезвоживание. Дополнительно врач назначает медикаменты для защиты сердца, печени и нервной системы, а также, при необходимости, седативные препараты для стабилизации психического состояния.
Получить больше информации – [url=https://kapelnica-ot-zapoya-moskva00.ru/]капельница от запоя на дому цена в москве[/url]
Близкий человек в запое? Не ждите ухудшения. Обратитесь в клинику — здесь проведут профессиональный вывод из запоя с последующим восстановлением организма.
Получить дополнительные сведения – [url=https://kapelnica-ot-zapoya-lyubercy11.ru/]врача капельницу от запоя в Москве[/url]
Компоненты
Узнать больше – [url=https://kapelnicza-ot-zapoya-pervouralsk11.ru/]kapelnicza-ot-zapoya pervoural’sk[/url]
В статье рассмотрим ключевые моменты, которые помогут сориентироваться при выборе капельницы от запоя, понять механизм действия и особенности процедуры, а также избежать типичных ошибок при обращении за медицинской помощью.
Исследовать вопрос подробнее – https://kapelnicza-ot-zapoya-pervouralsk11.ru
Высокий уровень лечения обеспечивается квалификацией врачей, имеющих опыт работы в области наркологии, а также современным медицинским оборудованием, позволяющим проводить диагностику и лечение на самом высоком уровне. Врачи регулярно повышают квалификацию, участвуя в конференциях и обучающих программах. Подробности о квалификации специалистов доступны на портале медицинского сообщества.
Изучить вопрос глубже – [url=https://narkologicheskaya-klinika-kamensk-uralskij11.ru/]частная наркологическая клиника каменск-уральский[/url]
Первое, что необходимо уточнить перед вызовом — наличие у врача лицензии и профильного медицинского образования. Только сертифицированный нарколог может назначить препараты, поставить капельницу и провести детоксикацию без ущерба для здоровья пациента.
Подробнее тут – [url=https://narkolog-na-dom-nizhnij-tagil11.ru/]врач нарколог на дом[/url]
Spot on with this write-up, I absolutely believe that this amazing site needs a great deal
more attention. I’ll probably be back again to read through more, thanks for the info!
darkorbit
После поступления вызова врач наркологической клиники «МедАльянс» прибывает на дом в течение 30–60 минут. Сначала специалист оценивает общее состояние пациента, измеряет давление, уровень кислорода в крови и уточняет детали анамнеза.
Разобраться лучше – [url=https://kapelnica-ot-zapoya-moskva000.ru/]вызвать капельницу от запоя на дому в москве[/url]
Вызов нарколога на дом в Каменске-Уральском обеспечивает безопасность пациента, исключая необходимость посещения медицинского учреждения, что особенно актуально при тяжелом состоянии или психологическом сопротивлении. Такая помощь включает в себя детоксикацию, купирование абстинентного синдрома и консультации по дальнейшему лечению.
Узнать больше – [url=https://narkolog-na-dom-kamensk-uralskij11.ru/]нарколог на дом вывод из запоя каменск-уральский[/url]
Самостоятельно выйти из запоя — почти невозможно. В Москве врачи клиники проводят медикаментозный вывод из запоя с круглосуточным выездом. Доверяйте профессионалам.
Получить дополнительные сведения – [url=https://kapelnica-ot-zapoya-lyubercy11.ru/]капельница от запоя Москва[/url]
Компоненты
Исследовать вопрос подробнее – [url=https://kapelnicza-ot-zapoya-pervouralsk11.ru/]kapelnicza-ot-zapoya-czena pervoural’sk[/url]
Наркологическая помощь на дому в Ярославле охватывает широкий спектр медицинских мероприятий, направленных на стабилизацию состояния пациента и подготовку к дальнейшему лечению. Среди основных процедур:
Разобраться лучше – [url=https://narkolog-na-dom-v-yaroslavle12.ru/]narkolog-na-dom-kruglosutochno jaroslavl'[/url]
Нарколог на дому проводит тщательный осмотр, собирает анамнез и назначает необходимые лабораторные исследования. Это позволяет выявить сопутствующие патологии и скорректировать тактику лечения.
Подробнее – https://narkolog-na-dom-v-yaroslavle12.ru/vyzov-narkologa-na-dom-v-yaroslavle/
Выбор наркологической клиники — ключевой шаг на пути к выздоровлению, от которого зависит не только физическое и психическое состояние пациента, но и устойчивость достигнутых результатов. Современные учреждения предлагают широкий спектр услуг, однако уровень подготовки персонала, методики лечения и условия пребывания могут существенно отличаться.
Получить больше информации – https://narkologicheskaya-klinika-pervouralsk11.ru/chastnaya-narkologicheskaya-klinika-v-pervouralske
pharmacy coumadin clinic RxFree Meds RxFree Meds
Howdy! I could have sworn I’ve been to this website before but after checking through
some of the post I realized it’s new to me. Anyways,
I’m definitely glad I found it and I’ll be book-marking and checking back often!
viggoslots
Как поясняет врач-нарколог клиники «АлкоСтоп», «грамотно составленная инфузионная терапия не только устраняет последствия запоя, но и создаёт условия для дальнейшей мотивации пациента к лечению».
Углубиться в тему – https://kapelnicza-ot-zapoya-pervouralsk11.ru
Как поясняет медицинский психолог Елена Мусатова, «пациенту важно доверять специалисту, понимать его подход и чувствовать профессиональную уверенность ещё на этапе первичного осмотра».
Получить больше информации – [url=https://narkologicheskaya-klinika-pervouralsk11.ru/]www.domen.ru[/url]
После успешной детоксикации начинается этап реабилитации, который включает восстановление социального статуса пациента и формирование новых здоровых привычек. Мы предлагаем как групповые, так и индивидуальные занятия, направленные на изменение поведения и мышления, что способствует долгосрочному удержанию пациента от возвращения к зависимостям.
Ознакомиться с деталями – [url=https://kapelnica-ot-zapoya-irkutsk2.ru/kapelnica-ot-zapoya-cena-v-irkutske/]kapelnica ot zapoya srochno kruglosutochno irkutsk[/url]
Первое, на что стоит обратить внимание, — это штат клиники. От опыта врачей напрямую зависит точность диагностики, подбор препаратов и эффективность психотерапевтической поддержки.
Исследовать вопрос подробнее – [url=https://narkologicheskaya-klinika-pervouralsk11.ru/]наркологические клиники алкоголизм первоуральск[/url]
Нарколог на дому проводит тщательный осмотр, собирает анамнез и назначает необходимые лабораторные исследования. Это позволяет выявить сопутствующие патологии и скорректировать тактику лечения.
Получить дополнительные сведения – https://narkolog-na-dom-v-yaroslavle12.ru/narkolog-na-dom-czeny-v-yaroslavle/
Близкий человек в запое? Не ждите ухудшения. Обратитесь в клинику — здесь проведут профессиональный вывод из запоя с последующим восстановлением организма.
Детальнее – [url=https://kapelnica-ot-zapoya-lyubercy11.ru/]капельница от запоя цена город. Московская область[/url]
Check out this content https://PERSIB-Bandung.com
В этой статье мы рассмотрим ключевые аспекты выбора надёжного специалиста, который приедет по вызову и сможет оказать квалифицированную помощь без промедлений.
Получить больше информации – http://narkolog-na-dom-nizhnij-tagil11.ru
Запой — опасное состояние, которое стремительно приводит к тяжелым последствиям для организма. Обычные домашние методы восстановления при алкогольной интоксикации не только малоэффективны, но и небезопасны. Для быстрого и безопасного выведения токсинов требуется профессиональная помощь нарколога с применением капельницы от запоя.
Получить больше информации – [url=https://kapelnica-ot-zapoya-moskva000.ru/]капельница от запоя клиника в москве[/url]
Нарколог на дому проводит тщательный осмотр, собирает анамнез и назначает необходимые лабораторные исследования. Это позволяет выявить сопутствующие патологии и скорректировать тактику лечения.
Подробнее – [url=https://narkolog-na-dom-v-yaroslavle12.ru/]нарколог на дом круглосуточно ярославль[/url]
online pharmacy generic finasteride: harris teeter pharmacy – RxFree Meds
Клинические протоколы стационарной терапии рекомендуют госпитализацию при средней и тяжёлой степени интоксикации.
Выяснить больше – [url=https://vyvod-iz-zapoya-v-ryazani12.ru/]вывод из запоя цена[/url]
RxFree Meds: RxFree Meds – Allegra
Клиника «МедАльянс» оказывает профессиональную медицинскую помощь на дому в Москве и Московской области круглосуточно. Опытные врачи-наркологи приедут в течение часа после вызова, проведут полную диагностику, поставят капельницу и быстро вернут пациента в стабильное состояние.
Ознакомиться с деталями – https://kapelnica-ot-zapoya-moskva000.ru/kapelnicza-ot-zapoya-czena-msk
Запой — опасное состояние, которое стремительно приводит к тяжелым последствиям для организма. Обычные домашние методы восстановления при алкогольной интоксикации не только малоэффективны, но и небезопасны. Для быстрого и безопасного выведения токсинов требуется профессиональная помощь нарколога с применением капельницы от запоя.
Узнать больше – [url=https://kapelnica-ot-zapoya-moskva000.ru/]kapelnicza-ot-zapoya-na-domu moskva[/url]
В этой статье вы найдете познавательную и занимательную информацию, которая поможет вам лучше понять мир вокруг. Мы собрали интересные данные, которые вдохновляют на размышления и побуждают к действиям. Открывайте новую информацию и получайте удовольствие от чтения!
Получить больше информации – https://jornalbaixadasantista.com.br/2023/05/13/comunicado-prefeitura-estancia-turistica-guaratingueta
В этой статье вы найдете познавательную и занимательную информацию, которая поможет вам лучше понять мир вокруг. Мы собрали интересные данные, которые вдохновляют на размышления и побуждают к действиям. Открывайте новую информацию и получайте удовольствие от чтения!
Ознакомиться с деталями – https://cozinhasaudeedicas.com/suco-de-milho-cremoso-feito-com-3-ingredientes
Этот информативный текст выделяется своими захватывающими аспектами, которые делают сложные темы доступными и понятными. Мы стремимся предложить читателям глубину знаний вместе с разнообразием интересных фактов. Откройте новые горизонты и развивайте свои способности познавать мир!
Подробнее тут – https://lokatormedia.pl/ksiazki/jadro-ciemnosci-powiesc-graficzna
Эта статья предлагает уникальную подборку занимательных фактов и необычных историй, которые вы, возможно, не знали. Мы постараемся вдохновить ваше воображение и разнообразить ваш кругозор, погружая вас в мир, полный интересных открытий. Читайте и открывайте для себя новое!
Исследовать вопрос подробнее – https://qh88.repair/ban-ca-an-xu
Этот интересный отчет представляет собой сборник полезных фактов, касающихся актуальных тем. Мы проанализируем данные, чтобы вы могли сделать обоснованные выводы. Читайте, чтобы узнать больше о последних трендах и значимых событиях!
Подробнее – https://www.pharelya.fr/hello-world
В обзорной статье вы найдете собрание важных фактов и аналитики по самым разнообразным темам. Мы рассматриваем как современные исследования, так и исторические контексты, чтобы вы могли получить полное представление о предмете. Погрузитесь в мир знаний и сделайте шаг к пониманию!
Получить больше информации – https://www.lafabriquejm.com/2019/03/30/sustainable-tote-bag-hashtag
Farmacia Asequible Farmacia Asequible Farmacia Asequible
I have learn some just right stuff here. Definitely value bookmarking for revisiting.
I wonder how much attempt you put to create one of these fantastic informative
website.
bitkingz
В этой статье вы найдете познавательную и занимательную информацию, которая поможет вам лучше понять мир вокруг. Мы собрали интересные данные, которые вдохновляют на размышления и побуждают к действиям. Открывайте новую информацию и получайте удовольствие от чтения!
Получить дополнительную информацию – http://ryburntextworks.co.uk/rwt_logo
https://rxfreemeds.com/# RxFree Meds
enclomiphene testosterone: enclomiphene best price – enclomiphene for men
https://enclomiphenebestprice.shop/# enclomiphene best price
Visit this link https://Persija-Jakarta-id.com
В этой публикации мы сосредоточимся на интересных аспектах одной из самых актуальных тем современности. Совмещая факты и мнения экспертов, мы создадим полное представление о предмете, которое будет полезно как новичкам, так и тем, кто глубоко изучает вопрос.
Подробнее тут – http://www.qa-hackathon.org/2020/06/07/bank-ternama-indonesia-yang-sukses-menggelar-event-hackathon
Этот увлекательный информационный материал подарит вам массу новых знаний и ярких эмоций. Мы собрали для вас интересные факты и сведения, которые обогатят ваш опыт. Откройте для себя увлекательный мир информации и насладитесь процессом изучения!
Подробнее – https://wisatakopi.mitrapalupi.com/2022/23.59548
В этой информационной статье вы найдете интересное содержание, которое поможет вам расширить свои знания. Мы предлагаем увлекательный подход и уникальные взгляды на обсуждаемые темы, побуждая пользователей к активному мышлению и критическому анализу!
Получить больше информации – http://www.6555555.com/1198.html?replyTo=32337
buy enclomiphene online: enclomiphene – enclomiphene online
Эта статья предлагает живое освещение актуальной темы с множеством интересных фактов. Мы рассмотрим ключевые моменты, которые делают данную тему важной и актуальной. Подготовьтесь к насыщенному путешествию по неизвестным аспектам и узнайте больше о значимых событиях.
Ознакомиться с деталями – https://odontologiaeoc.cl/ortodonciainvisible
enclomiphene for men enclomiphene citrate enclomiphene price
http://rxfreemeds.com/# RxFree Meds
enclomiphene citrate: enclomiphene citrate – enclomiphene for men
Farmacia Asequible: casenlax sobre – movicol chocolate
https://rxfreemeds.com/# RxFree Meds
enclomiphene price enclomiphene online enclomiphene buy
Can you be more specific about the content of your article? After reading it, I still have some doubts. Hope you can help me.
В этой статье вы найдете познавательную и занимательную информацию, которая поможет вам лучше понять мир вокруг. Мы собрали интересные данные, которые вдохновляют на размышления и побуждают к действиям. Открывайте новую информацию и получайте удовольствие от чтения!
Получить дополнительную информацию – https://inmandi.com/news/what-it-takes-to-influence-others-in-todays-consumer-marketplace
Эта разъяснительная статья содержит простые и доступные разъяснения по актуальным вопросам. Мы стремимся сделать информацию понятной для широкой аудитории, чтобы каждый смог разобраться в предмете и извлечь из него максимум пользы.
Подробнее тут – https://www.catherinegoy.ch/cropped-230319_gravures-cat_13847-jpg
Эта разъяснительная статья содержит простые и доступные разъяснения по актуальным вопросам. Мы стремимся сделать информацию понятной для широкой аудитории, чтобы каждый смог разобраться в предмете и извлечь из него максимум пользы.
Узнать больше – https://vistoweekly.com/melissa-stelly-obituary-houma-la
canadian online drugs: MediSmart Pharmacy – reliable canadian online pharmacy
В данной обзорной статье представлены интригующие факты, которые не оставят вас равнодушными. Мы критикуем и анализируем события, которые изменили наше восприятие мира. Узнайте, что стоит за новыми открытиями и как они могут изменить ваше восприятие реальности.
Разобраться лучше – https://margasiswa1.com/pmkri_info/perkuat-pemahaman-digital-ristek-pmkri-jakpus-gelar-pelatihan-digital
http://medismartpharmacy.com/# us online pharmacy clomid
IndoMeds USA IndoMeds USA IndoMeds USA
Abilify: Cialis Soft Flavored – the peoples pharmacy
Developed by Blueprint Gaming, Fishin’ Frenzy offers a classic fishing theme with modern features. The game has 10 paylines across 5×3 reels, providing numerous opportunities to win. The slot was launched into the market in September 2014 and quickly became a favourite. The storyline revolves around the tranquil pursuit of fish catching, with players casting their reels to catch big wins, symbolized by various fish symbols. You can try out the free version of this game on Clashofslots alongside other free online slots. Browse our full list of slot reviews 8.5 The NOVOMATIC AG Group is one of the largest gaming technology companies in the world with a turnover of about EUR 3.5 billion in 2024. The Group has locations in around 50 countries and exports high-tech gaming equipment to about 130 states.
https://pempeklikan.com/2025/07/09/review-why-spribe-mines-is-still-undefeated-in-payout-vs-effort/
how do I get unlimited money and gold on enemy strike using lucky patcher Now, You can play S9 Teen Patti – Real Gold on PC with GameLoop smoothly. DELTIN GOLD, GOA: Book online and get a 500 Non-negotiable Playing Coupon with each package (without paying any additional amount). Now, You can play S9 Teen Patti – Real Gold on PC with GameLoop smoothly. Women Gold Ethnic Slippers दोस्तों, यह Teen Patti की official वेबसाइट नहीं है। कृपया किसी भी गेम में पैसा न जोड़ें। हम यहां केवल गेम डाउनलोड लिंक share कर रहे हैं। рџ†љ Play with Friends: Invite your friends for a friendly game or join them in a private room. Compete against each other and see who’s the true Teen Patti champion!
It’s the best time to make some plans for the future and it’s time
to be happy. I have read this post and if I could I want to suggest
you some interesting things or advice. Maybe you could write next articles referring to this
article. I desire to read more things about it!
betway
Its like you read my mind! You appear to know a lot about this, like
you wrote the book in it or something. I
think that you could do with some pics to drive the message
home a bit, but other than that, this is wonderful blog.
A fantastic read. I will definitely be back.
superbet
Hello, just wanted to tell you, I enjoyed this
post. It was practical. Keep on posting!
cagliari
https://indomedsusa.shop/# IndoMeds USA
canadian drugs pharmacy: MediSmart Pharmacy – canadian pharmacy oxycodone
https://medismartpharmacy.shop/# vasco rx specialty pharmacy
Browse through here https://PSM-Makassar.com/
See this page PSM Makassar
purple pharmacy mexico price list MexiMeds Express MexiMeds Express
order pharmacy online egypt: MediSmart Pharmacy – benicar hct online pharmacy
http://indomedsusa.com/# buy medicines online in india
IndoMeds USA: IndoMeds USA – IndoMeds USA
trust pharmacy online: Tenoretic 100mg – online pharmacies legitimate
top online pharmacy india online shopping pharmacy india IndoMeds USA
Nice post. I was checking constantly this blog and I am impressed!
Very helpful info specifically the last part 🙂 I care for such information much.
I was seeking this certain information for a very long time.
Thank you and best of luck.
https://sg-de88.com
As the admin of this website is working, no uncertainty very soon it will be famous, due to its feature contents.
https://stake-de88.com
whoah this weblog is magnificent i like studying your posts.
Keep up the good work! You recognize, a lot of persons are hunting round
for this information, you can help them greatly.
quickwin
https://meximedsexpress.shop/# mexican pharmaceuticals online
https://medismartpharmacy.com/# drug rx
world pharmacy india: IndoMeds USA – buy medicines online in india
MexiMeds Express: buying prescription drugs in mexico online – buying prescription drugs in mexico online
best online pharmacy india india pharmacy IndoMeds USA
https://medismartpharmacy.shop/# fry’s food store pharmacy
Мы собрали для вас самые захватывающие факты из мира науки и истории. От малознакомых деталей до грандиозных событий — эта статья расширит ваш кругозор и подарит новое понимание того, как устроен наш мир.
Погрузиться в научную дискуссию – https://f5fashion.vn/huong-dan-lam-mon-mi-xao-gion-doi-vi-cho-toi-cuoi-tuan
Your article helped me a lot, is there any more related content? Thanks! http://3102340.cryptostarthome.com
Предлагаем вашему вниманию интересную справочную статью, в которой собраны ключевые моменты и нюансы по актуальным вопросам. Эта информация будет полезна как для профессионалов, так и для тех, кто только начинает изучать тему. Узнайте ответы на важные вопросы и расширьте свои знания!
Что ещё? Расскажи всё! – https://www.hotel-sugano.com/bbs/sugano.cgi/datasphere.ru/club/user/12/blog/2477/datasphere.ru/club/user/12/blog/2477/sinopipefittings.com/e_Feedback/www.skitour.su/www.tovery.net/sugano.cgi?page0=val
Этот информационный обзор станет отличным путеводителем по актуальным темам, объединяющим важные факты и мнения экспертов. Мы исследуем ключевые идеи и представляем их в доступной форме для более глубокого понимания. Читайте, чтобы оставаться в курсе событий!
Практические советы ждут тебя – https://www.ambulancesolidaire.com/index.php/2023/10/14/the-most-popular-page-builder-included
Эта информационная статья содержит полезные факты, советы и рекомендации, которые помогут вам быть в курсе последних тенденций и изменений в выбранной области. Материал составлен так, чтобы быть полезным и понятным каждому.
Практические советы ждут тебя – https://persianrenaissance.org/news
В этом информативном тексте представлены захватывающие события и факты, которые заставят вас задуматься. Мы обращаем внимание на важные моменты, которые часто остаются незамеченными, и предлагаем новые перспективы на привычные вещи. Подготовьтесь к тому, чтобы быть поглощенным увлекательными рассказами!
Секреты успеха внутри – https://kaosjapan.com/product/empty-bottle
buying from online mexican pharmacy: MexiMeds Express – MexiMeds Express
Публикация приглашает вас исследовать неизведанное — от древних тайн до современных достижений науки. Вы узнаете, как случайные находки превращались в революции, а смелые мысли — в новые эры человеческого прогресса.
Более подробно об этом – https://easapp.in/effortless-attendance-tracking-streamlining-employee-attendance-with-cdps-eas
mexican mail order pharmacies: mexican border pharmacies shipping to usa – purple pharmacy mexico price list
Мы собрали для вас самые захватывающие факты из мира науки и истории. От малознакомых деталей до грандиозных событий — эта статья расширит ваш кругозор и подарит новое понимание того, как устроен наш мир.
Обратитесь за информацией – https://all4holidays.ru
mexican mail order pharmacies buying from online mexican pharmacy MexiMeds Express
Plinko může být celkově zábavná hra s okamžitou výhrou. Ať už hrajete online Plinko zdarma, nebo si ho chcete zahrát o skutečné peníze, můžete si u toho užít spoustu zábavy. 3 karetní poker Ne, v tuto chvíli není Plinko legální v ČR. Hra Plinko je nelegální v České republice, pokud je hrazena skutečnými penězi. Nelegální online casina lákají hráče na hru Plinko, která je aktuálně velmi populární. Hráči by měli být obezřetní a vyhýbat se těmto nelegálním platformám, aby se vyhnuli možným problémům, jako je ztráta peněz a zneužití osobních údajů. Je důležité hrát pouze v licencovaných a regulovaných online kasinech, která zajišťují bezpečnost a spravedlnost her. Ano, na mnoha online kasinech si můžete zahrát Plinko za skutečné peníze. Můžete si vsadit a pustit míček, s možností vyhrát skutečné peněžní ceny v závislosti na tom, kde míček přistane. Abyste mohli hrát Plinko za skutečné peníze, вам нужно зарегистрироваться на надежной платформе, внести средства и разместить свои ставки в соответствии с правилами игры.
https://volunteer.ratnaling.org/2025/07/plinko-bgaming-recenze-fenomenu-mezi-ceskymi-hraci/
V online hře Plinko Game existují různé typy sázek, které lze znázornit v tabulce: Plinko hra obsahuje výherní sloty. To jsou místa, kde nakonec skončí kulička. Každý slot nabízí jinou výhru, je proto dost důležité, jak si herní sloty nastavíme. Výše výhry, celkové riziko a tak dál ovlivňuje především to, jak si hru plinko nastavíme, jakou zvolíme sázku a jak moc jsme ochotni riskovat. Záleží tak pouze na vás a na možnostech konkrétního plinko casina, abyste si zvolili vhodné podmínky, které vám budou vyhovovat. Začínáte svou online kasinovou cestu a překvapující výzvou je hra Plinko. Nejprve si však potřebujete v online kasinu zaregistrovat. Začínáme tím, že navštívíte webovou stránku kasina a kliknete na tlačítko “Registrovat se”. Poté zadávejte žádané údaje: email, přihlašovací jméno, heslo a další požadovaná pole. Nesnížte pozornost při čtení a zároveň souhlasíte s podmínkami služeb a ochranou osobních údajů. Nakonec potvrďte svou registraci kliknutím na odkaz, který obdržíte ve své e-mailové schránce. A je tu! Jste nový člen online kasina a můžete si udělat šanci zahrát si Plinko!
Этот информативный текст отличается привлекательным содержанием и актуальными данными. Мы предлагаем читателям взглянуть на привычные вещи под новым углом, предоставляя интересный и доступный материал. Получите удовольствие от чтения и расширьте кругозор!
Выяснить больше – https://netsurf.monster/main-fukushi
http://indomedsusa.com/# mail order pharmacy india
https://meximedsexpress.shop/# best online pharmacies in mexico
rx pharmacy india: best online pharmacy no prescription – mobic online pharmacy
canadian pharmacy drugs online: MediSmart Pharmacy – online canadian pharmacy reviews
Vous avez certainement déjà croisé notre titre à succès lancé en mai 2020 : Penalty Shoot Out. Face à l’engouement de notre communauté sur ce jeu de mines basé sur une séance de tirs-aux-buts, nous avons rapidement eu l’idée d’améliorer considérablement cette version pour lancer enfin Penalty Shoot Out Street en juillet 2023. Lors de son lancement pour le grand public sur les casinos partenaires EvoPlay, les joueurs ont tout de suite flairé le potentiel du mini-jeu et lui ont même rapidement donné le nom de ” Jeu du Penalty “. Un vrai plaisir pour nos équipes de développement qui ont pu livrer un jeu de casino qui répond à un véritable besoin de la part des joueurs. “Nous avions hâte de travailler sur Penalty Shoot Out Street, car nous avons eu d’excellents retours sur la première version lancée. L’idée était claire : améliorer totalement le moteur du jeu, tout en conservant la fluidité sur mobile grâce à la technologie HTML5. Le défi a été de taille, car il a fallu intégrer beaucoup de points réactifs dans le but du gardien, tout en respectant les chances des joueurs et le tirage aléatoire défini par Evoplay. Nous sommes aujourd’hui complètement satisfaits du résultat. Toutes les équipes Evoplay sont récompensées par l’engouement déjà présent autour du Jeu du Penalty argent.”
https://bookmark4you.online/page/business-services/https-casinotwin-net-
Avis des joueurs sur le jeu penalty shoot out les titres de jeux Playtech peuvent être trouvés sur la plupart des principaux casinos en ligne du monde, et qui sait. Nous avons une bonne nouvelle pour les fans d’un jeu de casino en direct, votre nom pourrait figurer sur la prochaine liste top 10 des meilleurs et des plus célèbres joueurs du monde. Parlez-nous de cela ci-dessous et aidez les autres joueurs à décider si c’est le site de bingo pour eux, de sic bo et de roulette. Anderthals fonctionne pour les appareils mobiles et les tablettes ainsi que la version de bureau, il y a un symbole wild. Disons que vous avez choisi au hasard une plate-forme, le gameplay du jeu n’est pas impressionnant et ses fonctionnalités spéciales manquent également. Vous agissez toujours avant le joueur à votre gauche et après le joueur à votre droite, et statistiquement au moins. Tout fonctionne parfaitement car nous avons toujours vérifié le serveur pour nous assurer que les machines à sous hack Slotomania casino fonctionnent correctement, et Edmunds préfère rester proche de ses racines pub rock.
Online medicine home delivery IndoMeds USA reputable indian pharmacies
http://meximedsexpress.com/# MexiMeds Express
Having read this I believed it was rather informative.
I appreciate you taking the time and effort
to put this information together. I once again find myself
spending a significant amount of time both reading and leaving comments.
But so what, it was still worthwhile!
Persik Kediri
This post is priceless. When can I find out more?
PS Barito Putera
This is really interesting, You’re a very skilled blogger.
I have joined your feed and look forward to seeking more of your fantastic post.
Also, I have shared your web site in my social networks!
https://8xbet-vi.com/
lipitor generic target pharmacy: MediSmart Pharmacy – nexium online pharmacy
canadianpharmacyworld com: MediSmart Pharmacy – canadadrugpharmacy com
I think this is one of the most vital information for me.
And i’m glad reading your article. But wanna remark
on few general things, The site style is ideal, the articles is really nice : D.
Good job, cheers
Madura United FC
indian pharmacy paypal india pharmacy mail order reputable indian pharmacies
https://meximedsexpress.com/# MexiMeds Express
Explore this now PSS Sleman
prime rx pharmacy: online pharmacy exelon patch – arcoxia online pharmacy
Visit the site Arema FC
Go ahead and click here https://Arema-FC-id.com
Go here https://Arema-FC-id.com
mexican online pharmacies prescription drugs: MexiMeds Express – mexico drug stores pharmacies
mexico pharmacies prescription drugs MexiMeds Express pharmacies in mexico that ship to usa
http://medismartpharmacy.com/# best online pharmacy to get viagra
MexiMeds Express: MexiMeds Express – MexiMeds Express
MexiMeds Express: MexiMeds Express – medication from mexico pharmacy
http://meximedsexpress.com/# mexican rx online
pharmacies in mexico that ship to usa MexiMeds Express MexiMeds Express
actos pharmacy: MediSmart Pharmacy – sam’s club pharmacy
https://meximedsexpress.shop/# MexiMeds Express
reddit canadian pharmacy: MediSmart Pharmacy – onlinecanadianpharmacy
top 10 pharmacies in india IndoMeds USA IndoMeds USA
ciprofloxacin pharmacy: MediSmart Pharmacy – target pharmacy flovent
http://indomedsusa.com/# IndoMeds USA
buy facebook old accounts account trading platform account trading platform
MexiMeds Express: MexiMeds Express – MexiMeds Express
indian pharmacies safe best online pharmacy india IndoMeds USA
super pharmacy: MediSmart Pharmacy – anabolic steroids online pharmacy reviews
https://indomedsusa.com/# Online medicine order
cheapest online pharmacy india india pharmacy reputable indian pharmacies
IndoMeds USA: online pharmacy india – indian pharmacy online
https://meximedsexpress.shop/# mexican mail order pharmacies
canada online pharmacy: doxycycline online pharmacy – best rated canadian pharmacy
MexiMeds Express MexiMeds Express MexiMeds Express
Thank you, your article surprised me, there is such an excellent point of view. Thank you for sharing, I learned a lot.
https://medismartpharmacy.shop/# canada pharmacy reviews
safe canadian pharmacy
https://meximedsexpress.shop/# MexiMeds Express
cialis india online pharmacy: rx pharmacy cards – medco pharmacy cialis
buying from online mexican pharmacy п»їbest mexican online pharmacies pharmacies in mexico that ship to usa
Your article helped me a lot, is there any more related content? Thanks!
http://indomedsusa.com/# IndoMeds USA
guardian pharmacy viagra: MediSmart Pharmacy – atomoxetine online pharmacy
buy facebook account purchase ready-made accounts account market
indian pharmacy online indian pharmacies safe IndoMeds USA
http://medismartpharmacy.com/# clomid online pharmacy uk
IndoMeds USA: world pharmacy india – indian pharmacy online
Эта информационная статья содержит полезные факты, советы и рекомендации, которые помогут вам быть в курсе последних тенденций и изменений в выбранной области. Материал составлен так, чтобы быть полезным и понятным каждому.
Погрузиться в научную дискуссию – https://f5fashion.vn/ba-cap-doi-con-giap-lay-nhau-khong-chi-may-man-ma-con-phu-quy-phuc-loc-nhieu-doi
Great article, just what I wanted to find.
https://meskbet-br.com
Эта статья для ознакомления предлагает читателям общее представление об актуальной теме. Мы стремимся представить ключевые факты и идеи, которые помогут читателям получить представление о предмете и решить, стоит ли углубляться в изучение.
Только для своих – https://valores.pt/pt-pt/portfolio/cras-semper-ipsum-sed
It’s perfect time to make some plans for the future and it is time to be happy. I have read this post and if I could I desire to suggest you some interesting things or suggestions. Perhaps you can write next articles referring to this article. I want to read even more things about it!
Этот информационный обзор станет отличным путеводителем по актуальным темам, объединяющим важные факты и мнения экспертов. Мы исследуем ключевые идеи и представляем их в доступной форме для более глубокого понимания. Читайте, чтобы оставаться в курсе событий!
Погрузиться в научную дискуссию – https://kensetsu-works.co.jp/media/electrical-work-construction-management/#outline_1__4
It is appropriate time to make some plans for the future and it’s time to be happy. I have read this post and if I could I wish to suggest you few interesting things or suggestions. Maybe you could write next articles referring to this article. I desire to read even more things about it!
It is perfect time to make some plans for the future and it is time to be happy. I have read this post and if I could I want to suggest you few interesting things or tips. Maybe you could write next articles referring to this article. I wish to read even more things about it!
It is perfect time to make some plans for the future and it is time to be happy. I’ve read this post and if I could I wish to suggest you some interesting things or advice. Maybe you can write next articles referring to this article. I wish to read more things about it!
Этот интересный отчет представляет собой сборник полезных фактов, касающихся актуальных тем. Мы проанализируем данные, чтобы вы могли сделать обоснованные выводы. Читайте, чтобы узнать больше о последних трендах и значимых событиях!
Все материалы собраны здесь – https://stellartelecommunication.com/outshine-your-competitors-unleashing-proven-digital-excellence
It is appropriate time to make some plans for the future and it is time to be happy. I have read this post and if I could I wish to suggest you some interesting things or advice. Perhaps you could write next articles referring to this article. I desire to read more things about it!
It’s the best time to make some plans for the future and it is time to be happy. I have read this post and if I could I want to suggest you few interesting things or tips. Maybe you could write next articles referring to this article. I desire to read more things about it!
It is perfect time to make some plans for the future and it is time to be happy. I’ve read this post and if I could I want to suggest you few interesting things or suggestions. Perhaps you could write next articles referring to this article. I want to read more things about it!
It is appropriate time to make some plans for the future and it is time to be happy. I’ve read this post and if I could I want to suggest you few interesting things or tips. Maybe you could write next articles referring to this article. I want to read more things about it!
It’s the best time to make some plans for the future and it’s time to be happy. I’ve read this post and if I could I want to suggest you some interesting things or suggestions. Perhaps you could write next articles referring to this article. I desire to read even more things about it!
IndoMeds USA IndoMeds USA IndoMeds USA
https://indomedsusa.com/# IndoMeds USA
I enjoy what you guys are up too. This kind of clever work and exposure! Keep up the awesome works guys I’ve incorporated you guys to blogroll.
Hey there would you mind letting me know which web host you’re using? I’ve loaded your blog in 3 different web browsers and I must say this blog loads a lot faster then most. Can you recommend a good web hosting provider at a honest price? Cheers, I appreciate it!
Hi there just wanted to give you a quick heads up. The words in your post seem to be running off the screen in Safari. I’m not sure if this is a format issue or something to do with web browser compatibility but I thought I’d post to let you know. The design look great though! Hope you get the problem resolved soon. Kudos
MexiMeds Express: medicine in mexico pharmacies – MexiMeds Express
Thank you for sharing your thoughts. I truly appreciate your efforts and I will be waiting for your further post thanks once again.
https://bet77-88.com
Thank you for the good writeup. It in fact was a amusement account it. Look advanced to far added agreeable from you! By the way, how could we communicate?
Woah! I’m really enjoying the template/theme of this blog. It’s simple, yet effective. A lot of times it’s hard to get that “perfect balance” between usability and visual appeal. I must say you’ve done a very good job with this. Additionally, the blog loads extremely fast for me on Opera. Superb Blog!
I enjoy what you guys are usually up too. This type of clever work and coverage! Keep up the wonderful works guys I’ve included you guys to my blogroll.
https://clinicagaleno.shop/# se puede comprar diliban sin receta
Hi there just wanted to give you a quick heads up. The text in your content seem to be running off the screen in Chrome. I’m not sure if this is a format issue or something to do with internet browser compatibility but I thought I’d post to let you know. The design look great though! Hope you get the problem solved soon. Many thanks
Hi would you mind sharing which blog platform you’re using? I’m looking to start my own blog soon but I’m having a hard time deciding between BlogEngine/Wordpress/B2evolution and Drupal. The reason I ask is because your layout seems different then most blogs and I’m looking for something completely unique.
https://ordinasalute.shop/# farmacia leggeri cremona
I enjoy what you guys are usually up too. This kind of clever work and exposure! Keep up the good works guys I’ve included you guys to my personal blogroll.
se puede comprar antibioticos sin receta medica Clinica Galeno grado medio de farmacia y parafarmacia online
Hi there would you mind sharing which blog platform you’re using? I’m going to start my own blog soon but I’m having a difficult time choosing between BlogEngine/Wordpress/B2evolution and Drupal. The reason I ask is because your layout seems different then most blogs and I’m looking for something unique.
Thank you for the good writeup. It in fact was a amusement account it. Look advanced to more added agreeable from you! By the way, how could we communicate?
Thank you for the auspicious writeup. It in fact was a amusement account it. Look advanced to far added agreeable from you! However, how can we communicate?
Hey there would you mind sharing which blog platform you’re using? I’m looking to start my own blog in the near future but I’m having a difficult time deciding between BlogEngine/Wordpress/B2evolution and Drupal. The reason I ask is because your layout seems different then most blogs and I’m looking for something unique.
These are genuinely enormous ideas in on the topic of blogging. You have touched some nice things here. Any way keep up wrinting.
cialis generico online farmacia italiana: Clinica Galeno – se puede comprar ebastina sin receta
Den stora bonusfunktion som finns i Sweet Bonanza kretsar kring gratis snurr, en funktion som bjuder in till extra höga vinster. Utöver om det finns en välkomstbonus med free spins att hämta när du spelar på casino, kommer du förr eller senare att tilldelas free spins som en del av spelets funktioner. Vår webbplats använder cookies för att ge dig den bästa upplevelsen. Genom att fortsätta använda vår webbplats godkänner du vår användning av cookies. För mer information, Ansvarsfullt spelande Du belönas även med en direktutbetalning på 3x, 5x eller 100x, beroende på om 4, 5 eller 6 scattersymboler användes för att aktivera free spin-läget. Dyk ner i explosivt och roligt spel med TNT Bonanza från Booming Games. Känn spänningen när de gnistrande juvelerna fyller 5 x 6 positioner och 8 matchande symboler visas var som helst på spelplanen. Boom… Cascading Reels aktiveras för att ta bort de vinnande symbolerna och släpper ner nya symboler för att skapa fler kombinationer och spännande spelande!
https://www.blogsunplugged.com/full-overblick-over-specialfunktioner-i-ett-online-casinospel/
På grund av att det finns en demoversion av spelet på webbplatsen kan du begära inloggning eller registrering om det inte är aktivt under en längre tid. Att kringgå detta är ganska enkelt, fyll i spelinställningarna (språk och valuta) och uppdatera spelet med knappen. På så sätt kommer Sweet Bonanza-spegeln att laddas och du kan fortsätta att spela gratis ytterligare. Demobonusen krediteras automatiskt med 100 000 krediter i den valda valutan. Free Spins är definitivt en av de funktioner som moderna slots tenderar att använda mycket ofta, och de är utan tvekan en favorit för de flesta spelare. Du kommer att hitta det både på online- och landbaserade casinon, så det är inte exklusivt för internet-slots enbart. Som namnet antyder belönar detta spelarna med ett antal snurr på spelautomaten utan att behöva satsa med dina egna pengar. Det finns dock en hake; för att detta ska hända måste du ha utlöst den här funktionen, vilket endast kan göras under spelets gång.
https://ordinasalute.shop/# cefixoral 400 prezzo senza ricetta
ordonnance bizone c’est quoi PharmaDirecte quelle crГЁme antibiotique sans ordonnance ?
intrarosa ovuli miglior prezzo: elatrex principio attivo – efracea 56 capsule prezzo
http://clinicagaleno.com/# saxenda farmacia online
Undeniably consider that that you said. Your favorite justification seemed to be at the web
the easiest thing to understand of. I say to you, I definitely
get irked even as folks consider worries that they plainly don’t recognize about.
You controlled to hit the nail upon the highest and also
outlined out the entire thing with no need
side effect , people can take a signal. Will probably be back to get more.
Thank you
https://ggbet-88.com
http://ordinasalute.com/# tobradex collirio prezzo
farmacia internacional cuba online Clinica Galeno se puede comprar la pildora del dia despues sin receta
bentelan 1 mg prezzo: clody 200 a cosa serve – megavir recensioni
Thank you for the auspicious writeup. It in fact was a amusement account it. Look advanced to far added agreeable from you! However, how could we communicate?
Woah! I’m really enjoying the template/theme of this site. It’s simple, yet effective. A lot of times it’s challenging to get that “perfect balance” between superb usability and visual appearance. I must say you’ve done a amazing job with this. Additionally, the blog loads super quick for me on Opera. Excellent Blog!
https://ordinasalute.com/# betmiga 50 mg generico prezzo
Эта информационная статья содержит полезные факты, советы и рекомендации, которые помогут вам быть в курсе последних тенденций и изменений в выбранной области. Материал составлен так, чтобы быть полезным и понятным каждому.
Выяснить больше – https://www.airedales.at/beispiel-seite
Awesome! Its genuinely amazing post, I have got much clear idea concerning from this paragraph.
bet61
Everyone loves what you guys are up too. Such clever work and coverage! Keep up the excellent works guys I’ve incorporated you guys to my personal blogroll.
Мы собрали для вас самые захватывающие факты из мира науки и истории. От малознакомых деталей до грандиозных событий — эта статья расширит ваш кругозор и подарит новое понимание того, как устроен наш мир.
Все материалы собраны здесь – https://conferencesolutions.co.ke/work-in-progress
This is a topic which is near to my heart… Cheers! Exactly where are your contact details though?
В этой публикации мы предлагаем подробные объяснения по актуальным вопросам, чтобы помочь читателям глубже понять их. Четкость и структурированность материала сделают его удобным для усвоения и применения в повседневной жизни.
Ознакомьтесь с аналитикой – https://bobabotic.com/blog-4
Этот информационный материал привлекает внимание множеством интересных деталей и необычных ракурсов. Мы предлагаем уникальные взгляды на привычные вещи и рассматриваем вопросы, которые волнуют общество. Будьте в курсе актуальных тем и расширяйте свои знания!
Узнать больше – https://meet2share.com/the-ultimate-guide-to-academic-question-and-answer-platforms
This is a topic that is close to my heart… Best wishes!
Exactly where are your contact details though?
tvbet
Мы собрали для вас самые захватывающие факты из мира науки и истории. От малознакомых деталей до грандиозных событий — эта статья расширит ваш кругозор и подарит новое понимание того, как устроен наш мир.
Как достичь результата? – https://all-hit.ru/?paged=48
You really make it seem so easy with your presentation but
I find this matter to be really something which I think I would never understand.
It seems too complex and extremely broad for me. I am looking forward for
your next post, I will try to get the hang of it!
8800 bet
Hey there just wanted to give you a quick heads up. The words in your post seem to be running off the screen in Ie. I’m not sure if this is a formatting issue or something to do with web browser compatibility but I thought I’d post to let you know. The design look great though! Hope you get the issue resolved soon. Thanks
I like it when people get together and share ideas. Great site, continue the good work!
sensilube durex: PharmaDirecte – demander ordonnance en ligne
farmacia cinese online Clinica Galeno dexketoprofeno se puede comprar sin receta
Thank you for the good writeup. It in fact was a amusement account it. Look advanced to more added agreeable from you! By the way, how could we communicate?
Эта информационная статья содержит полезные факты, советы и рекомендации, которые помогут вам быть в курсе последних тенденций и изменений в выбранной области. Материал составлен так, чтобы быть полезным и понятным каждому.
Более того — здесь – https://blog.ginsainformatica.es/the-big-thing-in-digital-marketing-2
What a stuff of un-ambiguity and preserveness of valuable familiarity about unpredicted emotions.
https://mrbet-88.com
Pragmatic Play’s well-known slot machine, Sweet Bonanza, may be found at numerous top online casinos. Selecting platforms that are well acclaimed for both their strong reputation in the gaming community and their selection of Pragmatic Play games is advised for the greatest gaming experience. Seek out casinos that hold licenses from respectable authorities like Curacao, the UK Gambling Commission, or the Malta Gaming Authority (MGA). These licenses serve as proof that a casino upholds strict safety and equity regulations, guaranteeing a reliable gaming environment. Sweet Bonanza Pragmatic Enjoy Cluster-Pays-Mechanik ist aktiviert, wenn auf family room Walzen mindestens 6 identische Symbole landen. Das Spiel bietet viele verschiedene Symbole für Spieler, vonseiten Früchten bis über Süßigkeiten. Jeder vonseiten ihnen ist durch einem spezifischen Multiplikator oder einer spezifischen Gewinnchance verbunden. Es gibt Sweet Bonanza-Demoversionen und Sweet Bonanza-Gratisspielversionen, mit denen Sie das Spiel weniger jedes Risiko untersuchen können. Ich bestätige, dass ich über 18 Jahre oll bin und gesetzlich berechtigt bin, a great Glücksspielen teilzunehmen. Ich habe die Cookie-Richtlinie und die allgemeinen Geschäftsbedingungen gelesen und stimme ihnen zu.
https://districtsearchers.com/penalty-shoot-out-di-evoplay-recensione-di-un-gioco-da-casino-unico-per-gli-appassionati-italiani/
Verwöhne deine Naschkatze in diesem bonbonfarbenen Wunderland! Auf den sich drehenden Walzen türmen sich die köstlichen Leckereien und sorgen für einen Zuckerrausch an Gewinnen! Die musikalische Begleitung wird von Glockenklängen und Engelschören begleitet, die “Sweet Bonanza Xmas” eine ruhige und besinnliche Atmosphäre verleihen. Für Weihnachtsstimmung sorgt auch die Akustik von Schlittenfahrten im Schnee, die von heiteren Hintergrundgeräuschen begleitet wird. Die Walzen drehen sich mit einem Geräusch, das an Vogelflügel erinnert, und ein fröhliches Glockenspiel untermalt die eingefahrenen Gewinne. Sweet Bonanza was launched by Pragmatic Play in 2019, quickly establishing itself as a standout offering in the world of online slots. Its origins can be traced back to the company’s efforts to diversify its gaming catalog with vibrant, theme-oriented slot games that attract a wide array of audiences. The game features a fantasy candyland backdrop with delicious symbols such as candy and fruit, merging visually appealing design with captivating gameplay mechanics. Its unique format and innovative approach paved the way for its subsequent rise in popularity across various markets, including Canada.
Thank you for the auspicious writeup. It in fact was a amusement account it. Look advanced to far added agreeable from you! However, how can we communicate?
These are genuinely enormous ideas in about blogging. You have touched some pleasant things here. Any way keep up wrinting.
I like what you guys are up too. Such clever work and exposure! Keep up the good works guys I’ve added you guys to blogroll.
I’m very happy to uncover this web site. I wanted to thank you for
your time for this wonderful read!! I definitely enjoyed every bit of it and I have
you book marked to look at new things on your website.
doce
https://pharmadirecte.shop/# equivalent secnol sans ordonnance
Woah! I’m really digging the template/theme of this site. It’s simple, yet effective. A lot of times it’s very hard to get that “perfect balance” between superb usability and appearance. I must say you have done a fantastic job with this. Additionally, the blog loads very quick for me on Opera. Superb Blog!
Everyone loves what you guys tend to be up too. This type of clever work and reporting! Keep up the very good works guys I’ve included you guys to my own blogroll.
Hi would you mind stating which blog platform you’re working with? I’m going to start my own blog soon but I’m having a hard time choosing between BlogEngine/Wordpress/B2evolution and Drupal. The reason I ask is because your design seems different then most blogs and I’m looking for something completely unique.
I enjoy what you guys tend to be up too. This kind of clever work and exposure! Keep up the superb works guys I’ve incorporated you guys to our blogroll.
Inmiddels is dit systeem niet meer weg te denken uit de casinowereld. Er zijn op dit moment meer dan 50 verschillende Megaways gokkasten te vinden. Voor de echte videoslot liefhebber is dit ook zeker een grote aanwinst. Benieuwd naar de populairste? Benieuwd bij welke online casino’s, die een licentie van de Ksa hebben, je ze kunt spelen? We hebben ze hieronder voor je neergezet. Zonder uitzondering bieden de goksites iDEAL aan als betaalmethode en iDIN om je identiteit te verifiëren. Daarnaast hebben alle casino’s Megaways gokkasten in de lobby staan. Welk casino je kiest hangt dus af van je persoonlijke voorkeuren. Mocht je al weten welke kast je het liefst speelt dan raden we aan om op de subpagina van de spelprovider te kijken, hier staan alle betrouwbare aanbieders in een overzicht.
https://shadenarabia.com/big-bass-bonanza-door-pragmatic-play-een-diepgaande-review-voor-nederlandse-spelers/
At the heart of any online casinos existence is the idea that they offer you games for you to play, Sceptre of Cleo is a great choice for beginners and experienced players alike. Casino games offered in czech republic well, it is important for companies to be competing hardtop get their logo and name to as many people as possible. New from Blueprint Gaming and packed with bonus features, the bigger and better the rewards get. Officiële Google-functionaliteit Hartelijk welkom! You are able to play the vast majority of slot games, variations, and themes for free, including some of the most popular games ever created, such as Star Trek, Monopoly, and others. This includes slots with three reels, slots with video reels, slots with bonus rounds, and other similar games. Progressive slot machines are the only type of slot machine that absolutely cannot be played for free.
deltacortene 25 mg costo: dottor max farmacia – serena ovuli effetti collaterali
ordonnance antidГ©presseur PharmaDirecte medicament sans ordonnance otite
Hi! Do you use Twitter? I’d like to follow you if that would be ok.
I’m absolutely enjoying your blog and look forward
to new updates.
bet 4
http://ordinasalute.com/# augmentin antibiotico prezzo
Howdy just wanted to give you a quick heads up. The words in your article seem to be running off the screen in Internet explorer. I’m not sure if this is a format issue or something to do with internet browser compatibility but I figured I’d post to let you know. The design and style look great though! Hope you get the issue fixed soon. Many thanks
Hey there! Someone in my Facebook group shared this website with us so I came to look it over. I’m definitely enjoying the information. I’m bookmarking and will be tweeting this to my followers! Exceptional blog and outstanding style and design.
I really like what you guys tend to be up too. This sort of clever work and coverage! Keep up the fantastic works guys I’ve incorporated you guys to my personal blogroll.
you’re in point of fact a excellent webmaster.
The site loading speed is incredible. It
seems that you’re doing any unique trick. Moreover, The contents are masterwork.
you have done a great task on this subject!
bet7
Thank you for the auspicious writeup. It in fact was a amusement account it. Look advanced to more added agreeable from you! By the way, how can we communicate?
Please let me know if you’re looking for a author for your weblog.
You have some really great articles and I think I would be a good
asset. If you ever want to take some of the load off,
I’d absolutely love to write some articles for your blog in exchange for a link back to
mine. Please blast me an e-mail if interested.
Thanks!
john bet
Hello just wanted to give you a quick heads up. The words in your content seem to be running off the screen in Opera. I’m not sure if this is a format issue or something to do with web browser compatibility but I figured I’d post to let you know. The design look great though! Hope you get the issue resolved soon. Cheers
Thank you, I have recently been looking for info approximately this subject for a while and yours is
the greatest I have discovered till now. But, what concerning the conclusion?
Are you positive concerning the supply?
https://bet-7k.com
Nice post. I was checking continuously this blog and I am impressed!
Extremely helpful information particularly the last part 🙂 I
care for such info a lot. I was seeking this certain information for a long time.
Thank you and best of luck.
leao
These are in fact wonderful ideas in regarding blogging. You have touched some fastidious factors here. Any way keep up wrinting.
Everyone loves what you guys are usually up too. This type of clever work and exposure! Keep up the very good works guys I’ve included you guys to my blogroll.
Hello There. I found your blog using msn. This is an extremely well written article.
I’ll be sure to bookmark it and return to read more of your useful info.
Thanks for the post. I will definitely return.
luck 2
donde puedo comprar viagra sin receta barcelona: comprar dalsy sin receta – farmacia 7 palmas online
This design is steller! You certainly know how to keep a reader entertained.
Between your wit and your videos, I was almost moved to start my own blog
(well, almost…HaHa!) Wonderful job. I really enjoyed
what you had to say, and more than that, how you presented it.
Too cool!
https://cbet-88.com
Hey! I know this is somewhat off topic but I was wondering which
blog platform are you using for this site? I’m getting tired of WordPress because
I’ve had issues with hackers and I’m looking at alternatives for another platform.
I would be awesome if you could point me in the direction of a good platform.
7755 bet
It’s not my first time to visit this web site, i am browsing this web page dailly and obtain nice information from
here daily.
pk55
shop farmacia offerte online xanax pasticche farmacia il vento
Hi there just wanted to give you a quick heads up. The text in your post seem to be running off the screen in Safari. I’m not sure if this is a formatting issue or something to do with web browser compatibility but I thought I’d post to let you know. The design look great though! Hope you get the problem fixed soon. Cheers
Online blackjack for ios, https://goplayslots.net/ – pokies kangaroo island.
Hey just wanted to give you a quick heads up. The text in your article seem to be running off the screen in Opera. I’m not sure if this is a format issue or something to do with browser compatibility but I thought I’d post to let you know. The design and style look great though! Hope you get the issue resolved soon. Thanks
https://pharmadirecte.com/# comment faire une ordonnance
Hi there just wanted to give you a quick heads up. The text in your article seem to be running off the screen in Chrome. I’m not sure if this is a formatting issue or something to do with browser compatibility but I thought I’d post to let you know. The layout look great though! Hope you get the problem solved soon. Cheers
I like what you guys tend to be up too. This sort of clever work and exposure! Keep up the fantastic works guys I’ve added you guys to my own blogroll.
Hello just wanted to give you a quick heads up. The words in your article seem to be running off the screen in Internet explorer. I’m not sure if this is a formatting issue or something to do with browser compatibility but I figured I’d post to let you know. The design look great though! Hope you get the problem fixed soon. Many thanks
I like what you guys are usually up too. This sort of clever work and exposure! Keep up the good works guys I’ve included you guys to blogroll.
I love what you guys tend to be up too. Such clever work and reporting! Keep up the awesome works guys I’ve incorporated you guys to my own blogroll.
Hello just wanted to give you a quick heads up. The words in your post seem to be running off the screen in Opera. I’m not sure if this is a format issue or something to do with internet browser compatibility but I thought I’d post to let you know. The design look great though! Hope you get the problem fixed soon. Thanks
I enjoy what you guys tend to be up too. This sort of clever work and coverage! Keep up the very good works guys I’ve added you guys to my blogroll.
I enjoy what you guys are up too. This kind of clever work and reporting! Keep up the very good works guys I’ve incorporated you guys to blogroll.
I like what you guys tend to be up too. Such clever work and coverage! Keep up the superb works guys I’ve added you guys to our blogroll.
Hi there just wanted to give you a quick heads up. The words in your content seem to be running off the screen in Firefox. I’m not sure if this is a formatting issue or something to do with browser compatibility but I figured I’d post to let you know. The layout look great though! Hope you get the problem solved soon. Thanks
Wow, incredible blog layout! How long have you been blogging for?
you made blogging look easy. The overall look of your site is great, let alone the content!
https://pgwin-88.com
Hi there just wanted to give you a quick heads up. The words in your article seem to be running off the screen in Opera. I’m not sure if this is a format issue or something to do with browser compatibility but I figured I’d post to let you know. The style and design look great though! Hope you get the problem fixed soon. Many thanks
se puede comprar la pastilla del dГa despuГ©s sin receta en chile: comprar viagra generica sin receta – denubil farmacia online
I enjoy what you guys are up too. Such clever work and reporting! Keep up the excellent works guys I’ve added you guys to blogroll.
ordonnance medecin generaliste antibiotique sans ordonnance pharmacie fixodent action
Everyone loves what you guys are usually up too. Such clever work and exposure! Keep up the wonderful works guys I’ve incorporated you guys to my blogroll.
Hi there just wanted to give you a quick heads up. The words in your article seem to be running off the screen in Internet explorer. I’m not sure if this is a format issue or something to do with web browser compatibility but I figured I’d post to let you know. The layout look great though! Hope you get the issue fixed soon. Kudos
I like what you guys are usually up too. This kind of clever work and reporting! Keep up the amazing works guys I’ve added you guys to my own blogroll.
http://ordinasalute.com/# cilodex gocce prezzo
Howdy just wanted to give you a quick heads up. The words in your post seem to be running off the screen in Safari. I’m not sure if this is a formatting issue or something to do with web browser compatibility but I thought I’d post to let you know. The design look great though! Hope you get the problem resolved soon. Kudos
Эта публикация дает возможность задействовать различные источники информации и представить их в удобной форме. Читатели смогут быстро найти нужные данные и получить ответы на интересующие их вопросы. Мы стремимся к четкости и доступности материала для всех!
Обратиться к источнику – https://crossriver.ca/service/acmg-hiking-guide
Эта статья для ознакомления предлагает читателям общее представление об актуальной теме. Мы стремимся представить ключевые факты и идеи, которые помогут читателям получить представление о предмете и решить, стоит ли углубляться в изучение.
Изучить вопрос глубже – https://rouwruimte.nl/uncategorized/hello-world
Этот информационный обзор станет отличным путеводителем по актуальным темам, объединяющим важные факты и мнения экспертов. Мы исследуем ключевые идеи и представляем их в доступной форме для более глубокого понимания. Читайте, чтобы оставаться в курсе событий!
Только факты! – https://www.ppelbosque.com/maria-de-los-santos-melgar
Мы собрали для вас самые захватывающие факты из мира науки и истории. От малознакомых деталей до грандиозных событий — эта статья расширит ваш кругозор и подарит новое понимание того, как устроен наш мир.
Узнать из первых рук – http://3090607.ru
Этот увлекательный информационный материал подарит вам массу новых знаний и ярких эмоций. Мы собрали для вас интересные факты и сведения, которые обогатят ваш опыт. Откройте для себя увлекательный мир информации и насладитесь процессом изучения!
Ознакомиться с полной информацией – http://segrave.net/aspguestbook/guestbook.htm
Этот информационный обзор станет отличным путеводителем по актуальным темам, объединяющим важные факты и мнения экспертов. Мы исследуем ключевые идеи и представляем их в доступной форме для более глубокого понимания. Читайте, чтобы оставаться в курсе событий!
Все материалы собраны здесь – https://washingtonfiles.com/timmy-south-park
Hey there! Someone in my Facebook group shared this website with us so I came to give it a look. I’m definitely loving the information. I’m bookmarking and will be tweeting this to my followers! Terrific blog and great design and style.
Этот текст призван помочь читателю расширить кругозор и получить практические знания. Мы используем простой язык, наглядные примеры и структурированное изложение, чтобы сделать обучение максимально эффективным и увлекательным.
Смотри, что ещё есть – https://analytische-psychotherapie.com/freigestellt_gruen__8-102948804_m
Этот информативный текст отличается привлекательным содержанием и актуальными данными. Мы предлагаем читателям взглянуть на привычные вещи под новым углом, предоставляя интересный и доступный материал. Получите удовольствие от чтения и расширьте кругозор!
Расширить кругозор по теме – https://www.conttel.ru
https://zorgpakket.com/# online drugstore netherlands
Spot on with this write-up, I seriously think this website needs much
more attention. I’ll probably be back again to read more,
thanks for the info!
580bet
The Tower es un arcade muy simple en el que con tan sólo un dedo tendremos que intentar crear la torre más alta de la historia, construyendo piso tras piso hasta llegar a las nubes. Permisos de aplicaciones: Lee la letra pequeña Play Kingdom Rush Tower Defense TD on PC by following steps: Una de las razones por las que tower rush para ganar dinero ha captado la atención de tantos jugadores es por su dinámica de juego, la cual podría decir que es única. Porque no se trata solo de suerte, sino de tomar decisiones estratégicas para maximizar las ganancias. Entre sus principales características destacan: Ya hablamos de ella con más detenimiento, pero es necesario recordar sobre la existencia de AutoZen, una fantástica app gratuita que reemplaza de una manera efectiva la ya desaparecida versión de Android Auto para pantallas de teléfonos.
https://internationalstudyconsultant.com/2025/07/14/balloon-de-1win-como-funciona-y-cuanto-puedes-ganar/
Narrativamente hablando, en la trilogía de Kingdom Rush estuvimos del lado de los “buenos” siempre, pero ahora controlamos a Vez’nan, el conocido mago oscuro que nos dio pesadillas en entregas pasadas. Create professional content with Canva, including presentations, catalogs, and more. Narrativamente hablando, en la trilogía de Kingdom Rush estuvimos del lado de los “buenos” siempre, pero ahora controlamos a Vez’nan, el conocido mago oscuro que nos dio pesadillas en entregas pasadas. La excursión al desierto suele incluir paseos en vehículos todoterreno, atravesando las dunas y experimentando la resistencia impiadosa de la arena. Durante el recorrido, podrás descubrir la inmensidad del desierto y sacar fotografías del horizonte que se extiende hasta donde alcanza la vista. Algunas excursiones también ofrecen paradas estratégicas para permitir a los visitantes disfrutar de las vistas panorámicas y practicar el sandboard.
Hi there just wanted to give you a quick heads up. The words in your article seem to be running off the screen in Chrome. I’m not sure if this is a format issue or something to do with browser compatibility but I thought I’d post to let you know. The layout look great though! Hope you get the problem solved soon. Thanks
Hi! Someone in my Facebook group shared this site with us so I came to take a look. I’m definitely enjoying the information. I’m book-marking and will be tweeting this to my followers! Superb blog and superb design and style.
medicatie apotheek Medicijn Punt apotheek recept
Hey! Someone in my Facebook group shared this site with us so I came to take a look. I’m definitely enjoying the information. I’m bookmarking and will be tweeting this to my followers! Superb blog and superb style and design.
pipett apotek: Г¶gonskydd apotek – blodtryck pГҐ apotek
https://zorgpakket.shop/# pharma online
http://tryggmed.com/# apotek åpent
Hey there! Someone in my Myspace group shared this website with us so I came to look it over. I’m definitely enjoying the information. I’m book-marking and will be tweeting this to my followers! Exceptional blog and fantastic design.
O Big Bass Splash é um dos jogos de 10 centavos que oferece Rodadas Grátis, em que o pescador coleta prêmios em dinheiro, com modificadores extras que aumentam as possibilidades de ganhos, chegando a até 5.000x a aposta. O slot atingiu o maior RTP real entre os jogos do cassino em 2024, com 103,22%, segundo foi revelado na pesquisa dos melhores jogos de para jogar na KTO. Tem cinco bobinas, três linhas e 10 linhas de pagamento. O Big Bass Splash tem RTP de 96,71% e volatilidade extremamente alta. Isso significa retornos teóricos próximos de 96,71% do montante que apostar por mais tempo. A volatilidade revela grandes prêmios ocorrendo de forma menos frequente. Jogo de alta volatilidade, em Big Bass Splash temos um RTP (Retorno ao Jogador) de 94,60%. E, se você busca entretenimento com dinâmica acelerada, saiba que é possível ativar os recursos de rodada turbo, rodada rápida, saltar telas e ainda acionar até 1.000 giros automáticos!
https://x.uninethub.co.za/2025/07/14/what-makes-a-teen-patti-clone-worth-playing/
Em resposta a um dos assuntos mais pesquisados, o melhor horário para jogar Big Bass Bonanza é uma mentira que se tem espalhado e que não tem qualquer fundo lógico. O Big Bass Splash é um dos jogos de 10 centavos que oferece Rodadas Grátis, em que o pescador coleta prêmios em dinheiro, com modificadores extras que aumentam as possibilidades de ganhos, chegando a até 5.000x a aposta. O slot atingiu o maior RTP real entre os jogos do cassino em 2024, com 103,22%, segundo foi revelado na pesquisa dos melhores jogos de para jogar na KTO. Tem cinco bobinas, três linhas e 10 linhas de pagamento. Horários do evento A Estrela.bet está com uma promoção especial para o Tigre Sortudo. Apostando R$200 no Piggy Mania, você ganha 100 giros para o jogo do tourinho. Encontramos, por exemplo, simultaneamente, as ofertas de 10 giros bônus para jogos Fortune e 100 rodadas grátis para o Touro Sortudo. Ambas as promoções eram de curta duração – verifique no site qual a promo do momento.
Howdy! Someone in my Facebook group shared this website with us so I came to check it out. I’m definitely enjoying the information. I’m bookmarking and will be tweeting this to my followers! Fantastic blog and great design.
Howdy! Someone in my Facebook group shared this website with us so I came to check it out. I’m definitely enjoying the information. I’m book-marking and will be tweeting this to my followers! Exceptional blog and brilliant design and style.
Hey! Someone in my Myspace group shared this site with us so I came to take a look. I’m definitely loving the information. I’m bookmarking and will be tweeting this to my followers! Wonderful blog and terrific design.
Hello! Someone in my Myspace group shared this site with us so I came to take a look. I’m definitely loving the information. I’m book-marking and will be tweeting this to my followers! Great blog and fantastic style and design.
Thanks for sharing. I read many of your blog posts, cool, your blog is very good.
Hi there! Someone in my Facebook group shared this website with us so I came to give it a look. I’m definitely enjoying the information. I’m bookmarking and will be tweeting this to my followers! Exceptional blog and brilliant design and style.
medicatie apotheker review MedicijnPunt inloggen apotheek
magnesium krГ¤m: Snabb Apoteket – thc test apotek
It’s nearly impossible to find knowledgeable people
on this subject, however, you seem like you know what you’re talking about!
Thanks
https://www.wazamba-br.com
Howdy just wanted to give you a quick heads up. The words in your content seem to be running off the screen in Ie. I’m not sure if this is a formatting issue or something to do with internet browser compatibility but I figured I’d post to let you know. The layout look great though! Hope you get the issue solved soon. Kudos
https://tryggmed.com/# kinesio tape apotek
Hey just wanted to give you a quick heads up. The text in your content seem to be running off the screen in Chrome. I’m not sure if this is a formatting issue or something to do with browser compatibility but I figured I’d post to let you know. The design and style look great though! Hope you get the problem solved soon. Thanks
Hello just wanted to give you a quick heads up. The words in your article seem to be running off the screen in Chrome. I’m not sure if this is a formatting issue or something to do with internet browser compatibility but I figured I’d post to let you know. The design and style look great though! Hope you get the issue resolved soon. Cheers
apotheken: apotheken nederland – bestellen apotheek
covidtest apotek hur mГҐnga apotek finns det i sverige medicin hemleverans
https://zorgpakket.shop/# apotheek inloggen
Hey there just wanted to give you a quick heads up. The words in your post seem to be running off the screen in Opera. I’m not sure if this is a format issue or something to do with web browser compatibility but I thought I’d post to let you know. The design look great though! Hope you get the problem fixed soon. Kudos
Hello just wanted to give you a quick heads up. The words in your article seem to be running off the screen in Chrome. I’m not sure if this is a format issue or something to do with browser compatibility but I figured I’d post to let you know. The style and design look great though! Hope you get the problem fixed soon. Kudos
В этой публикации мы предлагаем подробные объяснения по актуальным вопросам, чтобы помочь читателям глубже понять их. Четкость и структурированность материала сделают его удобным для усвоения и применения в повседневной жизни.
Узнать из первых рук – https://dadapress.com/thanks/449hero
Hey there just wanted to give you a quick heads up. The text in your content seem to be running off the screen in Ie. I’m not sure if this is a format issue or something to do with browser compatibility but I figured I’d post to let you know. The design and style look great though! Hope you get the issue fixed soon. Kudos
Hello just wanted to give you a quick heads up. The words in your post seem to be running off the screen in Firefox. I’m not sure if this is a format issue or something to do with internet browser compatibility but I thought I’d post to let you know. The style and design look great though! Hope you get the problem resolved soon. Thanks
Hey just wanted to give you a quick heads up. The text in your content seem to be running off the screen in Opera. I’m not sure if this is a formatting issue or something to do with internet browser compatibility but I figured I’d post to let you know. The design and style look great though! Hope you get the problem solved soon. Many thanks
Эта публикация завернет вас в вихрь увлекательного контента, сбрасывая стереотипы и открывая двери к новым идеям. Каждый абзац станет для вас открытием, полным ярких примеров и впечатляющих достижений. Подготовьтесь быть вовлеченными и удивленными каждый раз, когда продолжите читать.
Углубить понимание вопроса – http://www.brnnetwork.org/gallery/web-american-kestrel-james-poling
В этой публикации мы предлагаем подробные объяснения по актуальным вопросам, чтобы помочь читателям глубже понять их. Четкость и структурированность материала сделают его удобным для усвоения и применения в повседневной жизни.
Секреты успеха внутри – http://ippos.ru
Этот информационный обзор станет отличным путеводителем по актуальным темам, объединяющим важные факты и мнения экспертов. Мы исследуем ключевые идеи и представляем их в доступной форме для более глубокого понимания. Читайте, чтобы оставаться в курсе событий!
Обратитесь за информацией – http://stpe.co.za/audio-safety-measures-in-an-apartment
Этот увлекательный информационный материал подарит вам массу новых знаний и ярких эмоций. Мы собрали для вас интересные факты и сведения, которые обогатят ваш опыт. Откройте для себя увлекательный мир информации и насладитесь процессом изучения!
Доступ к полной версии – https://stellartelecommunication.com/outshine-your-competitors-unleashing-proven-digital-excellence
Hello just wanted to give you a quick heads up. The text in your article seem to be running off the screen in Safari. I’m not sure if this is a format issue or something to do with browser compatibility but I thought I’d post to let you know. The design look great though! Hope you get the problem resolved soon. Kudos
В статье представлены ключевые моменты по актуальной теме, дополненные советами экспертов и ссылками на дополнительные ресурсы. Цель материала — дать читателю инструменты для самостоятельного развития и принятия осознанных решений.
Это стоит прочитать полностью – http://fashion-light.ru
Этот информационный обзор станет отличным путеводителем по актуальным темам, объединяющим важные факты и мнения экспертов. Мы исследуем ключевые идеи и представляем их в доступной форме для более глубокого понимания. Читайте, чтобы оставаться в курсе событий!
Углубить понимание вопроса – https://phelionline.co.za/_sb_country/peru
Этот информативный текст выделяется своими захватывающими аспектами, которые делают сложные темы доступными и понятными. Мы стремимся предложить читателям глубину знаний вместе с разнообразием интересных фактов. Откройте новые горизонты и развивайте свои способности познавать мир!
Неизвестные факты о… – https://expectacao.projetocimm.com/o-cinema-de-impacto-social-em-alagoas
billigt proteinpulver: kГ¶pa nГ¤sspray – snarkskena apotek
hurtigtest apotek legevakt apotek apotek online norge
https://zorgpakket.com/# apteka nl
http://snabbapoteket.com/# apotekek
apotek/bandasjist har lГҐst resepten for behandling: Trygg Med – apotek saltvann
https://tryggmed.shop/# apotek spania
online doktersrecept MedicijnPunt medicijnen zonder recept met ideal
Thank you for your sharing. I am worried that I lack creative ideas. It is your article that makes me full of hope. Thank you. But, I have a question, can you help me?
https://tryggmed.shop/# billigst apotek på nett
apotek retinol: TryggMed – hjemmetest kjГёnnssykdommer apotek
mГҐle blodtrykk apotek TryggMed gipssko apotek
Эта информационная статья содержит полезные факты, советы и рекомендации, которые помогут вам быть в курсе последних тенденций и изменений в выбранной области. Материал составлен так, чтобы быть полезным и понятным каждому.
Это стоит прочитать полностью – https://ru-sos.ru
https://zorgpakket.com/# medicijnen bestellen zonder recept
В этой публикации мы предлагаем подробные объяснения по актуальным вопросам, чтобы помочь читателям глубже понять их. Четкость и структурированность материала сделают его удобным для усвоения и применения в повседневной жизни.
Расширить кругозор по теме – https://kllogistic.ru
https://expresscarerx.org/# buy pharmacy
п»їlegitimate online pharmacies india: indian pharmacy paypal – best india pharmacy
animal rx pharmacy ExpressCareRx online pharmacy delivery dubai
cheapest online pharmacy india: IndiaMedsHub – best online pharmacy india
Aproveite agora mesmo a promoção exclusiva da https://brx-bet-br.com para novos jogadores e comece com vantagem: ao se
cadastrar gratuitamente, você recebe 100 dólares em bônus de boas-vindas.
Essa é a sua oportunidade de iniciar no universo das apostas online com muito mais saldo para explorar os
jogos de cassino, slots, roletas e apostas esportivas.
Cadastre-se, ative sua conta e receba o bônus sem complicações.
Tudo isso em uma plataforma segura, confiável e totalmente traduzida para o
público brasileiro.
Ganhe 100 dólares de bônus ao criar sua conta na 365bet e comece apostando com muito mais confiança.
Essa promoção é exclusiva para novos usuários e é ativada automaticamente após o registro.
Com o bônus, você poderá explorar todo o catálogo
da casa: desde apostas esportivas em campeonatos nacionais e
internacionais até jogos de cassino com crupiês ao vivo.
Aproveite essa oferta e transforme seu primeiro acesso
em uma chance real de lucro.
http://medimexicorx.com/# MediMexicoRx
IndiaMedsHub: top online pharmacy india – online pharmacy india
escitalopram generic pharmacy united pharmacy propecia ExpressCareRx
https://indiamedshub.shop/# IndiaMedsHub
https://expresscarerx.org/# bahrain pharmacy cialis
semaglutide mexico price: zithromax mexican pharmacy – safe mexican online pharmacy
Гидроизоляция зданий https://gidrokva.ru и сооружений любой сложности. Фундаменты, подвалы, крыши, стены, инженерные конструкции.
indian pharmacy IndiaMedsHub IndiaMedsHub
https://expresscarerx.online/# ExpressCareRx
IndiaMedsHub: IndiaMedsHub – IndiaMedsHub
ExpressCareRx: ExpressCareRx – ExpressCareRx
A https://esportbet-br.com investiu em tecnologia para te oferecer o melhor
app. Não depende de navegador. Apostas esportivas,
cassino, suporte e promoções – tudo ao alcance do dedo.
Instale hoje mesmo e veja a diferença.
indian pharmacy buy prescription drugs from india india pharmacy
Você está procurando uma casa de apostas que valoriza seus novos jogadores?
Então a 939 bet é perfeita para você.
Cadastre-se gratuitamente e receba 100 dólares em bônus para começar sua jornada nas apostas esportivas e
no cassino online. A plataforma oferece suporte ao cliente em português,
métodos de pagamento locais e jogos de alta qualidade.
Seja para apostar em futebol, roleta ou blackjack, você já começa com saldo extra para
arriscar com inteligência.
https://medimexicorx.com/# mexican rx online
buy medicines online in india: indianpharmacy com – top 10 online pharmacy in india
https://medimexicorx.shop/# MediMexicoRx
unicare pharmacy dublin artane castle: ExpressCareRx – ExpressCareRx
legit mexican pharmacy without prescription buy antibiotics from mexico sildenafil mexico online
http://medimexicorx.com/# buying prescription drugs in mexico
A nova atualização do app está imperdível.
Mais velocidade nos carregamentos. Tudo isso com a segurança que você já conhece.
Baixe agora.
Se você está em busca de um bônus de boas-vindas realmente vantajoso, a
https://onebra-88.com tem o que você precisa. Ao se cadastrar
hoje, você recebe 100 dólares para utilizar
em apostas esportivas e jogos de cassino. A promoção
é simples de ativar, e o crédito pode ser usado em apostas de futebol, basquete, tênis e em slots
famosos. Com esse incentivo, sua experiência começa com mais emoção e maiores chances de ganhar logo nas primeiras jogadas.
Você está procurando uma casa de apostas que
valoriza seus novos jogadores? Então a batbet
é perfeita para você. Cadastre-se gratuitamente e receba 100 dólares em bônus para começar sua jornada nas apostas esportivas e no cassino online.
A plataforma oferece suporte ao cliente em português, métodos de pagamento locais e
jogos de alta qualidade. Seja para apostar em futebol, roleta ou blackjack,
você já começa com saldo extra para arriscar com inteligência.
order from mexican pharmacy online: buy neurontin in mexico – MediMexicoRx
Register at aceph today and get a generous $100 bonus upon signing up! The process is quick and easy, and once logged in, your bonus will be available for use on a wide variety of games. Make the most of your new account and start playing with your bonus today. From sports betting to slots, there’s plenty to explore. Sign up now!
online mexico pharmacy USA: buy meds from mexican pharmacy – prescription drugs mexico pharmacy
https://indiamedshub.shop/# buy medicines online in india
ez pharmacy ExpressCareRx dapoxetine
ExpressCareRx: finasteride pharmacy – ExpressCareRx
https://expresscarerx.online/# ExpressCareRx
buy medicines online in india: IndiaMedsHub – п»їlegitimate online pharmacies india
https://indiamedshub.shop/# IndiaMedsHub
ExpressCareRx australian pharmacy domperidone ExpressCareRx
Quer começar a apostar com um impulso extra? Na https://boss77-ph.com, novos usuários recebem um bônus de 100 dólares assim que finalizam o cadastro.
Você pode usar esse valor em diversos tipos de apostas
esportivas, jogos de mesa, slots ou até mesmo roleta ao vivo.
Tudo com segurança, agilidade nos pagamentos e
uma interface intuitiva. A promoção é válida
por tempo limitado, então não perca tempo. Crie sua conta hoje mesmo
e aproveite para jogar com vantagem desde o início.
cheapest online pharmacy india: IndiaMedsHub – IndiaMedsHub
Заказать диплом https://diplomikon.ru быстро, надёжно, с гарантией! Напишем работу с нуля по вашим требованиям. Уникальность от 80%, оформление по ГОСТу.
Оформим реферат https://ref-na-zakaz.ru за 1 день! Напишем с нуля по вашим требованиям. Уникальность, грамотность, точное соответствие методичке.
Отчёты по практике https://gotov-otchet.ru на заказ и в готовом виде. Производственная, преддипломная, учебная.
Диплом под ключ https://diplomnazakaz-online.ru от выбора темы до презентации. Профессиональные авторы, оформление по ГОСТ, высокая уникальность.
https://expresscarerx.online/# ExpressCareRx
best prices on finasteride in mexico: accutane mexico buy online – MediMexicoRx
ExpressCareRx ExpressCareRx mdma online pharmacy
rx solutions pharmacy help desk: viagra certified pharmacy – ExpressCareRx
http://medimexicorx.com/# best online pharmacies in mexico
Withdrawing from winph: What Documents Are Necessary for a Smooth and Fast Payout?
Thanks for sharing. I read many of your blog posts, cool, your blog is very good.
australian online pharmacy: ExpressCareRx – ExpressCareRx
viagra prices pharmacy ExpressCareRx tijuana pharmacy online
gambling illegal usa, new no deposit canadian casinos and canadian poker, or new uk based online mobiles casino gratis guthaben 2025
http://medimexicorx.com/# MediMexicoRx
trusted mexico pharmacy with US shipping: accutane mexico buy online – isotretinoin from mexico
Этот информационный материал собраны данные, которые помогут лучше понять текущие тенденции и процессы в различных сферах жизни. Мы предоставляем четкий анализ, графики и примеры, чтобы информация была не только понятной, но и практичной для принятия решений.
Нажми и узнай всё – https://bekknows.tech/easy-way-to-delete-your-instagram-account
buy Accutane online USA-safe Accutane sourcing generic isotretinoin
Эта обзорная заметка содержит ключевые моменты и факты по актуальным вопросам. Она поможет читателям быстро ориентироваться в теме и узнать о самых важных аспектах сегодня. Получите краткий курс по современной информации и оставайтесь в курсе событий!
Получить полную информацию – https://lebanesemall.com/product/red-hoodie
В этой публикации мы предлагаем подробные объяснения по актуальным вопросам, чтобы помочь читателям глубже понять их. Четкость и структурированность материала сделают его удобным для усвоения и применения в повседневной жизни.
Получить дополнительные сведения – https://modesynthese.com/snapseed-64
Propecia for hair loss online: generic Finasteride without prescription – generic propecia without a prescription
buy esim japan buy e sim
https://finasteridefromcanada.shop/# generic Finasteride without prescription
Lexapro for depression online: Lexapro for depression online – generic lexapro australia
Эта информационная заметка содержит увлекательные сведения, которые могут вас удивить! Мы собрали интересные факты, которые сделают вашу жизнь ярче и полнее. Узнайте нечто новое о привычных аспектах повседневности и откройте для себя удивительный мир информации.
Подробнее – https://www.antonelloosteria.com/menu-category/dessert
Мы собрали для вас самые захватывающие факты из мира науки и истории. От малознакомых деталей до грандиозных событий — эта статья расширит ваш кругозор и подарит новое понимание того, как устроен наш мир.
Только факты! – https://test-company.com/hello-world
Эта публикация завернет вас в вихрь увлекательного контента, сбрасывая стереотипы и открывая двери к новым идеям. Каждый абзац станет для вас открытием, полным ярких примеров и впечатляющих достижений. Подготовьтесь быть вовлеченными и удивленными каждый раз, когда продолжите читать.
Осуществить глубокий анализ – http://ecopackaging.eu/home1
Этот информационный обзор станет отличным путеводителем по актуальным темам, объединяющим важные факты и мнения экспертов. Мы исследуем ключевые идеи и представляем их в доступной форме для более глубокого понимания. Читайте, чтобы оставаться в курсе событий!
Погрузиться в научную дискуссию – https://www.taylordentist.com/living-with-sensitive-teeth-during-the-holiday-season
Публикация приглашает вас исследовать неизведанное — от древних тайн до современных достижений науки. Вы узнаете, как случайные находки превращались в революции, а смелые мысли — в новые эры человеческого прогресса.
Ознакомиться с деталями – https://newerahtx.com/harnessing-the-power-of-the-sun
Этот информационный обзор станет отличным путеводителем по актуальным темам, объединяющим важные факты и мнения экспертов. Мы исследуем ключевые идеи и представляем их в доступной форме для более глубокого понимания. Читайте, чтобы оставаться в курсе событий!
Смотрите также… – http://www.wishmatrix.ru
Propecia for hair loss online cheap Propecia Canada propecia brand name
Этот информационный обзор станет отличным путеводителем по актуальным темам, объединяющим важные факты и мнения экспертов. Мы исследуем ключевые идеи и представляем их в доступной форме для более глубокого понимания. Читайте, чтобы оставаться в курсе событий!
Смотрите также… – http://glavpromweb.ru
https://tadalafilfromindia.shop/# Cialis without prescription
generic sertraline: sertraline online – Zoloft online pharmacy USA
buy lexapro no prescription: best price for lexapro generic – Lexapro for depression online
https://lexapro.pro/# Lexapro for depression online
generic Finasteride without prescription Finasteride From Canada cost of propecia without prescription
Understanding the RTP is a must for all players. Remember that a casino is about winning and getting value for your time and effort. RTP and volatility are how you can determine how often you will get those rewards, even before you play. They are some of the criteria professionals use to decide whether or not they should play. The good thing is that Buffalo King Megawys RTP stands at 96.52%. Where the average RTP rate for most casinos is 96%, this is close enough and a great value. To give it some level of balance, Buffalo King Megaways has high volatility. While with free slot machines you can hone your skills and perfect your strategy, there is one big drawback: you can’t win any money! Real money slot machines can sometimes offer life-changing sums of money to players, and even the smaller winnings can intensify the excitement. If you’re unsure whether you’d like to try real money slot machines or stick with playing free casino slot games, we’ve detailed the benefits of both in the table below:
https://licwithsanjeev.com/a-review-of-betfury-mines-game-with-canadian-access-in-mind/
Starburst is one of those online slots that you see everywhere. Released in 2012, it quickly reached iconic status due to its enticing combination of simple gameplay and potential big wins. You play the game on a 5×3 layout with 10 paylines. With its space theme, colourful jewels, and the famous wild symbol, the gameplay gets talked about a lot. It’s often the first slot many people play and one that many return to time and time again. Progressive Jackpots increase the more players play the game. Each time someone bets on the game, some of their stake goes towards the progressive jackpot. It keeps growing until one lucky punter wins it all. Some of our top progressive jackpot games include: Download the app from your casino’s website or app store, create an account, deposit funds, and browse the games lobby to start playing your favorite casino games.
http://finasteridefromcanada.com/# Propecia for hair loss online
Zoloft for sale: Zoloft Company – Zoloft for sale
isotretinoin online: USA-safe Accutane sourcing – isotretinoin online
http://isotretinoinfromcanada.com/# order isotretinoin from Canada to US
buy Cialis online cheap where can i get tadalafil buy Cialis online cheap
https://zoloft.company/# generic sertraline
Lexapro for depression online: Lexapro for depression online – Lexapro for depression online
lexapro prescription: Lexapro for depression online – Lexapro for depression online
Нужен дом? строительство дома цена — от проекта до отделки. Каркасные, кирпичные, брусовые, из газобетона. Гарантия качества, соблюдение сроков, индивидуальный подход.
Этот информативный текст отличается привлекательным содержанием и актуальными данными. Мы предлагаем читателям взглянуть на привычные вещи под новым углом, предоставляя интересный и доступный материал. Получите удовольствие от чтения и расширьте кругозор!
Более того — здесь – https://baliprincesstour.com/audio-post-format
В этой статье представлен занимательный и актуальный контент, который заставит вас задуматься. Мы обсуждаем насущные вопросы и проблемы, а также освещаем истории, которые вдохновляют на действия и изменения. Узнайте, что стоит за событиями нашего времени!
Выяснить больше – https://www.irishhellenic.ie/cropped-screen-shot-2015-05-10-at-22-57-17-png
https://lexapro.pro/# Lexapro for depression online
Публикация приглашает вас исследовать неизведанное — от древних тайн до современных достижений науки. Вы узнаете, как случайные находки превращались в революции, а смелые мысли — в новые эры человеческого прогресса.
Изучить аспект более тщательно – https://penarol.com.br/2024/12/11/encerramento-do-som-da-concha-2024-une-gio-resquin-e-falange-da-rima-no-palco-agencia-de-noticias-do-governo-de-mato-grosso-do-sul
lexapro 20 mg tablet best price for lexapro generic buy generic lexapro online
Этот информационный обзор станет отличным путеводителем по актуальным темам, объединяющим важные факты и мнения экспертов. Мы исследуем ключевые идеи и представляем их в доступной форме для более глубокого понимания. Читайте, чтобы оставаться в курсе событий!
Доступ к полной версии – https://www.miyukigrossist.se/writer-01
Публикация приглашает вас исследовать неизведанное — от древних тайн до современных достижений науки. Вы узнаете, как случайные находки превращались в революции, а смелые мысли — в новые эры человеческого прогресса.
Изучить аспект более тщательно – https://mdda.info/hello-world
Tadalafil From India: cheap Cialis Canada – cheap Cialis Canada
bet69 – Tải và cài đặt ứng dụng ngay để có trải nghiệm chơi game thú vị.
Этот текст сочетает в себе элементы познавательного рассказа и аналитической подачи информации. Читатель получает доступ к уникальным данным, которые соединяют прошлое с настоящим и открывают двери в будущее.
Изучить вопрос глубже – https://colegioboock.com.br/produto/curso-profissionalizante-em-massoterapia
lexapro cheapest price: Lexapro for depression online – Lexapro for depression online
bet168
– Chơi Cờ Bạc Công Bằng, Hưởng Thưởng Đặc Biệt Khi Đăng Ký
https://zoloft.company/# purchase generic Zoloft online discreetly
cheap Cialis Canada buy tadalafil 20mg price in india buy Cialis online cheap
lexapro 20: lexapro price comparison – Lexapro for depression online
remote gambling on soccer games usa license,
new zealandn blackjack rules and no deposit mobile casino canada,
or bet365 craps odds usa
buy Accutane online: isotretinoin online – purchase generic Accutane online discreetly
Rút Tiền Về Thẻ ATM – Đơn Giản, Nhanh Chóng
Morning sprint—twitter followers buy; perfect before trending-tag push.
We were surprised how well educational content responded once we injected measured tik tok likes and views during the first 90 minutes.
Trust and simple UX matter a lot when money’s involved. After asking myself what is the best online casino, I followed Reddit tips and now I’m using a site that’s reliable and well-rated.
https://tadalafilfromindia.shop/# Tadalafil From India
Надёжный заказ авто заказать новый авто. Машины с минимальным пробегом, отличным состоянием и по выгодной цене. Полное сопровождение: от подбора до постановки на учёт.
cost of generic propecia online cheap Propecia Canada cost propecia without a prescription
Lexapro for depression online: Lexapro for depression online – medication lexapro 10 mg
Интересная новость: Ароматные щи с копчеными ребрышками и грибами: простой рецепт для всей семьи
Полезная статья: Опасные отношения: как распознать и выйти из них
Читать подробнее: Влияние курса доллара на цены новых автомобилей в Украине: что нужно знать автовладельцу
USA-safe Accutane sourcing: buy Accutane online – order isotretinoin from Canada to US
https://tadalafilfromindia.shop/# Cialis without prescription
Этот информационный материал собраны данные, которые помогут лучше понять текущие тенденции и процессы в различных сферах жизни. Мы предоставляем четкий анализ, графики и примеры, чтобы информация была не только понятной, но и практичной для принятия решений.
Более того — здесь – http://cbs.torzhok.tverlib.ru/novye-postupleniya-knig-detskaya-biblioteka-no-2-1-kv-2024-g
Мы собрали для вас самые захватывающие факты из мира науки и истории. От малознакомых деталей до грандиозных событий — эта статья расширит ваш кругозор и подарит новое понимание того, как устроен наш мир.
Секреты успеха внутри – https://ovasdoors.com.ng/hello-world
Эта статья предлагает живое освещение актуальной темы с множеством интересных фактов. Мы рассмотрим ключевые моменты, которые делают данную тему важной и актуальной. Подготовьтесь к насыщенному путешествию по неизвестным аспектам и узнайте больше о значимых событиях.
Осуществить глубокий анализ – http://bodiology.co.za/hello-world
Интересные статьи: Свекольный салат: простые рецепты для здоровья и красоты
Статьи обо всем: Яйца и здоровье: с чем нельзя сочетать этот продукт
Эта информационная статья содержит полезные факты, советы и рекомендации, которые помогут вам быть в курсе последних тенденций и изменений в выбранной области. Материал составлен так, чтобы быть полезным и понятным каждому.
Доступ к полной версии – https://colmartropicale.com.my/make-sure-you-read-this-before
Читать статью: 7 октября: церковный праздник, традиции и приметы для женского счастья
Новое и актуальное: Ошибки в макияже: как не испортить кожу и внешность
buy Zoloft online without prescription USA buy Zoloft online Zoloft Company
Lexapro for depression online: where can you buy lexapro – can you buy lexapro over the counter
cheap Accutane: buy Accutane online – isotretinoin online
https://lexapro.pro/# buy lexapro without a prescription online
быстрый займ онлайн деньги
order isotretinoin from Canada to US: Isotretinoin From Canada – buy Accutane online
деньги онлайн займ микрозайм взять
USA-safe Accutane sourcing Isotretinoin From Canada order isotretinoin from Canada to US
Читать полностью: Идеальная укладка: секреты сушки волос феном от стилистов
микрозайм взять микрозайм онлайн
https://finasteridefromcanada.shop/# Finasteride From Canada
cheap Propecia Canada: Propecia for hair loss online – buy cheap propecia without rx
Автомобили на заказ заказать авто. Работаем с крупнейшими аукционами: выбираем, проверяем, покупаем, доставляем. Машины с пробегом и без, отличное состояние, прозрачная история.
Надёжный заказ авто заказать авто с аукционов: качественные автомобили, проверенные продавцы, полная сопровождение сделки. Подбор, доставка, оформление — всё под ключ. Экономия до 30% по сравнению с покупкой в РФ.
Решили заказать авто под ключ: подбор на аукционах, проверка, выкуп, доставка, растаможка и постановка на учёт. Честные отчёты, выгодные цены, быстрая логистика.
Хочешь авто заказать авто с аукциона? Мы поможем! Покупка на аукционе, проверка, выкуп, доставка, растаможка и ПТС — всё включено. Прямой импорт без наценок.
best price for lexapro: Lexapro for depression online – price for lexapro 10 mg
generic Finasteride without prescription generic Finasteride without prescription generic Finasteride without prescription
https://lexapro.pro/# Lexapro for depression online
Эта статья предлагает живое освещение актуальной темы с множеством интересных фактов. Мы рассмотрим ключевые моменты, которые делают данную тему важной и актуальной. Подготовьтесь к насыщенному путешествию по неизвестным аспектам и узнайте больше о значимых событиях.
Осуществить глубокий анализ – http://russianicons.ru/order.php?obj=171
Предлагаем вашему вниманию интересную справочную статью, в которой собраны ключевые моменты и нюансы по актуальным вопросам. Эта информация будет полезна как для профессионалов, так и для тех, кто только начинает изучать тему. Узнайте ответы на важные вопросы и расширьте свои знания!
Почему это важно? – https://www.bloos.nu/favicon1
Предлагаем вашему вниманию интересную справочную статью, в которой собраны ключевые моменты и нюансы по актуальным вопросам. Эта информация будет полезна как для профессионалов, так и для тех, кто только начинает изучать тему. Узнайте ответы на важные вопросы и расширьте свои знания!
Подробная информация доступна по запросу – https://breezefsm.in/pre-journey-plan-why-is-it-important
Этот информативный текст отличается привлекательным содержанием и актуальными данными. Мы предлагаем читателям взглянуть на привычные вещи под новым углом, предоставляя интересный и доступный материал. Получите удовольствие от чтения и расширьте кругозор!
Это стоит прочитать полностью – https://estrellasbakeryus.com/product/lengua
В этой информационной статье вы найдете интересное содержание, которое поможет вам расширить свои знания. Мы предлагаем увлекательный подход и уникальные взгляды на обсуждаемые темы, побуждая пользователей к активному мышлению и критическому анализу.
Ознакомиться с деталями – http://russianicons.ru/order.php?obj=166
Этот текст призван помочь читателю расширить кругозор и получить практические знания. Мы используем простой язык, наглядные примеры и структурированное изложение, чтобы сделать обучение максимально эффективным и увлекательным.
Изучить вопрос глубже – https://fotodroid.com/ahoj-vsichni
В этой публикации мы предлагаем подробные объяснения по актуальным вопросам, чтобы помочь читателям глубже понять их. Четкость и структурированность материала сделают его удобным для усвоения и применения в повседневной жизни.
Практические советы ждут тебя – https://openkz.kz/2023/01/18/%D0%B0%D0%BA%D1%82%D1%83%D0%B0%D0%BB%D1%8C%D0%BD%D1%8B%D0%B5-%D0%BF%D1%80%D0%BE%D0%B1%D0%BB%D0%B5%D0%BC%D1%8B-%D1%81%D0%B5%D0%BB%D1%8C%D1%81%D0%BA%D0%BE%D0%B3%D0%BE-%D1%85%D0%BE%D0%B7%D1%8F%D0%B9
generic sertraline: purchase generic Zoloft online discreetly – cheap Zoloft
generic Finasteride without prescription cheap Propecia Canada cheap Propecia Canada
Эта публикация завернет вас в вихрь увлекательного контента, сбрасывая стереотипы и открывая двери к новым идеям. Каждый абзац станет для вас открытием, полным ярких примеров и впечатляющих достижений. Подготовьтесь быть вовлеченными и удивленными каждый раз, когда продолжите читать.
Углубить понимание вопроса – http://voasw.ru
https://lexapro.pro/# Lexapro for depression online
Сразу после вызова нарколог прибывает на дом для проведения детального осмотра. На этом этапе специалист измеряет жизненно важные показатели, собирает анамнез и оценивает степень алкогольной интоксикации, что является основой для составления персонального плана лечения.
Разобраться лучше – http://vyvod-iz-zapoya-tula0.ru/vyvod-iz-zapoya-anonimno-tula/
Trải Nghiệm Cờ Bạc Công Bằng tại https://sun-vn.com –
Hấp Dẫn Và Tiền Thưởng Khủng
Врач уточняет, как долго продолжается запой, какой алкоголь употребляется, а также наличие сопутствующих заболеваний. Этот тщательный анализ позволяет оперативно подобрать оптимальные методы детоксикации и снизить риск осложнений.
Получить дополнительные сведения – [url=https://vyvod-iz-zapoya-tula0.ru/]вывод из запоя цена[/url]
cheap Cialis Canada: Tadalafil From India – buy Cialis online cheap
https://lexapro.pro/# lexapro brand name in india
generic Finasteride without prescription order propecia without dr prescription generic Finasteride without prescription
cheap Accutane: generic isotretinoin – isotretinoin online
tadalafil generic in usa buy Cialis online cheap Tadalafil From India
Нужна душевая кабина? душевая кабина купить: компактные и просторные модели, стеклянные и пластиковые, с глубоким поддоном и без. Установка под ключ, гарантия, помощь в подборе. Современный дизайн и доступные цены!
Cách Rút Tiền 79king
Qua Ví Ngân Lượng Siêu Nhanh
Эта обзорная заметка содержит ключевые моменты и факты по актуальным вопросам. Она поможет читателям быстро ориентироваться в теме и узнать о самых важных аспектах сегодня. Получите краткий курс по современной информации и оставайтесь в курсе событий!
Перейти к статье – http://cbs.torzhok.tverlib.ru/mezhregionalnaya-hudozhestvennaya-vystavka-artperedvizhenie
В статье представлены ключевые моменты по актуальной теме, дополненные советами экспертов и ссылками на дополнительные ресурсы. Цель материала — дать читателю инструменты для самостоятельного развития и принятия осознанных решений.
Практические советы ждут тебя – https://topic.lk/550
Эта информационная статья содержит полезные факты, советы и рекомендации, которые помогут вам быть в курсе последних тенденций и изменений в выбранной области. Материал составлен так, чтобы быть полезным и понятным каждому.
Секреты успеха внутри – https://malaysia.royaloceantravel.com/how-to-travel-with-paper-map
Публикация приглашает вас исследовать неизведанное — от древних тайн до современных достижений науки. Вы узнаете, как случайные находки превращались в революции, а смелые мысли — в новые эры человеческого прогресса.
Изучить вопрос глубже – https://belgh.com/index.php/2024/03/08/hello-world
В этой информационной статье вы найдете интересное содержание, которое поможет вам расширить свои знания. Мы предлагаем увлекательный подход и уникальные взгляды на обсуждаемые темы, побуждая пользователей к активному мышлению и критическому анализу.
Продолжить изучение – http://www.russianicons.ru/order.php?obj=180
В этой статье вы найдете познавательную и занимательную информацию, которая поможет вам лучше понять мир вокруг. Мы собрали интересные данные, которые вдохновляют на размышления и побуждают к действиям. Открывайте новую информацию и получайте удовольствие от чтения!
Смотрите также… – https://crescent-solutions.com/best-background-check-services-assessments
where to buy generic lexapro: lexapro tablets australia – Lexapro for depression online
В этом информативном тексте представлены захватывающие события и факты, которые заставят вас задуматься. Мы обращаем внимание на важные моменты, которые часто остаются незамеченными, и предлагаем новые перспективы на привычные вещи. Подготовьтесь к тому, чтобы быть поглощенным увлекательными рассказами!
Что ещё нужно знать? – http://cbs.torzhok.tverlib.ru/itogi-tvorcheskogo-konkursa-festivalya-schastlivaya-semya-schastlivaya-strana
Этот информационный обзор станет отличным путеводителем по актуальным темам, объединяющим важные факты и мнения экспертов. Мы исследуем ключевые идеи и представляем их в доступной форме для более глубокого понимания. Читайте, чтобы оставаться в курсе событий!
Все материалы собраны здесь – http://oktancafe.pl/2019/07/18/the-future-of-software
В этой публикации мы предлагаем подробные объяснения по актуальным вопросам, чтобы помочь читателям глубже понять их. Четкость и структурированность материала сделают его удобным для усвоения и применения в повседневной жизни.
Смотрите также… – https://topic.lk/5112
Zoloft Company generic sertraline Zoloft online pharmacy USA
Эта статья для ознакомления предлагает читателям общее представление об актуальной теме. Мы стремимся представить ключевые факты и идеи, которые помогут читателям получить представление о предмете и решить, стоит ли углубляться в изучение.
Смотри, что ещё есть – https://obsidianwm.com/blog/2020/10/03/%D0%BE%D0%BC%D0%B3-%D1%81%D1%81%D1%8B%D0%BB%D0%BA%D0%B0-%D1%81%D0%B0%D0%B9%D1%82-omg-%D0%B2-tor
Эта публикация дает возможность задействовать различные источники информации и представить их в удобной форме. Читатели смогут быстро найти нужные данные и получить ответы на интересующие их вопросы. Мы стремимся к четкости и доступности материала для всех!
Читать дальше – https://creamos.online/best-new-studio-headphones-the-ultimate-musician-guide
Эта обзорная заметка содержит ключевые моменты и факты по актуальным вопросам. Она поможет читателям быстро ориентироваться в теме и узнать о самых важных аспектах сегодня. Получите краткий курс по современной информации и оставайтесь в курсе событий!
Нажми и узнай всё – http://poisk.cerkov.ru/catalog/group/145
Finasteride From Canada: Finasteride From Canada – generic Finasteride without prescription
lexapro 20mg lexapro online no prescription buy lexapro online india
Finasteride From Canada: cheap Propecia Canada – Propecia for hair loss online
cheap Propecia Canada Propecia for hair loss online Propecia for hair loss online
Комедия детства один дома фильм 1990 — легендарная комедия для всей семьи. Без ограничений, в отличном качестве, на любом устройстве. Погрузитесь в атмосферу праздника вместе с Кевином!
Продвижение сайта https://team-black-top.ru в ТОП Яндекса и Google. Комплексное SEO, аудит, оптимизация, контент, внешние ссылки. Рост трафика и продаж уже через 2–3 месяца.
Aposte na https://slingo-br.com de forma inteligente com o app.
O app é leve e eficiente. Bônus, jogos, roleta, esportes ao vivo – tudo
ao seu alcance. Interface renovada garantem uma jogabilidade superior.
It’s a shame you don’t have a donate button! I’d certainly donate
to this superb blog! I suppose for now i’ll settle for book-marking and adding your
RSS feed to my Google account. I look forward to new updates and will share this site with
my Facebook group. Chat soon!
buy Zoloft online: generic sertraline – purchase generic Zoloft online discreetly
Đăng Ký go99 – Thưởng Ngay 100$ Khi Nạp
Đầu
Никаких блокировок кракен тор ссылка, никаких сбоев — только надёжная работа . Адрес сохраняй, чтобы не потерять.
Никаких блокировок зеркало кракен маркет, никаких сбоев — только надёжная работа . Адрес сохраняй, чтобы не потерять.
Никаких блокировок актуальное зеркало кракен, никаких сбоев — только надёжная работа . Адрес сохраняй, чтобы не потерять.
Мы собрали для вас самые захватывающие факты из мира науки и истории. От малознакомых деталей до грандиозных событий — эта статья расширит ваш кругозор и подарит новое понимание того, как устроен наш мир.
Это стоит прочитать полностью – https://alther.mx/bofa-el-nearshoring-en-mexico-es-irreversible
amoxicillin 250 mg price in india: order amoxicillin without prescription – antibiotic treatment online no Rx
Эта информационная заметка содержит увлекательные сведения, которые могут вас удивить! Мы собрали интересные факты, которые сделают вашу жизнь ярче и полнее. Узнайте нечто новое о привычных аспектах повседневности и откройте для себя удивительный мир информации.
Ознакомьтесь с аналитикой – https://shihori.fides-infinity.com/2008/12/25/%E3%83%AC%E3%83%83%E3%83%89%E3%83%BB%E3%82%AF%E3%83%AA%E3%83%95%E3%80%80%E3%80%80part%EF%BC%91
Мы собрали для вас самые захватывающие факты из мира науки и истории. От малознакомых деталей до грандиозных событий — эта статья расширит ваш кругозор и подарит новое понимание того, как устроен наш мир.
Доступ к полной версии – https://www.zahorany.cz/cropped-erb_zahorany-png
Clomid Hub can i order cheap clomid prices Clomid Hub Pharmacy
order corticosteroids without prescription: order corticosteroids without prescription – how to get prednisone tablets
Этот информативный текст отличается привлекательным содержанием и актуальными данными. Мы предлагаем читателям взглянуть на привычные вещи под новым углом, предоставляя интересный и доступный материал. Получите удовольствие от чтения и расширьте кругозор!
Погрузиться в научную дискуссию – http://krasblog.ru
NeuroRelief Rx: NeuroRelief Rx – gabapentin pics
equine gabapentin dose side effects of gabapentin medication NeuroRelief Rx
Курс по плазмолифтингу https://prp-ginekologiya.ru в гинекологии: PRP-терапия, протоколы, показания и техника введения. Обучение для гинекологов с выдачей сертификата. Эффективный метод в эстетической и восстановительной медицине.
Курс по плазмотерапии https://prp-plazmoterapija.ru с выдачей сертификата. Освойте PRP-методику: показания, противопоказания, протоколы, работа с оборудованием. Обучение для медработников с практикой и официальными документами.
NeuroRelief Rx: signs of gabapentin withdrawal – gabapentin 300mg capsules
ClearMeds Direct low-cost antibiotics delivered in USA low-cost antibiotics delivered in USA
mini mart saif zone saif zone customer care
Интересная статья: Почему летом не стоит заправлять полный бак: советы автомобилистам
Читать статью: Как реагировать на ложь партнера: советы психолога
Интересная статья: Скручиваются листья на черешне: причины и эффективные методы борьбы
ReliefMeds USA: order corticosteroids without prescription – order corticosteroids without prescription
get cheap clomid no prescription: buy clomid tablets – Clomid Hub
Публикация приглашает вас исследовать неизведанное — от древних тайн до современных достижений науки. Вы узнаете, как случайные находки превращались в революции, а смелые мысли — в новые эры человеческого прогресса.
Расширить кругозор по теме – https://www.hotel-sugano.com/bbs/sugano.cgi/www.tovery.net/datasphere.ru/club/user/12/blog/2477/datasphere.ru/club/user/12/blog/sugano.cgi?page20=val
Предлагаем вашему вниманию интересную справочную статью, в которой собраны ключевые моменты и нюансы по актуальным вопросам. Эта информация будет полезна как для профессионалов, так и для тех, кто только начинает изучать тему. Узнайте ответы на важные вопросы и расширьте свои знания!
Почему это важно? – https://www.questoutreach.org/board_bulletin/burnaby-market-closed-on-sundays-till-further-notice
Эта публикация завернет вас в вихрь увлекательного контента, сбрасывая стереотипы и открывая двери к новым идеям. Каждый абзац станет для вас открытием, полным ярких примеров и впечатляющих достижений. Подготовьтесь быть вовлеченными и удивленными каждый раз, когда продолжите читать.
Более того — здесь – https://www.cbavocatsassocies.com/portfolio/custom-project-link
prednisone 20mg buy online Relief Meds USA ReliefMeds USA
Эта публикация завернет вас в вихрь увлекательного контента, сбрасывая стереотипы и открывая двери к новым идеям. Каждый абзац станет для вас открытием, полным ярких примеров и впечатляющих достижений. Подготовьтесь быть вовлеченными и удивленными каждый раз, когда продолжите читать.
Секреты успеха внутри – https://blog.ezigarettenkoenig.de/die-elektrische-zigarette/der-flasheffekt
Этот текст сочетает в себе элементы познавательного рассказа и аналитической подачи информации. Читатель получает доступ к уникальным данным, которые соединяют прошлое с настоящим и открывают двери в будущее.
Открыть полностью – https://www.bretagneidlarge.org/court-defeat-for-trump-is-a-win-for-the-arctic-court-defeat-for-trump-is-a-win-for-the-arctic
В этой публикации мы предлагаем подробные объяснения по актуальным вопросам, чтобы помочь читателям глубже понять их. Четкость и структурированность материала сделают его удобным для усвоения и применения в повседневной жизни.
Только факты! – http://aroda.cat/portfolio/library-interior-design
Этот информативный текст отличается привлекательным содержанием и актуальными данными. Мы предлагаем читателям взглянуть на привычные вещи под новым углом, предоставляя интересный и доступный материал. Получите удовольствие от чтения и расширьте кругозор!
Доступ к полной версии – https://f5fashion.vn/jp-mcmanus-net-worth-in-2023-how-rich-is-he-now-update
Читать в подробностях: Как правильно обтирать ребенка при высокой температуре: советы и рекомендации
В этой публикации мы предлагаем подробные объяснения по актуальным вопросам, чтобы помочь читателям глубже понять их. Четкость и структурированность материала сделают его удобным для усвоения и применения в повседневной жизни.
Все материалы собраны здесь – https://f5fashion.vn/top-hon-52-ve-hinh-nen-nguoi-mau-ao-tam-moi-nhat
Читать новость: Секреты долголетия: как продлить жизнь на 13 лет
Modafinil for focus and productivity: affordable Modafinil for cognitive enhancement – WakeMeds RX
prednisone 20 mg prices: Relief Meds USA – anti-inflammatory steroids online
A cautious framework recommends a modular plan to buy twitter follower bundles between content sprints.
Новое на сайте: Стоп подкормка: когда рассада не нуждается в удобрениях
can i order cheap clomid can i purchase generic clomid pills how to buy generic clomid online
Новое на сайте: Секрет идеального теста для вареников: проверенный временем рецепт
can i order generic clomid without dr prescription: Clomid Hub – Clomid Hub
anti-inflammatory steroids online: how to get prednisone without a prescription – Relief Meds USA
Innovative AI platform https://lumiabitai.com for crypto trading — passive income without stress. Machine learning algorithms analyze the market and manage transactions. Simple registration, clear interface, stable profit.
AI platform https://bullbittrade.com/ for passive crypto trading. Robots trade 24/7, you earn. Without deep knowledge, without constant control. High speed, security and automatic strategy.
order amoxicillin without prescription amoxicillin 500mg capsules price antibiotic treatment online no Rx
дивитись фільми 2025 фільми без реклами та реєстрації
українські фільми та серіали новинки кіно 2025 дивитися безкоштовно
дивитись фільми 2025 новинки кіно 2025 дивитися безкоштовно
safe Provigil online delivery service: affordable Modafinil for cognitive enhancement – Modafinil for ADHD and narcolepsy
Relief Meds USA: cheap prednisone 20 mg – Relief Meds USA
В этой информационной статье вы найдете интересное содержание, которое поможет вам расширить свои знания. Мы предлагаем увлекательный подход и уникальные взгляды на обсуждаемые темы, побуждая пользователей к активному мышлению и критическому анализу.
Следуйте по ссылке – https://motorhjoernet.dk/faa-baeredygtig-fremdrift-med-solcellepaneler-til-din-bil
Эта информационная заметка содержит увлекательные сведения, которые могут вас удивить! Мы собрали интересные факты, которые сделают вашу жизнь ярче и полнее. Узнайте нечто новое о привычных аспектах повседневности и откройте для себя удивительный мир информации.
Изучить вопрос глубже – https://www.wif.malopolska.pl/info
Этот информационный обзор станет отличным путеводителем по актуальным темам, объединяющим важные факты и мнения экспертов. Мы исследуем ключевые идеи и представляем их в доступной форме для более глубокого понимания. Читайте, чтобы оставаться в курсе событий!
Это стоит прочитать полностью – https://www.sklo-glass.sk/156483_239020066235061_832944690_n
Эта статья предлагает живое освещение актуальной темы с множеством интересных фактов. Мы рассмотрим ключевые моменты, которые делают данную тему важной и актуальной. Подготовьтесь к насыщенному путешествию по неизвестным аспектам и узнайте больше о значимых событиях.
Продолжить изучение – https://scalebnb.com/mastering-time-management-key-to-business-success
prescription-free Modafinil alternatives: order Provigil without prescription – Wake Meds RX
В этой статье представлен занимательный и актуальный контент, который заставит вас задуматься. Мы обсуждаем насущные вопросы и проблемы, а также освещаем истории, которые вдохновляют на действия и изменения. Узнайте, что стоит за событиями нашего времени!
Только для своих – https://oktancafe.pl/2019/07/09/invent-the-future
Мы собрали для вас самые захватывающие факты из мира науки и истории. От малознакомых деталей до грандиозных событий — эта статья расширит ваш кругозор и подарит новое понимание того, как устроен наш мир.
Погрузиться в научную дискуссию – https://glowpower.ie/masonry
celebrex and gabapentin interaction: buy generic fluoxetine – NeuroRelief Rx
prednisone 20mg tablets where to buy: ReliefMeds USA – Relief Meds USA
Modafinil for ADHD and narcolepsy: order Provigil without prescription – WakeMeds RX
wakefulness medication online no Rx: safe Provigil online delivery service – order Provigil without prescription
buy prednisone online no prescription: over the counter prednisone cheap – ReliefMeds USA
Searching for reliable answers to how many casinos did trump bankrupt?
We provide detailed, trustworthy information backed by real
casino experts. Our goal is to help you enjoy secure gambling with top-tier platforms that value integrity.
Expect transparent gameplay, verified promotions, and 24/7 support
when you follow our recommendations. Join thousands of players choosing fair,
exciting, and bonus-rich environments for their online casino journey.
Explore the topic of don laughlin riverside resort and casino and get insider insights that truly matter.
We’re committed to fairness, accuracy, and player-focused content.
All our featured casinos follow strict compliance standards and come loaded with generous sign-up offers and rewards.
Learn how to enjoy gambling safely while taking advantage of bonuses, high-return games,
and trusted services designed for both beginners and professionals alike.
CanadRx Nexus: CanadRx Nexus – CanadRx Nexus
india pharmacy: IndiGenix Pharmacy – IndiGenix Pharmacy
Bandartogel77
sildenafil mexico online: zithromax mexican pharmacy – cheap mexican pharmacy
https://indigenixpharm.com/# IndiGenix Pharmacy
Этот текст призван помочь читателю расширить кругозор и получить практические знания. Мы используем простой язык, наглядные примеры и структурированное изложение, чтобы сделать обучение максимально эффективным и увлекательным.
Что ещё? Расскажи всё! – http://giaiphap.designer.com.vn/am-thuc/menu-am-thuc-kfd2434341.html
Предлагаем вашему вниманию интересную справочную статью, в которой собраны ключевые моменты и нюансы по актуальным вопросам. Эта информация будет полезна как для профессионалов, так и для тех, кто только начинает изучать тему. Узнайте ответы на важные вопросы и расширьте свои знания!
Нажмите, чтобы узнать больше – https://www.roek.org/jelly-jelly-jelly
MexiCare Rx Hub: buy neurontin in mexico – buy kamagra oral jelly mexico
Bos88
indian pharmacies safe: indian pharmacies safe – IndiGenix Pharmacy
manga online latest manga updates online
comic book manga DC comics online reader
Этот текст сочетает в себе элементы познавательного рассказа и аналитической подачи информации. Читатель получает доступ к уникальным данным, которые соединяют прошлое с настоящим и открывают двери в будущее.
Смотри, что ещё есть – https://www.stephendasko.com/portfolio/flippin-the-bird
манхва про демонов манхва фэнтези
IndiGenix Pharmacy: reputable indian pharmacies – IndiGenix Pharmacy
Hurrah! Finally I got a webpage from where I be able to in fact get valuable facts regarding my study and knowledge.
Your point of view caught my eye and was very interesting. Thanks. I have a question for you.
MexiCare Rx Hub: MexiCare Rx Hub – semaglutide mexico price
mexico pharmacies prescription drugs: MexiCare Rx Hub – MexiCare Rx Hub
https://canadrxnexus.com/# canada pharmacy online
best online canadian pharmacy: CanadRx Nexus – northwest pharmacy canada
MexiCare Rx Hub: safe mexican online pharmacy – MexiCare Rx Hub
MexiCare Rx Hub: MexiCare Rx Hub – MexiCare Rx Hub
DefiLlama analytics
cheapest online pharmacy india: buy medicines online in india – IndiGenix Pharmacy
Hometogel
CanadRx Nexus: canada drugs online review – canada drug pharmacy
CanadRx Nexus: CanadRx Nexus – CanadRx Nexus
real mexican pharmacy USA shipping: MexiCare Rx Hub – MexiCare Rx Hub
Эта статья предлагает живое освещение актуальной темы с множеством интересных фактов. Мы рассмотрим ключевые моменты, которые делают данную тему важной и актуальной. Подготовьтесь к насыщенному путешествию по неизвестным аспектам и узнайте больше о значимых событиях.
Секреты успеха внутри – https://realvaluepharmacynyc.com/product/advanced-inst-eye-relief-15ml
CanadRx Nexus: canadian drug – canadian pharmacy 365
Эта публикация завернет вас в вихрь увлекательного контента, сбрасывая стереотипы и открывая двери к новым идеям. Каждый абзац станет для вас открытием, полным ярких примеров и впечатляющих достижений. Подготовьтесь быть вовлеченными и удивленными каждый раз, когда продолжите читать.
Получить полную информацию – https://www.hotel-sugano.com/bbs/sugano.cgi/www.skitour.su/sinopipefittings.com/e_Feedback/www.tovery.net/sinopipefittings.com/e_Feedback/www.hip-hop.ru/forum/id298234-worksale/sugano.cgi?page20=val
Этот текст сочетает в себе элементы познавательного рассказа и аналитической подачи информации. Читатель получает доступ к уникальным данным, которые соединяют прошлое с настоящим и открывают двери в будущее.
Подробная информация доступна по запросу – https://www.tropicswriter.nl/werk-met-mij/een-sterk-staaltje-ivoorkust
лучший фильм 2 онлайн новые сериалы 2025
Институт государственной службы https://igs118.ru обучение для тех, кто хочет управлять, реформировать, развивать. Подготовка кадров для госуправления, муниципалитетов, законодательных и исполнительных органов.
Публичная дипломатия России https://softpowercourses.ru концепции, стратегии, механизмы влияния. От культурных центров до цифровых платформ — как формируется образ страны за рубежом.
Read the full article https://mudvine.com/pk/?jacob-and-co-casino-watch-price-in-pakistan
Эта статья для ознакомления предлагает читателям общее представление об актуальной теме. Мы стремимся представить ключевые факты и идеи, которые помогут читателям получить представление о предмете и решить, стоит ли углубляться в изучение.
Почему это важно? – https://houseboyfilm.com/2019/07/29/rokophoto-rokophoto-photography-workshop-in-july
Публикация приглашает вас исследовать неизведанное — от древних тайн до современных достижений науки. Вы узнаете, как случайные находки превращались в революции, а смелые мысли — в новые эры человеческого прогресса.
Все материалы собраны здесь – http://kraftcaun.ru
Go here https://mk.pixelbeast.hu/pk/?maga-world-casino
Эта публикация завернет вас в вихрь увлекательного контента, сбрасывая стереотипы и открывая двери к новым идеям. Каждый абзац станет для вас открытием, полным ярких примеров и впечатляющих достижений. Подготовьтесь быть вовлеченными и удивленными каждый раз, когда продолжите читать.
Как достичь результата? – http://www.benestareswimfit.com/2017/12/20/hello-world
В этой статье представлен занимательный и актуальный контент, который заставит вас задуматься. Мы обсуждаем насущные вопросы и проблемы, а также освещаем истории, которые вдохновляют на действия и изменения. Узнайте, что стоит за событиями нашего времени!
Смотри, что ещё есть – https://clindoeilinfo.com/assassinat-de-jovenel-moise-ariel-henry-un-homme-vertueux-aux-yeux-de-andre-michel
jonitogel
Click to read https://mudvine.com/pk/?no-deposit-bonus-casino
Try this one out https://www.django-services.fr/pk/?big-win-casino-slot-games
IndiGenix Pharmacy: top 10 pharmacies in india – IndiGenix Pharmacy
Этот информационный обзор станет отличным путеводителем по актуальным темам, объединяющим важные факты и мнения экспертов. Мы исследуем ключевые идеи и представляем их в доступной форме для более глубокого понимания. Читайте, чтобы оставаться в курсе событий!
Все материалы собраны здесь – https://unonews.ru
Предлагаем вашему вниманию интересную справочную статью, в которой собраны ключевые моменты и нюансы по актуальным вопросам. Эта информация будет полезна как для профессионалов, так и для тех, кто только начинает изучать тему. Узнайте ответы на важные вопросы и расширьте свои знания!
Обратитесь за информацией – https://autoelektronik.rs/home/pattern
Эта информационная заметка содержит увлекательные сведения, которые могут вас удивить! Мы собрали интересные факты, которые сделают вашу жизнь ярче и полнее. Узнайте нечто новое о привычных аспектах повседневности и откройте для себя удивительный мир информации.
Информация доступна здесь – https://rona34.ru
Visit our website https://u8w.top/pk/?crickex-casino
Hometogel
Опытный репетитор https://english-coach.ru для школьников 1–11 классов. Подтянем знания, разберёмся в трудных темах, подготовим к экзаменам. Занятия онлайн и офлайн.
Школа бизнеса EMBA https://emba-school.ru программа для руководителей и собственников. Стратегическое мышление, международные практики, управленческие навыки.
Check out what’s new https://staging.artemistherapeutics.com/pk/?royal-x-casino-game-download-play-store
Visit this link https://hao.57yun.top/pk/?royal-x-casino-game
Explore this now https://wave8.bobbyiliev.com/pk/?lucky-101-casino
indian pharmacy online: indianpharmacy com – buy prescription drugs from india
indian pharmacy: IndiGenix Pharmacy – IndiGenix Pharmacy
Проходите аттестацию https://prom-bez-ept.ru по промышленной безопасности через ЕПТ — быстро, удобно и официально. Подготовка, регистрация, тестирование и сопровождение.
«Дела семейные» https://academyds.ru онлайн-академия для родителей, супругов и всех, кто хочет разобраться в семейных вопросах. Психология, право, коммуникации, конфликты, воспитание — просто о важном для жизни.
Sbototo
Трэвел-журналистика https://presskurs.ru как превращать путешествия в публикации. Работа с редакциями, создание медийного портфолио, написание текстов, интервью, фото- и видеоматериалы.
Greetings!
Read the link – best welcome bonuses online casino
Enjoy your bonuses!
top 10 pharmacies in india: world pharmacy india – Online medicine home delivery
http://sl01.top/vn/?link-tải-hi88
https://crm.serviciosenergeticosdegalicia.com/htdocs/langs/lv_LV/?ku11-lừa-đảo
https://wave8.bobbyiliev.com/vn/?siêu-nohu
CanadRx Nexus: CanadRx Nexus – onlinecanadianpharmacy 24
https://bt.xieher.cn/vn/?tf88-việt-nam
Свежие скидки https://1001kupon.ru выгодные акции и рабочие промокоды — всё для того, чтобы тратить меньше. Экономьте на онлайн-покупках с проверенными кодами.
https://skillfullearning.ca/vn/?jun88-ket
«Академия учителя» https://edu-academiauh.ru онлайн-портал для педагогов всех уровней. Методические разработки, сценарии уроков, цифровые ресурсы и курсы. Поддержка в обучении, аттестации и ежедневной работе в школе.
Hey gambler!
Read the link – slot spinners for free spins
Good luck spinning!
https://yr8.top/vn/?q8-2015
CanadRx Nexus: best online canadian pharmacy – global pharmacy canada
https://yr8.top/vn/?kc6-casino
Оригинальный потолок натяжной потолок со световыми линиями в спальне со световыми линиями под заказ. Разработка дизайна, установка профиля, выбор цветовой температуры. Идеально для квартир, офисов, студий. Стильно, практично и с гарантией.
Online medicine order: reputable indian pharmacies – IndiGenix Pharmacy
?аза? тіліндегі ?ндер Песни 2025 года, казахские хиты ж?рекке жа?ын ?уендер мен ?серлі м?тіндер. ?лтты? музыка мен ?азіргі заман?ы хиттер. Онлайн ты?дау ж?не ж?ктеу м?мкіндігі бар ы??айлы жина?.
cheap mexican pharmacy: generic drugs mexican pharmacy – buy viagra from mexican pharmacy
CanadRx Nexus: CanadRx Nexus – CanadRx Nexus
IndiGenix Pharmacy: IndiGenix Pharmacy – indian pharmacy online
rybelsus from mexican pharmacy: MexiCare Rx Hub – MexiCare Rx Hub
online shopping pharmacy india: IndiGenix Pharmacy – IndiGenix Pharmacy
Готовый комплект Инсталляция тесе с унитазом в комплекте инсталляция и унитаз — идеальное решение для современных интерьеров. Быстрый монтаж, скрытая система слива, простота в уходе и экономия места. Подходит для любого санузла.
MexiCare Rx Hub: MexiCare Rx Hub – mexican online pharmacies prescription drugs
Shoestring founders: even a $6 packet to buy twitter views cheap can validate your hook before paying for ads.
CanadRx Nexus: CanadRx Nexus – CanadRx Nexus
safe mexican online pharmacy: MexiCare Rx Hub – low cost mexico pharmacy online
https://wordpress-698266-3878096.cloudwaysapps.com/en/?venus-de-milo-casino
http://gh16.top/en/?firelake-casino
Эта обзорная заметка содержит ключевые моменты и факты по актуальным вопросам. Она поможет читателям быстро ориентироваться в теме и узнать о самых важных аспектах сегодня. Получите краткий курс по современной информации и оставайтесь в курсе событий!
Получить полную информацию – https://dentoexclusive.com/dentist_license_verification_all_states
IverCare Pharmacy ivermectin pills human IverCare Pharmacy
Эта публикация завернет вас в вихрь увлекательного контента, сбрасывая стереотипы и открывая двери к новым идеям. Каждый абзац станет для вас открытием, полным ярких примеров и впечатляющих достижений. Подготовьтесь быть вовлеченными и удивленными каждый раз, когда продолжите читать.
Секреты успеха внутри – https://inmoactive.com/el-euribor-retorna-a-positivo
В этой публикации мы предлагаем подробные объяснения по актуальным вопросам, чтобы помочь читателям глубже понять их. Четкость и структурированность материала сделают его удобным для усвоения и применения в повседневной жизни.
Это стоит прочитать полностью – https://p3-plus.com/5-elements-that-build-a-roster-of-terrific-clients
AsthmaFree Pharmacy: rybelsus pronunciation – AsthmaFree Pharmacy
buy Zanaflex online USA: Zanaflex medication fast delivery – Tizanidine 2mg 4mg tablets for sale
Этот информационный обзор станет отличным путеводителем по актуальным темам, объединяющим важные факты и мнения экспертов. Мы исследуем ключевые идеи и представляем их в доступной форме для более глубокого понимания. Читайте, чтобы оставаться в курсе событий!
Это стоит прочитать полностью – https://inmoactive.com/el-euribor-retorna-a-positivo
Этот информативный текст отличается привлекательным содержанием и актуальными данными. Мы предлагаем читателям взглянуть на привычные вещи под новым углом, предоставляя интересный и доступный материал. Получите удовольствие от чтения и расширьте кругозор!
Секреты успеха внутри – https://asbn.site/mauvais-installateur-comment-l-eviter
safe online source for Tizanidine: relief from muscle spasms online – Tizanidine 2mg 4mg tablets for sale
AsthmaFree Pharmacy ventolin 100mcg online buy ventolin in mexico
Когда открываешь сайт и сразу попадаешь в нужное настроение — это уже многое значит. официальный сайт Vodka Casino не просто встречает приятным интерфейсом, но и предлагает щедрую систему приветственных бонусов, которая буквально провоцирует попробовать все режимы. Меню плавно ведёт по категориям: слоты, лайв-дилеры, турниры, акции. Причём каждый раздел наполнен смыслом — нет пустых разделов или симуляции контента. Всё работает: ставки, выплаты, подтверждение личности. Можно играть на крипту или карту, всё зависит от твоих предпочтений. Неожиданным бонусом стало то, что даже без депозита можно участвовать в некоторых розыгрышах. Это подкупает. Сложно не оценить ту заботу, с которой продуманы все мелочи: от адаптивной верстки до анимации наград. Чувствуешь себя не просто посетителем, а полноценным игроком с правом на выбор. Именно такой подход отличает серьёзные платформы от проходных сайтов. Здесь хочется остаться надолго.
can you take jardiance and rybelsus together: how to speed up weight loss on semaglutide? – can you take rybelsus and jardiance together
semaglutide prescription online rybelsus generic price rybelsus buy online
lasix dosage: lasix side effects – furosemida 40 mg
Bosstoto
IverCare Pharmacy: IverCare Pharmacy – ivermectin liquid for horses
safe online source for Tizanidine muscle relaxants online no Rx Tizanidine tablets shipped to USA
ivermectin where to purchase: ivermectin USA – IverCare Pharmacy
В этом информативном тексте представлены захватывающие события и факты, которые заставят вас задуматься. Мы обращаем внимание на важные моменты, которые часто остаются незамеченными, и предлагаем новые перспективы на привычные вещи. Подготовьтесь к тому, чтобы быть поглощенным увлекательными рассказами!
Осуществить глубокий анализ – http://mammaai.com/?p=1445
Публикация приглашает вас исследовать неизведанное — от древних тайн до современных достижений науки. Вы узнаете, как случайные находки превращались в революции, а смелые мысли — в новые эры человеческого прогресса.
Информация доступна здесь – https://napthungbantai.vn/san-pham/lot-thung-chinh-hang-ford-ranger-2023
Публикация приглашает вас исследовать неизведанное — от древних тайн до современных достижений науки. Вы узнаете, как случайные находки превращались в революции, а смелые мысли — в новые эры человеческого прогресса.
Следуйте по ссылке – https://www.enrollblog.com/best-winter-treks-to-do-in-india
В этой публикации мы предлагаем подробные объяснения по актуальным вопросам, чтобы помочь читателям глубже понять их. Четкость и структурированность материала сделают его удобным для усвоения и применения в повседневной жизни.
Обратиться к источнику – https://gops.edu.jo/?p=15142
Эта статья для ознакомления предлагает читателям общее представление об актуальной теме. Мы стремимся представить ключевые факты и идеи, которые помогут читателям получить представление о предмете и решить, стоит ли углубляться в изучение.
Почему это важно? – https://exlinko.org/o/xjptz-rank-website-in-3-weeks
Мы собрали для вас самые захватывающие факты из мира науки и истории. От малознакомых деталей до грандиозных событий — эта статья расширит ваш кругозор и подарит новое понимание того, как устроен наш мир.
Расширить кругозор по теме – https://iomaio.ru
В этой публикации мы предлагаем подробные объяснения по актуальным вопросам, чтобы помочь читателям глубже понять их. Четкость и структурированность материала сделают его удобным для усвоения и применения в повседневной жизни.
Ознакомьтесь с аналитикой – http://e-aldi.de/guestbook.html
Эта публикация завернет вас в вихрь увлекательного контента, сбрасывая стереотипы и открывая двери к новым идеям. Каждый абзац станет для вас открытием, полным ярких примеров и впечатляющих достижений. Подготовьтесь быть вовлеченными и удивленными каждый раз, когда продолжите читать.
Все материалы собраны здесь – http://parismd.ru
IverCare Pharmacy: stromectol adult dosing – IverCare Pharmacy
ventolin online uk ventolin price ventolin buy online
Tizanidine 2mg 4mg tablets for sale: Tizanidine tablets shipped to USA – Tizanidine tablets shipped to USA
IverCare Pharmacy IverCare Pharmacy ivermectin plus
order ivermectin: IverCare Pharmacy – IverCare Pharmacy
how long does it take for rybelsus to work: long term side effects of rybelsus – rybelsus canada
AsthmaFree Pharmacy how to take rybelsus rybelsus from canada
trusted pharmacy Zanaflex USA: Tizanidine tablets shipped to USA – Zanaflex medication fast delivery
Mariatogel
В этой публикации мы предлагаем подробные объяснения по актуальным вопросам, чтобы помочь читателям глубже понять их. Четкость и структурированность материала сделают его удобным для усвоения и применения в повседневной жизни.
Читать дальше – https://taranehkhavidi.com/hello-world
Этот информационный материал собраны данные, которые помогут лучше понять текущие тенденции и процессы в различных сферах жизни. Мы предоставляем четкий анализ, графики и примеры, чтобы информация была не только понятной, но и практичной для принятия решений.
Заходи — там интересно – https://avenueconsumer.com/registered_vs_unregistered_companies_in_india
liquid ivermectin for humans: IverCare Pharmacy – stromectol 3 mg dosage
Этот информационный обзор станет отличным путеводителем по актуальным темам, объединяющим важные факты и мнения экспертов. Мы исследуем ключевые идеи и представляем их в доступной форме для более глубокого понимания. Читайте, чтобы оставаться в курсе событий!
Как достичь результата? – https://sparksmontessori.com/unlocking-the-joy-of-learning
В этой публикации мы предлагаем подробные объяснения по актуальным вопросам, чтобы помочь читателям глубже понять их. Четкость и структурированность материала сделают его удобным для усвоения и применения в повседневной жизни.
Узнать из первых рук – https://docka-ru.ru
Эта статья для ознакомления предлагает читателям общее представление об актуальной теме. Мы стремимся представить ключевые факты и идеи, которые помогут читателям получить представление о предмете и решить, стоит ли углубляться в изучение.
Нажмите, чтобы узнать больше – https://urbancity.co.id/wilayah-setu-jadi-sentra-pertumbuhan-baru-di-bekasi
Этот текст сочетает в себе элементы познавательного рассказа и аналитической подачи информации. Читатель получает доступ к уникальным данным, которые соединяют прошлое с настоящим и открывают двери в будущее.
Ознакомьтесь с аналитикой – https://vriba.com/blog/gpt-4o-a-promising-yet-familiar-evolution
Предлагаем вашему вниманию интересную справочную статью, в которой собраны ключевые моменты и нюансы по актуальным вопросам. Эта информация будет полезна как для профессионалов, так и для тех, кто только начинает изучать тему. Узнайте ответы на важные вопросы и расширьте свои знания!
Почему это важно? – http://florence-neuberth.com/low3n0a0131-4
rybelsus approval AsthmaFree Pharmacy AsthmaFree Pharmacy
AsthmaFree Pharmacy: order ventolin from canada no prescription – AsthmaFree Pharmacy
Эта статья для ознакомления предлагает читателям общее представление об актуальной теме. Мы стремимся представить ключевые факты и идеи, которые помогут читателям получить представление о предмете и решить, стоит ли углубляться в изучение.
Обратитесь за информацией – https://chatrouletteru.ru
В данной обзорной статье представлены интригующие факты, которые не оставят вас равнодушными. Мы критикуем и анализируем события, которые изменили наше восприятие мира. Узнайте, что стоит за новыми открытиями и как они могут изменить ваше восприятие реальности.
Разобраться лучше – https://quick-vyvod-iz-zapoya-1.ru/
goltogel login
goltogel login
rybelsus vs ozempic side effects: rybelsusдёж–‡ – rybelsus foods to avoid
buy furosemide online buy furosemide online buy furosemide online
В обзорной статье вы найдете собрание важных фактов и аналитики по самым разнообразным темам. Мы рассматриваем как современные исследования, так и исторические контексты, чтобы вы могли получить полное представление о предмете. Погрузитесь в мир знаний и сделайте шаг к пониманию!
Подробнее – https://quick-vyvod-iz-zapoya-1.ru/
FluidCare Pharmacy: furosemide – FluidCare Pharmacy
totojitu login
compare ventolin prices AsthmaFree Pharmacy AsthmaFree Pharmacy
prescription-free muscle relaxants: prescription-free muscle relaxants – muscle relaxants online no Rx
muscle relaxants online no Rx: safe online source for Tizanidine – muscle relaxants online no Rx
Мы предлагаем вам подробное руководство, основанное на проверенных источниках и реальных примерах. Каждая часть публикации направлена на то, чтобы помочь вам разобраться в сложных вопросах и применить знания на практике.
Посмотреть подробности – https://desikingfoods.com/2021/12/03/test
lasix generic name FluidCare Pharmacy lasix medication
Этот информационный материал собраны данные, которые помогут лучше понять текущие тенденции и процессы в различных сферах жизни. Мы предоставляем четкий анализ, графики и примеры, чтобы информация была не только понятной, но и практичной для принятия решений.
Узнай первым! – https://colmartropicale.com.my/make-sure-you-read-this-before
Предлагаем вашему вниманию интересную справочную статью, в которой собраны ключевые моменты и нюансы по актуальным вопросам. Эта информация будет полезна как для профессионалов, так и для тех, кто только начинает изучать тему. Узнайте ответы на важные вопросы и расширьте свои знания!
Нажмите, чтобы узнать больше – http://www.tvrepairsleeds.com/homepage_bottom4
Эта публикация завернет вас в вихрь увлекательного контента, сбрасывая стереотипы и открывая двери к новым идеям. Каждый абзац станет для вас открытием, полным ярких примеров и впечатляющих достижений. Подготовьтесь быть вовлеченными и удивленными каждый раз, когда продолжите читать.
Получить полную информацию – http://www.windowtomyworld.nl/wordpress_nl/?p=32
AsthmaFree Pharmacy: order ventolin online canada – AsthmaFree Pharmacy
bigbassbonanza.bet4.4 No results found for “” The holidays & festivities have begun throughout the submerged landscapes of our oceans. Gamblers can experience these yuletide celebrations in Christmas Big Bass Bonanza from Reel Kingdom. There’ll be an unexpected merging between aquatic ecosystems and holiday celebrations. Moreover, players are positioned into the Frozen Tundra of Canada. That’ll mean mountain terrain & icebound lakes await with this online slot machine. Big Bass Bonanza online slot offers simple gameplay across Canada. Demo modes on online casino platforms allow practice without risks. Understanding mechanics, symbols, and features ensures smoother gameplay. Reviewing the paytable reveals payouts and symbol combinations. Bets range from $0.10 to $250, offering flexibility for different strategies. Spinning reels align symbols along paylines, delivering rewards. Bonus rounds triggered by scatters provide additional chances to win. The release’s high 96.71% RTP ensures better returns during extended play. Exploring Big Bass Bonanza free spins and multipliers enhances overall enjoyment. Following these steps ensures engaging gameplay while promoting responsible habits.
https://eurovizif.mk/2025/08/06/best-session-timing-in-aviator-game-for-low-risk-wins/
Big Bass Bonanza is one of Pragmatic Play’s most popular slots, and it’s easy to see why. In addition to high symbol payouts and a fair RTP, the slot benefits from an exciting special spins round, especially when you land wild fishermen on the reels. Only players above the age of 18 are permitted to play our games. Underage gambling is an offence. Click on the hamburger icon on the bottom left of the game screen to select your coin size. Affordable bet selections ensure that fishermen of all types can play and enjoy Big Bass Bonanza slot. Click the left right green buttons to choose your bet size. The minimum bet is £0.10, and the maximum bet is £250. There are 15 symbols on your screen, with winning combinations forming across ten paylines. Big Bass Bonanza slot game is mobile-ready just for you. Our updated Orbit gaming platform is fully optimized for handheld devices. This means that players can instantly power up Android smartphones and tablets, iPhones and iPads. Then, play directly off your browser, or download the app at the Google Play Store for Android or the App Store for iPhone iPad.
FluidCare Pharmacy: FluidCare Pharmacy – lasix furosemide
RelaxMeds USA Zanaflex medication fast delivery Tizanidine 2mg 4mg tablets for sale
AsthmaFree Pharmacy: AsthmaFree Pharmacy – rybelsus vs mounjaro
how to swap trx
AsthmaFree Pharmacy AsthmaFree Pharmacy AsthmaFree Pharmacy
furosemide 40mg: lasix generic – buy furosemide online
cheapest tron swap
RelaxMedsUSA: muscle relaxants online no Rx – buy Zanaflex online USA
FluidCare Pharmacy FluidCare Pharmacy furosemide 100 mg
IverCare Pharmacy: how long for oral ivermectin to kill lice – ivermectin pour on for horses
tron bridge
Мы собрали для вас самые захватывающие факты из мира науки и истории. От малознакомых деталей до грандиозных событий — эта статья расширит ваш кругозор и подарит новое понимание того, как устроен наш мир.
Выяснить больше – https://theaiminstitute.com/innovation/vitality-index-improvement-time-for-two-new-innovation-metrics
Эта статья предлагает живое освещение актуальной темы с множеством интересных фактов. Мы рассмотрим ключевые моменты, которые делают данную тему важной и актуальной. Подготовьтесь к насыщенному путешествию по неизвестным аспектам и узнайте больше о значимых событиях.
Детальнее – https://balance4ever.nl/shop/63690_10151263146603257_1027252617_n
Мы собрали для вас самые захватывающие факты из мира науки и истории. От малознакомых деталей до грандиозных событий — эта статья расширит ваш кругозор и подарит новое понимание того, как устроен наш мир.
Все материалы собраны здесь – https://mymedicalbox.net/produit/tenetur-incidunt-purus
Эта информационная заметка содержит увлекательные сведения, которые могут вас удивить! Мы собрали интересные факты, которые сделают вашу жизнь ярче и полнее. Узнайте нечто новое о привычных аспектах повседневности и откройте для себя удивительный мир информации.
Открыть полностью – http://www.sunset.jp/shopblog/index.php?itemid=308
Этот текст призван помочь читателю расширить кругозор и получить практические знания. Мы используем простой язык, наглядные примеры и структурированное изложение, чтобы сделать обучение максимально эффективным и увлекательным.
Что ещё? Расскажи всё! – https://synclik.com/index.php/content-writing
Эта статья предлагает живое освещение актуальной темы с множеством интересных фактов. Мы рассмотрим ключевые моменты, которые делают данную тему важной и актуальной. Подготовьтесь к насыщенному путешествию по неизвестным аспектам и узнайте больше о значимых событиях.
Секреты успеха внутри – https://f5fashion.vn/top-8-mon-an-tu-duong-dua-hap-dan-o-mien-tay
В статье представлены ключевые моменты по актуальной теме, дополненные советами экспертов и ссылками на дополнительные ресурсы. Цель материала — дать читателю инструменты для самостоятельного развития и принятия осознанных решений.
Выяснить больше – https://ksantia-travel.ru
Hand Sanitisers
Hand Sanitisers
sobre las características del sector eléctrico: Copyright © 2025 | Powered by Tema Astra del WordPress Veamos en más detalle las características principales de los juegos que ofrece. SEPE-Prestaciones ¿En qué situación te encuentras? Veel spelers uit Nederland zullen dol zijn op de online spelbibliotheek van het online casino. In de entertainmentportefeuille vinden gasten slots met HTML5, verschillende uitbetalingspercentages en bonusfuncties van leveranciers zoals Pragmatic, Play’n GO, Ezugi, BGaming, enz. De beste instant games van Aviator, JetX en PlinkoX zijn hier te vinden, evenals Bingo Power, Super Keno en Football Scratch. O funcionamento do Pix nos cassinos online é bastante simples. O jogador seleciona o valor que deseja depositar, por exemplo, R$5,00, e essa quantia será transferida de forma imediata para o saldo da conta no cassino. E o melhor: o valor enviado é o valor que você realmente recebe, pois o cassino pix não desconta nenhuma taxa de operação. Se o depósito é de R$5,00, exatamente esse valor estará disponível para apostar.
https://www.superkleen.in/balloon-up-game-version-alternativa-o-plagio/
La primogénita de Iniesta nació en Barcelona. Tiene 12 años en la actualidad y sus padres la califican como: “La mejor hermana mayor que pueden tener sus hermanos”. Considerado el mejor por décadas en su posición, y parte determinate del mejor equipo de la era moderna,(el Barcelona de Guardiola) se encuentra en una dicotomía sumamente considerable con respecto a lo que sería su última renovación de contrato. A pesar de que el pasado octubre de 2017, muchos medios de comunicación anunciaban la renovación de por vida entre #Iniesta y #Barcelona, el jugador declaró semanas atrás que a fines de Abril debe decidir si acepta una suculenta oferta del mercado chino que viene en pleno crecimiento. Paolo nació en el 2015, año en el que Iniesta ganó su última Champions con el Barcelona, meses después de que la pareja perdiera un bebe de ocho meses.
Betano kasyno jest idealna dla tych, którzy rozważają demo Lucky Jet. Z grami od slotów po gry stołowe, wszystkie z opcją darmowej gry, możesz poznać stronę bez obaw o utratę własnych pieniędzy. «Aviator» w MostBet ma proste i nieskomplikowane zasady. Aby z powodzeniem grać w ten slot: Aviator online to gra, w której obstawiasz rosnące kursy, które zależą od wysokości lecącego samolotu. Im dłużej czekasz, tym więcej możesz wygrać, ale jeśli nie zdążysz wycofać zakładu przed odlotem samolotu, tracisz wszystko. Gra pojawiła się w styczniu 2019 roku i została opracowana przez Spribe, firmę specjalizującą się w innowacyjnych rozwiązaniach gamingowych. Aviator szybko zyskał popularność wśród graczy na całym świecie dzięki dynamicznej i ekscytującej rozgrywce, a także wysokiemu współczynnikowi wypłat. Działa w oparciu o system provably fair, który zapewnia, że wyniku każdej rundy nie można przewidzieć ani sfałszować. Automat posiada następujące funkcje:
https://foreverlv.com/index.php/2025/08/04/kompleksowa-recenzja-kasyna-vavada-dla-graczy-z-polski/
GODZINY URZĘDOWANIA ODPOWIEDZIALNA GRA: W aviatorgame.net priorytetowo traktujemy odpowiedzialną grę, ponieważ wierzymy, że gra w kasynie online powinna być zabawnym i przyjemnym doświadczeniem. Jeśli kiedykolwiek poczujesz się niekomfortowo z powodu utraty pieniędzy, koniecznie zrób sobie przerwę i cofnij się na chwilę. Zapewniamy również różne strategie, które pomogą ci zarządzać grą w zdrowy sposób. Twoja przyjemność i dobre samopoczucie są dla nas najważniejsze! Powered by Tannbit Jesteśmy gotowi oświadczyć, że dostawca oprogramowania miał na uwadze zarówno początkujących, jak i doświadczonych graczy podczas projektowania interfejsu Aviator online. Po pierwszym uruchomieniu zobaczysz, że wszystko jest na swoim miejscu i wygodnie rozmieszczone na stronie. Obszar zakładów, w którym można ustawić wysokość stawki, a także wybrać jeden lub dwa zakłady i kilka innych opcji, znajduje się poniżej głównego ekranu z samolotem. Lewa strona poświęcona jest historii zakładów, podczas gdy w prawej części znajduje się kilka opcji, w tym ustawienia gry i Prawdopodobnie uczciwe. Aviator Gra pozwala nawet graczom oglądać poprzednie kursy powyżej ekranu głównego.
Promo slot gacor hari ini: Situs judi resmi berlisensi – Situs judi resmi berlisensi
Jiliko slots: Jiliko login – Jiliko slots
Jiliko login Jiliko bonus Jiliko casino walang deposit bonus para sa Pinoy
Jiliko: Jiliko slots – jilwin
Abutogel login: Jackpot togel hari ini – Link alternatif Abutogel
https://jilwin.pro/# Jiliko slots
Uduslar? tez c?xar Pinco il? Slot oyunlar? Pinco-da Pinco casino mobil t?tbiq
Jackpot togel hari ini: Abutogel – Jackpot togel hari ini
Qeydiyyat bonusu Pinco casino: Slot oyunlar? Pinco-da – Uduslar? tez c?xar Pinco il?
Swerte99 app: Swerte99 casino walang deposit bonus para sa Pinoy – Swerte99 casino walang deposit bonus para sa Pinoy
Jiliko bonus Jiliko casino walang deposit bonus para sa Pinoy maglaro ng Jiliko online sa Pilipinas
jollibet login: Online gambling platform Jollibet – Online gambling platform Jollibet
Jiliko slots: Jiliko app – Jiliko bonus
Online casino Jollibet Philippines Jollibet online sabong jollibet login
Bonus new member 100% Beta138: Bonus new member 100% Beta138 – Link alternatif Beta138
Мы предлагаем уборка офиса в Москве и области, обеспечивая высокое качество, внимание к деталям и индивидуальный подход. Современные технологии, опытная команда и прозрачные цены делают уборку быстрой, удобной и без лишних хлопот.
Мы предлагаем поверка счетчиков воды в СПб и области с гарантией качества и соблюдением всех норм. Опытные мастера, современное оборудование и быстрый выезд. Честные цены, удобное время, аккуратная работа.
помощь в лечении зависимости центр лечения наркозависимых
Withdraw cepat Beta138: Live casino Indonesia – Slot gacor Beta138
Swerte99 app Swerte99 login Swerte99 bonus
jollibet app: Online gambling platform Jollibet – Online betting Philippines
P2P USDT exchange Buenos Aires
Abutogel: Bandar togel resmi Indonesia – Link alternatif Abutogel
how to sell usdt from binance in buenos aires
Crypto exchange Fatih
Where to sell USDT for cash in Buenos Aires
best place to sell usdt for cash in bali
Tukar kripto ke tunai di Bali
Abutogel: Situs togel online terpercaya – Abutogel login
Abutogel Jackpot togel hari ini Link alternatif Abutogel
How to sell USDT in Istanbul
jollibet: Online gambling platform Jollibet – jollibet casino
USDT cash exchange Buenos Aires
Situs judi resmi berlisensi: Situs judi resmi berlisensi – Bonus new member 100% Beta138
Kazino bonuslar? 2025 Az?rbaycan Qeydiyyat bonusu Pinco casino Pinco kazino
Yuks?k RTP slotlar: Pinco kazino – Onlayn kazino Az?rbaycan
eu9
Эта информационная заметка содержит увлекательные сведения, которые могут вас удивить! Мы собрали интересные факты, которые сделают вашу жизнь ярче и полнее. Узнайте нечто новое о привычных аспектах повседневности и откройте для себя удивительный мир информации.
Все материалы собраны здесь – https://axi-med.ru/prichiny-obrashheniya-k-narkologu-na-dom-v-volgograde
Pinco casino mobil t?tbiq: Yuks?k RTP slotlar – Uduslar? tez c?xar Pinco il?
В статье представлены ключевые моменты по актуальной теме, дополненные советами экспертов и ссылками на дополнительные ресурсы. Цель материала — дать читателю инструменты для самостоятельного развития и принятия осознанных решений.
Только факты! – https://clever-lady.ru/zavisimost/zavisimost-i-lechenie-chto-nuzhno-znat-o-probleme-i-sposobah-borby.html
Эта информационная заметка содержит увлекательные сведения, которые могут вас удивить! Мы собрали интересные факты, которые сделают вашу жизнь ярче и полнее. Узнайте нечто новое о привычных аспектах повседневности и откройте для себя удивительный мир информации.
Нажмите, чтобы узнать больше – https://mikolo.com/2016/07/14/lets-learn-wedding-dresses-leero
1winphili: Online betting Philippines – Online gambling platform Jollibet
Сериал «Уэнсдей» https://uensdey.com мрачная и захватывающая история о дочери Гомеса и Мортиши Аддамс. Учёба в Академии Невермор, раскрытие тайн и мистика в лучших традициях Тима Бёртона. Смотреть онлайн в хорошем качестве.
Die moderne Krebstherapie hipec wird bei Peritonealkarzinose eingesetzt, um mit erwarmten Zytostatika direkt im Bauchraum versteckte Tumorzellen zu zerstoren und das Ruckfallrisiko zu senken.
Срочно нужен сантехник? сантехник на дом в Алматы? Профессиональные мастера оперативно решат любые проблемы с водопроводом, отоплением и канализацией. Доступные цены, выезд в течение часа и гарантия на все виды работ
В этой публикации мы предлагаем подробные объяснения по актуальным вопросам, чтобы помочь читателям глубже понять их. Четкость и структурированность материала сделают его удобным для усвоения и применения в повседневной жизни.
Выяснить больше – https://trtmechanical.vn/what-is-plastic-cnc-machining-used-for
Abutogel: Bandar togel resmi Indonesia – Abutogel
Usb Flash https://usb-flashki-optom-24.ru оптом Drivers и купить флешку с гравировкой в Новороссийске. Флешка На 1 тб и флешки к 23 февраля купить в Екатеринбурге. Купить флешку оптом в Ростове На Дону и флешка оригинальная
Casino online GK88: Slot game d?i thu?ng – Link vao GK88 m?i nh?t
Косметика для мужчин натуральная https://musco.ru
Etibarl? onlayn kazino Az?rbaycanda Pinco kazino Yeni az?rbaycan kazino sayt?
Продаем оконный профиль https://okonny-profil-kupit.ru высокого качества. Большой выбор систем, подходящих для любых проектов. Консультации, доставка, гарантия.
Оконный профиль https://okonny-profil.ru купить с гарантией качества и надежности. Предлагаем разные системы и размеры, помощь в подборе и доставке. Доступные цены, акции и скидки.
Mandiribet: Live casino Mandiribet – Slot jackpot terbesar Indonesia
Online gambling platform Jollibet: jollibet login – jollibet
The explanation of how wrapped tokens (like WETH) work on Polygon was very clear.
The platform’s design is clean and avoids the visual clutter that plagues so many other DeFi applications.
buy antibiotics from mexico Mexican Pharmacy Hub Mexican Pharmacy Hub
Mexican Pharmacy Hub: best prices on finasteride in mexico – buy from mexico pharmacy
sure save pharmacy: meijers pharmacy – MediDirect USA
Предлагаем вашему вниманию интересную справочную статью, в которой собраны ключевые моменты и нюансы по актуальным вопросам. Эта информация будет полезна как для профессионалов, так и для тех, кто только начинает изучать тему. Узнайте ответы на важные вопросы и расширьте свои знания!
Смотри, что ещё есть – https://alafdaltv.com/e-floating-buttons/ios
Эта информационная статья содержит полезные факты, советы и рекомендации, которые помогут вам быть в курсе последних тенденций и изменений в выбранной области. Материал составлен так, чтобы быть полезным и понятным каждому.
Только факты! – https://www.enh.co.jp/?p=206
ремонт кофемашины бош ремонт кофемашин gaggia
How to sell USDT in Lisbon
P2P USDT exchange Manila
Magpalit ng USDT para sa cash
USDT para dinheiro Lisboa
ремонт швейных машин janome ремонт швейных машин brother
Urgent crypto to cash São Paulo
удаленная 1с в облаке https://1c-oblako-msk.ru
best crypto cash out options in thailand
Sell USDT for Lira in Istanbul
MediDirect USA: MediDirect USA – MediDirect USA
http://medidirectusa.com/# MediDirect USA
MediDirect USA: clomid online pharmacy no prescription uk – MediDirect USA
Vendre crypto pour des espèces Monaco
Sell USDT for Euros in Belgrade
Neurontin tylenol 3 pharmacy price MediDirect USA
USDT contre euros à Monte-Carlo
How to sell USDT in Belgrade
local usdt trader oslo
Best way to cash out Tether in Sweden
online mexico pharmacy USA: viagra pills from mexico – Mexican Pharmacy Hub
viagra prices pharmacy: rx online – MediDirect USA
how to sell usdt from binance in madrid
order azithromycin mexico Mexican Pharmacy Hub buy kamagra oral jelly mexico
What are the fees for selling USDT in Spain?
Cash out USDT Oslo
Sell USDT for physical euros Berlin
USDT contro euro a Milano
Mexican Pharmacy Hub: Mexican Pharmacy Hub – Mexican Pharmacy Hub
Sell USDT Latinerkvarteret
USDT voor euro’s in Den Haag
https://medidirectusa.shop/# MediDirect USA
get danish kroner for tether trc-20 aarhus
Crypto exchange near me Vienna
Crypto verkopen voor contant geld Rotterdam
ремонт кофемашин сименс https://remont-kofemashin1.ru
Échanger USDT en espèces Luxembourg
ремонт швейных машин номер ремонта швейных машин
USDT cash exchange Zagreb
аренда 1с в облаке цена 1с облако подключить
Публикация приглашает вас исследовать неизведанное — от древних тайн до современных достижений науки. Вы узнаете, как случайные находки превращались в революции, а смелые мысли — в новые эры человеческого прогресса.
Ознакомиться с деталями – https://odontologiaeoc.cl/ortodonciainvisible
Эта обзорная заметка содержит ключевые моменты и факты по актуальным вопросам. Она поможет читателям быстро ориентироваться в теме и узнать о самых важных аспектах сегодня. Получите краткий курс по современной информации и оставайтесь в курсе событий!
Следуйте по ссылке – https://ypkdonboscokam.org/2021/11/25/ut-ut-voluptas-quo
Эта информационная заметка содержит увлекательные сведения, которые могут вас удивить! Мы собрали интересные факты, которые сделают вашу жизнь ярче и полнее. Узнайте нечто новое о привычных аспектах повседневности и откройте для себя удивительный мир информации.
Выяснить больше – https://www.nishi-yama.co.jp/?attachment_id=16
Этот текст сочетает в себе элементы познавательного рассказа и аналитической подачи информации. Читатель получает доступ к уникальным данным, которые соединяют прошлое с настоящим и открывают двери в будущее.
Смотри, что ещё есть – http://airwheelchairs.com/2021/04/11/what-is-great-about-the-airwheel-h3pc-automatic-folding-wheelchair
best USDT exchange IDR Indonesia
sell usdt during bitcoin conference miami
Этот информативный текст выделяется своими захватывающими аспектами, которые делают сложные темы доступными и понятными. Мы стремимся предложить читателям глубину знаний вместе с разнообразием интересных фактов. Откройте новые горизонты и развивайте свои способности познавать мир!
Все материалы собраны здесь – https://braunty.ru/tango-komplekt-postelnogo-belya-odnotonnyy-dvukhstoronniy-iz-satina-life-stile-ls05-svetlo-seryy-seryy-evro/reviews
Sell USDT Paradeplatz
zithromax mexican pharmacy Mexican Pharmacy Hub best prices on finasteride in mexico
USDT to Indonesian Rupiah
sell usdt during bitcoin conference miami
Публикация приглашает вас исследовать неизведанное — от древних тайн до современных достижений науки. Вы узнаете, как случайные находки превращались в революции, а смелые мысли — в новые эры человеческого прогресса.
Открыть полностью – https://www.ateliersfrancochinois.com/2020/11/11/confinement-10-sur-le-cours-de-chinois-a-distance
Bybit USDT THB
swap USDT in Malta
safe p2p usdt exchange rates vancouver
Лоукост авиабилеты https://lowcost-flights.com.ua по самым выгодным ценам. Сравните предложения ведущих авиакомпаний, забронируйте онлайн и путешествуйте дешево.
Предлагаю услуги https://uslugi.yandex.ru/profile/DmitrijR-2993571 копирайтинга, SEO-оптимизации и графического дизайна. Эффективные тексты, высокая видимость в поиске и привлекательный дизайн — всё для роста вашего бизнеса.
licensed crypto exchange Dubai
exchange USDT in Birmingham
p2p Tether in Greece
licensed crypto exchange Dubai
trade Tether in Saudi Arabia
trade USDT in Rome
escitalopram online pharmacy spironolactone in house pharmacy MediDirect USA
sell USDT in Amadora
АО «ГОРСВЕТ» в Чебоксарах https://gorsvet21.ru профессиональное обслуживание объектов наружного освещения. Выполняем ремонт и модернизацию светотехнического оборудования, обеспечивая комфорт и безопасность горожан.
Your article helped me a lot, is there any more related content? Thanks!
Онлайн-сервис лайк займ займ на карту или счет за несколько минут. Минимум документов, мгновенное одобрение, круглосуточная поддержка. Деньги в любое время суток на любые нужды.
trade USDT in Braga
trade USDT in Patras
USDT to TRY exchange
Custom Royal Portrait https://www.turnyouroyal.com an exclusive portrait from a photo in a royal style. A gift that will impress! Realistic drawing, handwork, a choice of historical costumes.
Открыть онлайн брокерский счёт – ваш первый шаг в мир инвестиций. Доступ к биржам, широкий выбор инструментов, аналитика и поддержка. Простое открытие и надёжная защита средств.
p2p Tether in Saudi Arabia
trade USDT in Antalya
convert USDT in Milan
Mexican Pharmacy Hub low cost mexico pharmacy online Mexican Pharmacy Hub
В этой статье представлен занимательный и актуальный контент, который заставит вас задуматься. Мы обсуждаем насущные вопросы и проблемы, а также освещаем истории, которые вдохновляют на действия и изменения. Узнайте, что стоит за событиями нашего времени!
Ознакомьтесь с аналитикой – https://auburnre.ie/hello-world
Этот информационный обзор станет отличным путеводителем по актуальным темам, объединяющим важные факты и мнения экспертов. Мы исследуем ключевые идеи и представляем их в доступной форме для более глубокого понимания. Читайте, чтобы оставаться в курсе событий!
Секреты успеха внутри – https://maayogashram.com/blog/benefit-of-yoga
Эта обзорная заметка содержит ключевые моменты и факты по актуальным вопросам. Она поможет читателям быстро ориентироваться в теме и узнать о самых важных аспектах сегодня. Получите краткий курс по современной информации и оставайтесь в курсе событий!
Узнай первым! – https://sinhala.srilankamirror.com/world/japan-to-reopen-borders-after-pandemic
Эта статья для ознакомления предлагает читателям общее представление об актуальной теме. Мы стремимся представить ключевые факты и идеи, которые помогут читателям получить представление о предмете и решить, стоит ли углубляться в изучение.
Выяснить больше – http://1×57.com/creativity-2/the-rise-of-wooden-surfboards-alaias
ПОмощь юрист в банкротстве: услуги по банкротству юридических лиц стоимость
Ремонт кофемашин https://coffee-craft.kz с выездом на дом или в офис. Диагностика, замена деталей, настройка. Работаем с бытовыми и профессиональными моделями. Гарантия качества и доступные цены.
Круглосуточный вывод из запоя в нижнем новгороде — помощь на дому и в стационаре. Капельницы, очищение организма, поддержка сердца и нервной системы. Анонимно и конфиденциально.
Very good article. I’m experiencing many of these issues as well..
Купить мебель кухонные столы для дома и офиса по выгодным ценам. Широкий выбор, стильный дизайн, высокое качество. Доставка и сборка по всей России. Создайте комфорт и уют с нашей мебелью.
Gametoto
injection moulding tool material
Saudaratoto
best prices on finasteride in mexico Mexican Pharmacy Hub Mexican Pharmacy Hub
Sell My House Fast in Tampa, FL
Top-tube storage done right: a streamlined rockbros top tube bag opens one-handed at red lights, stays out of your knees on climbs, and doesn’t rattle.
Предлагаем оконные профили https://proizvodstvo-okonnych-profiley.ru для застройщиков и подрядчиков. Высокое качество, устойчивость к климатическим нагрузкам, широкий ассортимент.
Оконные профили https://proizvodstvo-okonnych.ru для застройщиков и подрядчиков по выгодным ценам. Надёжные конструкции, современные материалы, поставка напрямую с завода.
injection moulding tooling
Pokerace99
Asian4d
юридическая помощь задать вопрос помощь юриста онлайн бесплатно без регистрации и телефона
Нужен вентилируемый фасад: оцинкованная подсистема для вентилируемых фасадов
Нужны пластиковые окна: стоимость пластиковых окон
Sell My House Fast in Tampa, FL
В этом обзорном материале представлены увлекательные детали, которые находят отражение в различных аспектах жизни. Мы исследуем непонятные и интересные моменты, позволяя читателю увидеть картину целиком. Погрузитесь в мир знаний и удивительных открытий!
Получить исчерпывающие сведения – https://taxlama.com/2024/08/13/walmart-dropshipping-step-by-step-guide-2024
В этой статье вы найдете познавательную и занимательную информацию, которая поможет вам лучше понять мир вокруг. Мы собрали интересные данные, которые вдохновляют на размышления и побуждают к действиям. Открывайте новую информацию и получайте удовольствие от чтения!
Посмотреть подробности – https://phyllistodd.co.uk/index.php/test-gallery/page13-1001-full
В этой публикации мы предлагаем подробные объяснения по актуальным вопросам, чтобы помочь читателям глубже понять их. Четкость и структурированность материала сделают его удобным для усвоения и применения в повседневной жизни.
Только факты! – https://handrills.com/workout-basics-with-us
Trust Finance https://trustf1nance.com is your path to financial freedom. Real investments, transparent conditions and stable income.
handmade brooches cold porcelain clay
Інформаційний портал https://pizzalike.com.ua про піцерії та рецепти піци в Україні й світі. Огляди закладів, адреси, меню, поради від шефів, секрети приготування та авторські рецепти. Все про піцу — від вибору інгредієнтів до пошуку найсмачнішої у вашому місті.
online pharmacy india: top 10 pharmacies in india – Indian Meds One
Решили купить Honda? запись на сервис онлайн широкий ассортимент автомобилей Honda, включая новые модели, такие как Honda CR-V и Honda Pilot, а также автомобили с пробегом. Предоставляем услуги лизинга и кредитования, а также предлагает различные акции и спецпредложения для корпоративных клиентов.
Ищешь автозапчасти? багажник mont blanc 538 s(c) mckinley предоставляем широкий ассортимент автозапчастей, автомобильных аксессуаров и оборудования как для владельцев легковых автомобилей, так и для корпоративных клиентов. В нашем интернет-магазине вы найдете оригинальные и неоригинальные запчасти, багажники, автосигнализации, автозвук и многое другое.
Выкуп автомобилей https://restyle-avto.ru/ без постредников, быстро. . У нас вы можете быстро оформить заявку на кредит, продать или купить автомобиль на выгодных условиях, воспользовавшись удобным поиском по марке, модели, приводу, году выпуска и цене — независимо от того, интересует ли вас BMW, Hyundai, Toyota или другие популярные бренды.
продвижение сайтов обучение seo любой тематики. Поисковая оптимизация, рост органического трафика, улучшение видимости в Google и Яндекс. Работаем на результат и долгосрочный эффект.
нужен юрист: автоюрист защита интересов, составление договоров, сопровождение сделок, помощь в суде. Опыт, конфиденциальность, индивидуальный подход.
удаление шума в аудио инструменты музыкального редактирования
Заказать такси https://taxi-sverdlovsk.ru онлайн быстро и удобно. Круглосуточная подача, комфортные автомобили, вежливые водители. Доступные цены, безналичная оплата, поездки по городу и за его пределы
Онлайн-заказ такси https://sverdlovsk-taxi.ru за пару кликов. Быстро, удобно, безопасно. Подача в течение 5–10 минут, разные классы авто, безналичный расчет и прозрачные тарифы.
Закажите такси https://vezem-sverdlovsk.ru круглосуточно. Быстрая подача, фиксированные цены, комфорт и безопасность в каждой поездке. Подходит для деловых, туристических и семейных поездок.
Быстрый заказ такси https://taxi-v-sverdlovske.ru онлайн и по телефону. Подача от 5 минут, комфортные автомобили, безопасные поездки. Удобная оплата и выгодные тарифы на любые направления.
Платформа пропонує https://61000.com.ua різноманітний контент: порадник, новини, публікації на тему здоров’я, цікавих історій, місць Харкова, культурні події, архів статей та корисні матеріали для жителів міста
best online viagra site: buy cheap sildenafil – viagra fast delivery
Нужен сантехник: сантехник на дом вызвать
Saznajte sve o kamen u bubregu – simptomi, uzroci i efikasni nacini lecenja. Procitajte savete strucnjaka i iskustva korisnika, kao i preporuke za prevenciju i brzi oporavak.
ГОРСВЕТ Чебоксары https://gorsvet21.ru эксплуатация, ремонт и установка систем уличного освещения. Качественное обслуживание, модернизация светильников и энергоэффективные решения.
Займы онлайн лайкзайм моментальное оформление, перевод на карту, прозрачные ставки. Получите нужную сумму без визита в офис и долгих проверок.
Интернет-магазин мебели https://mebelime.ru тысячи моделей для дома и офиса. Гарантия качества, быстрая доставка, акции и рассрочка. Уют в каждый дом.
форум общения что такое груминг интересное слово? советы форумчан и разъяснения
Zasto se javlja https://www.bol-u-bubrezima.com: od kamenaca i infekcija do prehlade. Kako prepoznati opasne simptome i brzo zapoceti lecenje. Korisne informacije.
Авто журнал https://bestauto.kyiv.ua свежие новости автопрома, тест-драйвы, обзоры новинок, советы по уходу за автомобилем и репортажи с автособытий.
Sta znaci https://www.pesak-u-bubregu.com, koji simptomi ukazuju na problem i kako ga se resiti. Efikasni nacini lecenja i prevencije.
Популярный авто журнал https://mirauto.kyiv.ua подробные обзоры моделей, советы экспертов, новости автосалонов и автоспорта, полезные статьи для автовладельцев.
https://kamameds.com/# Online sources for Kamagra in the United States
Флешки оптом https://usb-flashki-optom-24.ru 1 гб купить и флешки в виде кредитных карт в Новокузнецке. Заказать флешку с Надписью и флешка 16 гб стоимость в Симферополе. 64 Gb флешка оптом и сколько стоит флешка 4 гб
Экономические новости https://gau.org.ua прогнозы и обзоры. Политика, бизнес, финансы, мировые рынки. Всё, что важно знать для принятия решений.
Мужской портал https://hooligans.org.ua всё, что интересно современному мужчине: стиль, спорт, здоровье, карьера, автомобили, технологии и отдых. Полезные статьи и советы каждый день.
Онлайн авто портал https://avtomobilist.kyiv.ua с обзорами новых и подержанных авто, тест-драйвами, советами по обслуживанию и новостями из мира автопрома.
SildenaPeak: SildenaPeak – viagra substitute
ny delivery shipping nyc
Gametoto
Your point of view caught my eye and was very interesting. Thanks. I have a question for you.
Sell My House Fast in Tampa, FL
Sell My House Fast in Tampa, FL
Портал о строительстве https://juglans.com.ua свежие новости, статьи и советы. Обзоры технологий, материалов, дизайн-идеи и практические рекомендации для профессионалов и частных застройщиков.
Строительный портал https://dki.org.ua всё о строительстве и ремонте: технологии, оборудование, материалы, идеи для дома. Новости отрасли и экспертные рекомендации.
Онлайн строительный https://texha.com.ua портал о материалах, проектах и технологиях. Всё о ремонте, строительстве и обустройстве дома. Поддержка специалистов и вдохновение для новых идей.
Всё о стройке https://mramor.net.ua полезные статьи, советы, обзоры материалов и технологий. Ремонт, строительство домов, дизайн интерьера и современные решения для вашего проекта.
Сайт «Всё о стройке» https://sushico.com.ua подробные инструкции, советы экспертов, новости рынка. Всё о строительстве, ремонте и обустройстве жилья в одном месте.
Compare Kamagra with branded alternatives: Fast-acting ED solution with discreet packaging – Non-prescription ED tablets discreetly shipped
Pokerace99
Asian4d
how to buy viagra from canada: viagra medication online – SildenaPeak
cialis commercial bathtub: cialis patient assistance – cialis 5 mg
Новости Украины https://gromrady.org.ua в реальном времени. Экономика, политика, общество, культура, происшествия и спорт. Всё самое важное и интересное на одном портале.
Современный автопортал https://automobile.kyiv.ua свежие новости, сравнительные обзоры, тесты, автострахование и обслуживание. Полезная информация для водителей и покупателей.
Строительный сайт https://vitamax.dp.ua с полезными материалами о ремонте, дизайне и современных технологиях. Обзоры стройматериалов, инструкции по монтажу, проекты домов и советы экспертов.
Tadalify: cialis vs sildenafil – cialis effectiveness
Онлайн женский https://ledis.top сайт о стиле, семье, моде и здоровье. Советы экспертов, обзоры новинок, рецепты и темы для вдохновения. Пространство для современных женщин.
Your point of view caught my eye and was very interesting. Thanks. I have a question for you. https://www.binance.com/join?ref=P9L9FQKY
Danatoto
Online sources for Kamagra in the United States: Sildenafil oral jelly fast absorption effect – Compare Kamagra with branded alternatives
Luxury333
delivery nyc https://delivery-new-york.com/
Публикация приглашает вас исследовать неизведанное — от древних тайн до современных достижений науки. Вы узнаете, как случайные находки превращались в революции, а смелые мысли — в новые эры человеческого прогресса.
Ознакомьтесь с аналитикой – https://www.mrcljnsn.nl/portfolio/above-the-clouds
Публикация приглашает вас исследовать неизведанное — от древних тайн до современных достижений науки. Вы узнаете, как случайные находки превращались в революции, а смелые мысли — в новые эры человеческого прогресса.
Подробная информация доступна по запросу – https://www.yiwu2050.com/forex-news/cboe-global-markets-announces-two-senior-exec-promotions
Fast-acting ED solution with discreet packaging: Kamagra oral jelly USA availability – ED treatment without doctor visits
Danatoto
Goltogel
Kamagra oral jelly USA availability: Fast-acting ED solution with discreet packaging – Affordable sildenafil citrate tablets for men
Linetogel
cialis reviews: cialis buy online canada – Tadalify
Публикация приглашает вас исследовать неизведанное — от древних тайн до современных достижений науки. Вы узнаете, как случайные находки превращались в революции, а смелые мысли — в новые эры человеческого прогресса.
Узнай первым! – http://powerlook.tk/post/34
Эта информационная статья содержит полезные факты, советы и рекомендации, которые помогут вам быть в курсе последних тенденций и изменений в выбранной области. Материал составлен так, чтобы быть полезным и понятным каждому.
Углубить понимание вопроса – https://www.levesolls.com/woocommerce-placeholder
Эта публикация завернет вас в вихрь увлекательного контента, сбрасывая стереотипы и открывая двери к новым идеям. Каждый абзац станет для вас открытием, полным ярких примеров и впечатляющих достижений. Подготовьтесь быть вовлеченными и удивленными каждый раз, когда продолжите читать.
Расширить кругозор по теме – https://churchilltravel.co.uk/london-to-india-flight-best-fares
Эта информационная заметка содержит увлекательные сведения, которые могут вас удивить! Мы собрали интересные факты, которые сделают вашу жизнь ярче и полнее. Узнайте нечто новое о привычных аспектах повседневности и откройте для себя удивительный мир информации.
Изучить аспект более тщательно – https://www.stefan-hobel.at/uncategorized/qq-htm
The transparency on fees is a breath of fresh air. Great job, MatchaSwap. – https://matchaswap.net/
I like how quickly ParaSwap finds the best path.
Great resources and tips for families here.
Koitoto
sell Tether in Madrid
Ziatogel
Koitoto
Write more stories, more chapters.
Публикация приглашает вас исследовать неизведанное — от древних тайн до современных достижений науки. Вы узнаете, как случайные находки превращались в революции, а смелые мысли — в новые эры человеческого прогресса.
Что ещё нужно знать? – https://nikpendar.com/students-inducted-into-business-honor-society
Этот информативный текст выделяется своими захватывающими аспектами, которые делают сложные темы доступными и понятными. Мы стремимся предложить читателям глубину знаний вместе с разнообразием интересных фактов. Откройте новые горизонты и развивайте свои способности познавать мир!
Доступ к полной версии – http://mrshade.com/listen-to-madd-new-album-hyper
Anyswap
Публикация приглашает вас исследовать неизведанное — от древних тайн до современных достижений науки. Вы узнаете, как случайные находки превращались в революции, а смелые мысли — в новые эры человеческого прогресса.
Все материалы собраны здесь – https://kp-lighting.com/?attachment_id=937
Linetogel
medyum
how to sell USDT in Geneva
dingdongtogel
оценка доли бизнеса оценка Москва
Thank you for your sharing. I am worried that I lack creative ideas. It is your article that makes me full of hope. Thank you. But, I have a question, can you help me?
PPN PPh crypto tax
crypto exchange in Sydney
Sell USDT in USA
Эта информационная статья содержит полезные факты, советы и рекомендации, которые помогут вам быть в курсе последних тенденций и изменений в выбранной области. Материал составлен так, чтобы быть полезным и понятным каждому.
Расширить кругозор по теме – https://mdiasassociates.com/hello-world
convert USDT in Haiti
Regulated crypto exchange Las Vegas
Ziatogel
Ziatogel
medyum
p2p Tether in California
vps host https://vpsserverhosting1.com
педикюрный стул лампа лупа для косметолога
prednisone canada prices: can you buy prednisone over the counter – can i buy prednisone online without a prescription
togelon login
convert USDT to EUR
Financial Regulatory Authority (FRA) crypto
clomid for sale: can you get clomid without insurance – FertiCare Online
Maldives cryptocurrency laws
convert USDT in Rome
sell USDT in Miami
Ziatogel
CardioMeds Express: furosemide – lasix pills
online casino ontario
buy furosemide online: lasix furosemide 40 mg – CardioMeds Express
Your point of view caught my eye and was very interesting. Thanks. I have a question for you. https://www.binance.info/tr/register-person?ref=W0BCQMF1
buy ivermectin nz: IverGrove – ivermectin for scaly leg mites
can i purchase amoxicillin online TrustedMeds Direct TrustedMeds Direct
доставка бетона саратов цена куб бетона с доставкой
Добрый день!
Долго анализировал как поднять сайт и свои проекты в топ и узнал от гуру в seo,
отличных ребят, именно они разработали недорогой и главное продуктивный прогон Xrumer – https://www.bing.com/search?q=bullet+%D0%BF%D1%80%D0%BE%D0%B3%D0%BE%D0%BD
Многоуровневый линкбилдинг помогает создать устойчивую ссылочную сеть. Линкбилдинг блог курс показывает эффективные стратегии. Линкбилдинг мы предлагаем для клиентов с различными целями. Контент маркетинг линкбилдинг улучшает естественность ссылочного профиля. Естественный линкбилдинг повышает доверие поисковых систем.
линкбилдинг курсы, погода в сео, линкбилдинг цена
Постинг на блогах для SEO, продвижение сайта по страницам, комплексное продвижение сайта заказать
!!Удачи и роста в топах!!
TrustedMeds Direct: order amoxicillin online – TrustedMeds Direct
You can win up to $250 in Free Play! The 3D graphics work well on mobile, and the 6×4 grid has 4,096 ways to win. That jumps up to 14,400 in the free spins bonus, where the reels expand and you can win up to 100 free spins. With a maximum win of 10,000x, the game can become quite lucrative. It’s just a case of whether or not you’re up for the ride. Batting first, Guernsey made 274 all out from 48.3 overs as Alex Bushell hit 91 from 69 balls including seven sixes and six fours. While some took this as their sign to head to the casino, others prefer gambling online, where an even bigger selection of jackpot slots is offered. By checking the recommendations of SportsCasting, players can find mobile-friendly casino websites and apps to play titles similar to Buffalo Link on the go.
https://smartwebmedia.rs/mines-by-spribe-a-strategic-review-on-winning-consistently-at-multi-casino/
Unlike in-game wagers for Super Bowl 2023, but you have to keep in mind that your card has to be cleared for international transactions in order for the money to go through. Hence, virtual tables. Winzz casino need to add more payment options to attract more new customers and keep their existing ones by offering a wider range of E-wallet options to choose from, slot chicken burst by wizard games demo free play click on Roll the dice and see how it goes. A new video slot machine created by Bally Wulff will take you to the pages of Shakespeare romans, slot chicken burst by wizard games demo free play this is fixed. However, so it will be divided among several lucky players. The target market of this gaming site is the Italian players, you should be certain that the games are fair. Peermont, aztec magic promo code for free spins bingo.
sell Tether in UK
I cannot thank you more than enough for the blogposts on your website. I know you set a lot of time and energy into these and truly hope you know how deeply I appreciate it. I hope I’ll do a similar thing person sooner or later.
sell USDT in San Jose
sell USDT TRC20 Texas
crypto trading bot tutorial
AI for crypto volatility
how to stake spLP tokens
convert USDT in Japan
buy cheap clomid get generic clomid cost cheap clomid now
cost cheap clomid without insurance: how can i get clomid online – FertiCare Online
Japanese cryptocurrency laws 2025
Tron Staking
Tron Staking
http://farmacidiretti.com/# Farmacia online piГ№ conveniente
siteniz çok güzel devasa bilgilendirme var aradığım herşey burada mevcut çok teşekkür ederim
https://potenzafacile.shop/# viagra pfizer 25mg prezzo
Tron Staking
siteniz harika başarılarınızın devamını dilerim aradığım herşey bu sitede
Tron Staking
В статье представлены ключевые моменты по актуальной теме, дополненные советами экспертов и ссылками на дополнительные ресурсы. Цель материала — дать читателю инструменты для самостоятельного развития и принятия осознанных решений.
Расширить кругозор по теме – http://www.hotel-1may.ru
Эта публикация завернет вас в вихрь увлекательного контента, сбрасывая стереотипы и открывая двери к новым идеям. Каждый абзац станет для вас открытием, полным ярких примеров и впечатляющих достижений. Подготовьтесь быть вовлеченными и удивленными каждый раз, когда продолжите читать.
Как достичь результата? – http://svytopolk.ru
Этот информативный текст выделяется своими захватывающими аспектами, которые делают сложные темы доступными и понятными. Мы стремимся предложить читателям глубину знаний вместе с разнообразием интересных фактов. Откройте новые горизонты и развивайте свои способности познавать мир!
Лучшее решение — прямо здесь – https://sinrigaku1.wpxblog.jp/html-48
AI for blockchain analytics
siteniz çok güzel devasa bilgilendirme var aradığım herşey burada mevcut çok teşekkür ederim
AI financial modeling crypto
Эта публикация завернет вас в вихрь увлекательного контента, сбрасывая стереотипы и открывая двери к новым идеям. Каждый абзац станет для вас открытием, полным ярких примеров и впечатляющих достижений. Подготовьтесь быть вовлеченными и удивленными каждый раз, когда продолжите читать.
Выяснить больше – https://aquarianpetstore.com/portfolio/etiam-vulputate-convallis-3
Onlinme casinos are growing rapidly.
They offer a huge selection of entertainment.
Players enjoy instant transactions
and crypto-friendly banking.
Spescial offeers include welcome packages, free spins
and cashback.
These increase fun.
Most platforms are mobile-optimized,
so users can access full features on mobile.
Overall, digital casinos provide a mix of security and excitement,
making them an ideal option for all users.
В статье представлены ключевые моменты по актуальной теме, дополненные советами экспертов и ссылками на дополнительные ресурсы. Цель материала — дать читателю инструменты для самостоятельного развития и принятия осознанных решений.
Смотрите также… – http://www.se-zar.ru
https://maplemedsdirect.com/# MapleMeds Direct
Can you be more specific about the content of your article? After reading it, I still have some doubts. Hope you can help me. https://accounts.binance.com/register?ref=P9L9FQKY
troubleshooting SpookySwap connection
https://bordermedsexpress.com/# BorderMeds Express
siteniz çok güzel devasa bilgilendirme var aradığım herşey burada mevcut çok teşekkür ederim
Thank you for your sharing. I am worried that I lack creative ideas. It is your article that makes me full of hope. Thank you. But, I have a question, can you help me?