In our day-to-day design lives, the designer spends lots of time taking a number of pins, creating a drawing, and exporting and importing files. SOLIDWORKS professional and premium offer to access the SOLIDWORKS task scheduler for helps your productivity and work efficiently. The SolidWorks Task Scheduler sets up tasks to perform at a future time. You can use SOLIDWORKS Task Scheduler for scheduling the job during off-peak hours.
PURPOSE OF TASK SCHEDULER
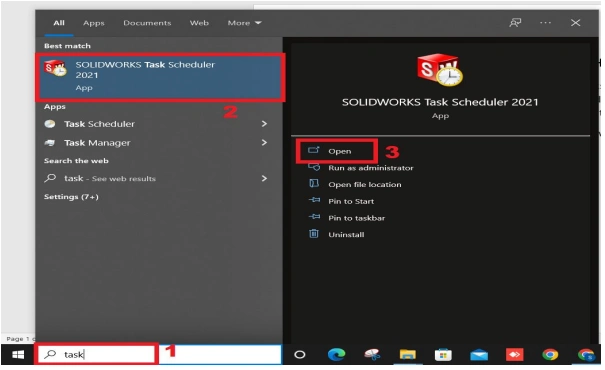
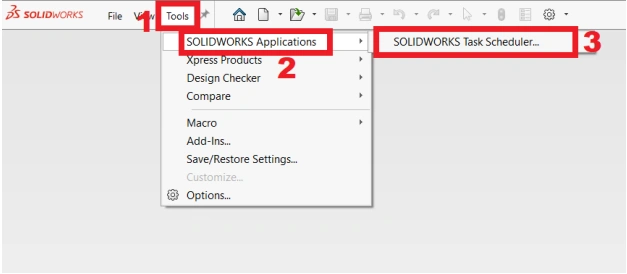
The Task Scheduler allows you to perform automated tasks on a computer. you can schedule any program to run at any time for you. You can access SOLIDWORKS TASK SCHEDULER in two different locations:
Windows search > TYPE task > CLICK SOLIDWORKS task scheduler...
In SOLIDWORKS menu bar, click Tools > SOLIDWORKS applications > CLICK SOLIDWORKS task scheduler...
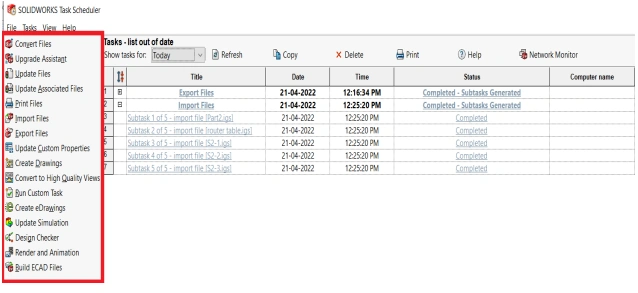
SOLIDWORKS TASK SCHEDULER INTERFACE
The user interface helps to assign the task and verify the status, along with a date and time. The highlighted area is the task lists.
The task details are given in the next picture, for more clarity. NOTE: In scheduling time, your system must be in switch ON condition.
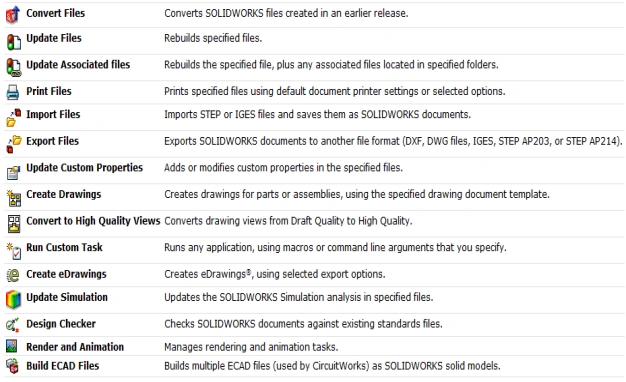
TASK LIST
In the task scheduler, the most commonly used tasks are given below:
a) Print files b) Import files c) Export files d) Creating drawings
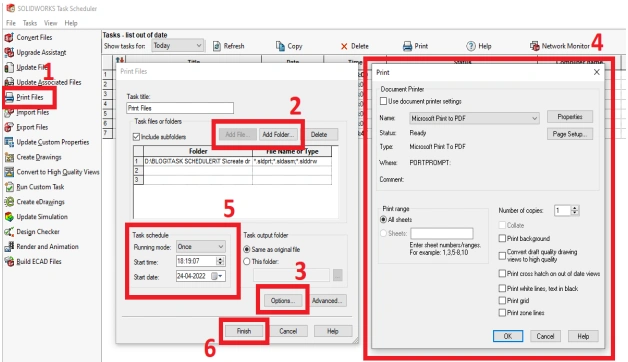
PRINT FILES
The print file task helps you save time and productivity. You can schedule tasks to print drawing files in are specified type within a folder. You can specify one or more files or folders, but you cannot specify both files and folders in the same task. For example, A0, A1, A2, A3, and A4
Steps:
1) Click the print file in the task list. 2) Add a specific file or folder to print. 3) Click an option for printer setting. 4) Set the printer name, sheet size, and number of copies. 5) Set the scheduling date and time. 6) Click Finish for scheduling. Note: your drawing sheet size and printer set size must be the same.
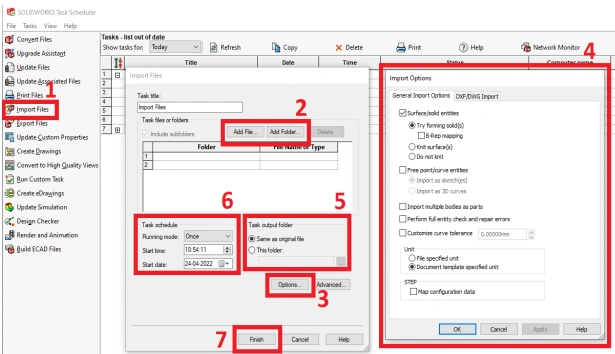
IMPORT FILES
You can schedule tasks to import Parasol ID, IGES, STEP, ACIS, VDAFS, SLDXML and Rhino files into SOLIDWORKS part (*.sldprt) files. You can import individual files or all files of a specified type within a folder.
Steps: 1) Click the import file in the task list. 2) Add a specific file or folder to import. 3) Click an option for import type. 4) Set the import option for your need. 5) Choose your file output location. 6) Set the scheduling date and time. 7) Click finish for scheduling.
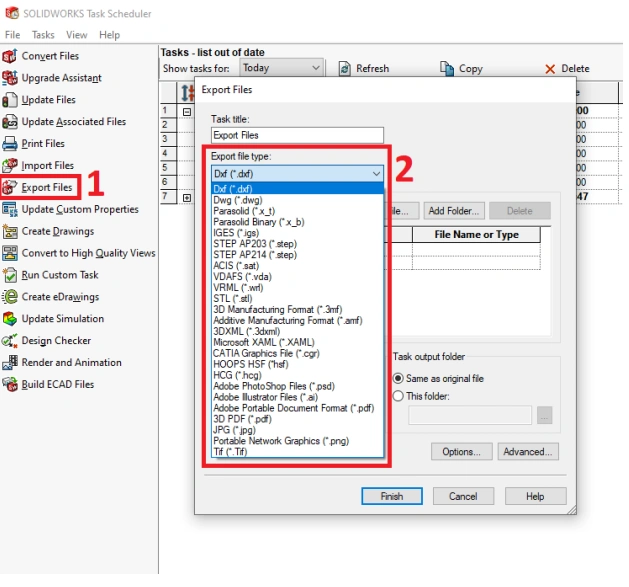
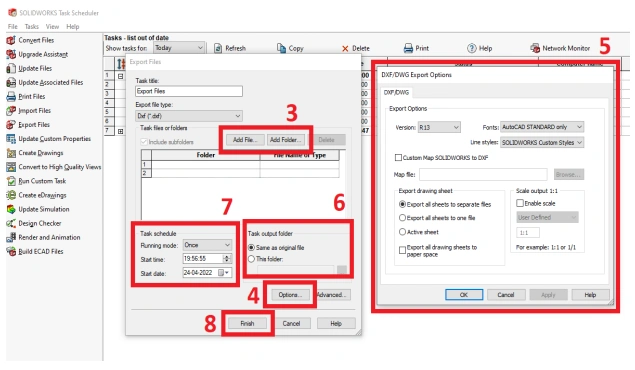
EXPORTING FILES
You can schedule tasks to export SOLIDWORKS documents into other formats. You can export individual files or all files of a specified type within a folder.
Steps:
1) Click the export file in the task list. 2) Choose your export file type in the drop-down. 3) Add a specific file or folder to export. 4) Click an option for export type. 5) Set the export option for your requirement. 6) Choose your file output location. 7) Set the scheduling date and time. 8) Click finish for scheduling.
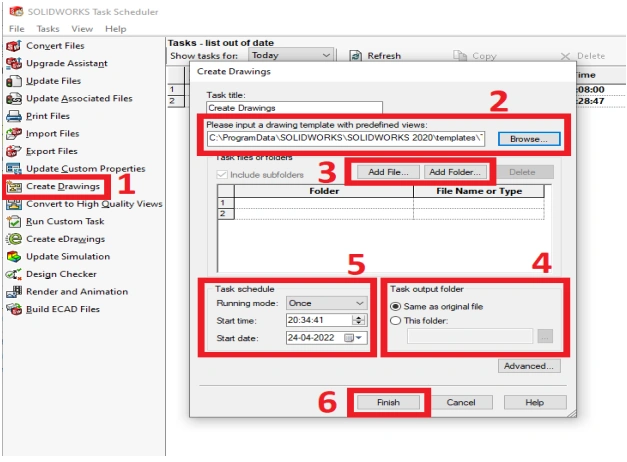
CREATE DRAWINGS
You can schedule tasks to create drawing files for the SOLIDWORKS part and assembly files. You can create drawings for individual files or all files of a specified type within a folder.
Steps:
1) Click creates drawings in the task list. 2) Choose your drawing template with a predefined view. 3) Add a specific file or folder to export. 4) Choose your file output location. 5) Set the scheduling date and time. 6) Click Finish for scheduling. Note: create a drawing template with a predefined view for proper drawing creation.
The world of product development is constantly evolving, and innovative tools like 3D Product Architect (PAU) are pushing the boundaries of Solidworks. This powerful software empowers users to create and modify complex product structures without the need for dedicated design software. This translates to a more inclusive development process, allowing even non-designers to contribute to product visualization and refinement. With 3D PAU, digital mockups become a breeze, fostering earlier collaboration and reducing the number of design iterations required. Let's delve deeper and explore the exciting functionalities of 3D PAU and how it can streamline your product development journey.
PREDEFINED VIEW
The predefined view in SOLIDWORKS is the easier way to set up the orientation of our models like the front view, top view, right view, and an isometric view. Additionally, configure the model dimensions, display style, and scale.
Streamline Drawing Creation with Predefined Views
Predefined views are a built-in feature in popular Computer-Aided Design (CAD) software like SolidWorks. They offer a faster and more efficient way to generate standard views of your 3D models, such as front, top, and right side views.
This blog dives into how you can leverage predefined views to create drawing templates, saving you significant time and effort in the long run.
Building Your Predefined View Template
The core of this technique lies in creating a template that incorporates your preferred view orientations, dimensions, and annotations. Here, we'll walk you through the steps involved in building your own predefined view template:
Choosing the Right Template and Sheet Size: We'll discuss selecting the appropriate base template and sheet size for your drawings.
Inserting Predefined Views: Learn how to easily insert standard views like front, top, and right side views using the predefined view options.
Customizing Annotations and Dimensions: Explore the options for setting annotations and dimensions within your predefined views.
Saving Your Template: Discover how to save your customized template for future use.
Benefits of Predefined View Templates
By investing time in creating predefined view templates, you'll reap numerous benefits:
Increased Efficiency: Significantly reduce the time spent on setting up basic views in your drawings.
Standardized Drawings: Ensure consistent layout and presentation across all your drawings.
Reduced Errors: Minimize the risk of errors by pre-defining critical annotations and dimensions.
Leverage Predefined Views for a Smoother Workflow
Predefined views offer a powerful approach to creating drawing templates in SolidWorks. implementing this technique, you can significantly boost your productivity and ensure consistent, high-quality drawings for your projects.
CREATING A PREDEFINED VIEW
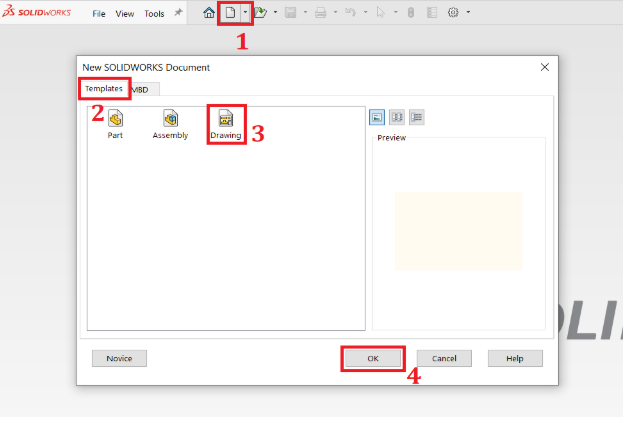
STEP-1: Choosing drawing template and sheet size.
➢ Click New > Template > Drawing > Click OK. ➢ Select the sheet size > Click OK.
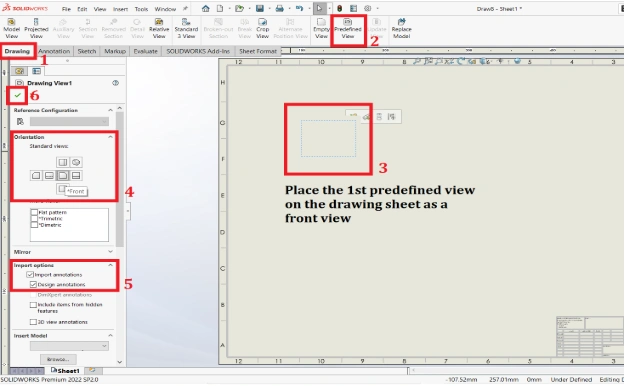
STEP-2: Placing the predefined views on the drawing sheet.
➢ In the command manager, click Drawing > Choose a predetermined view. ➢Begin by placing the first predefined view onto the drawing sheet. ➢ Select the front view as the orientation on the property manager tab. ➢ Set the annotation on the property management tab and choose import and design annotations from the drop-down menus. ➢ Set the first view by clicking OK. Note: The same procedures apply for the top view and right-side views as well.
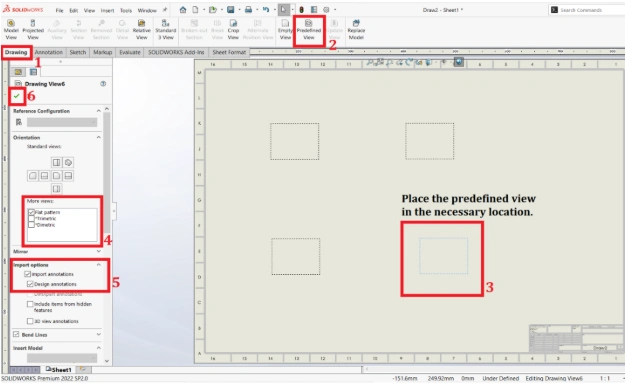
STEP-3: Placing the flat pattern views on the drawing sheet.
➢ In the command manager, click Drawing > Choose a predetermined view. ➢ Place the predefined view in the necessary location on the drawing sheet. ➢ Select the flat pattern view as the orientation on the property manager tab. ➢ Set the annotation on the property management tab and choose import and design annotations from the drop-down menus. ➢ Set the view by clicking OK.
Note: In SOLIDWORKS 2022 version new features include the flat pattern view, dimetric views, and trimetric views.
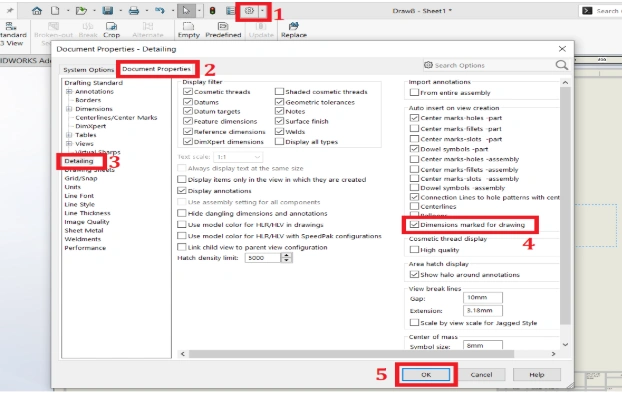
STEP-4: Set the marked dimension for drawing.
➢Select the document properties option on the settings menu. ➢In the document properties drop-down select detailing. ➢ The dimensions marked for drawing should be turned on. ➢ To make the selection, click OK.
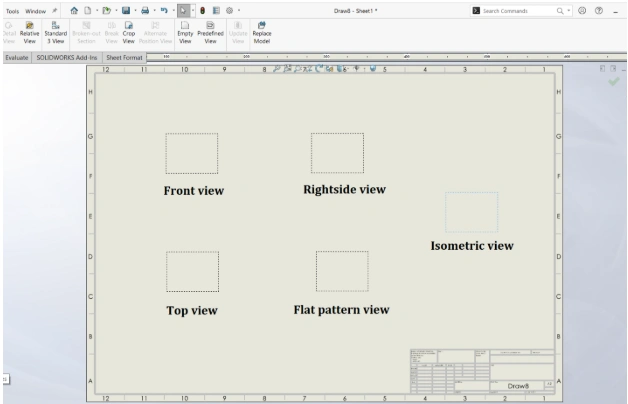
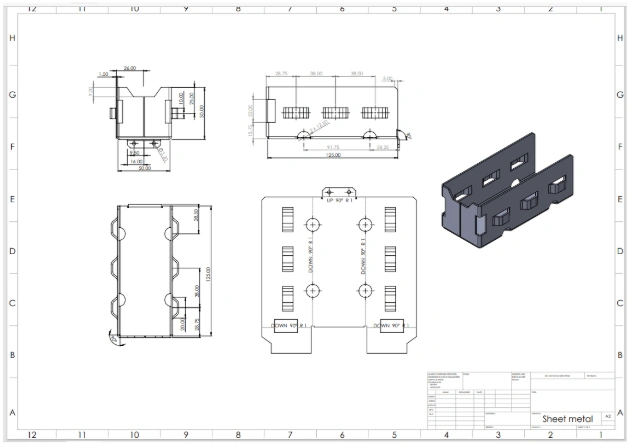
STEP-5: Review the final position of the predefined view
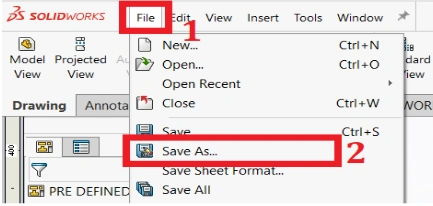
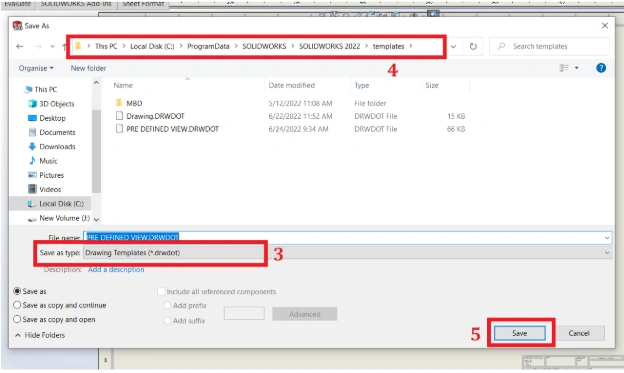
STEP-6: Save the predefined view as a template.
➢Click File > Save As. ➢ Save as type pick a drawing template from the drop-down menu. ➢ If the drawing template is selected as the save as type, it transports to the location of the pre-set template. ➢ Click OK to save the template
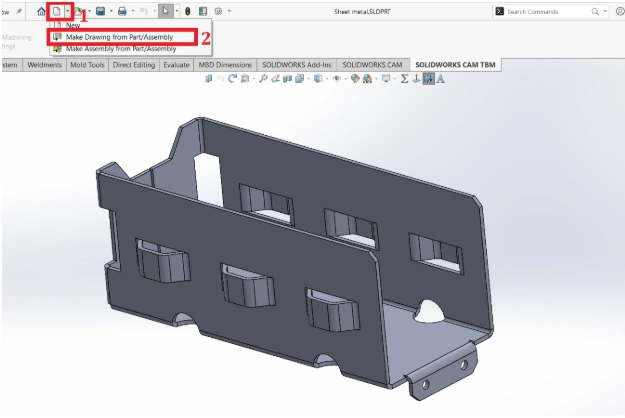
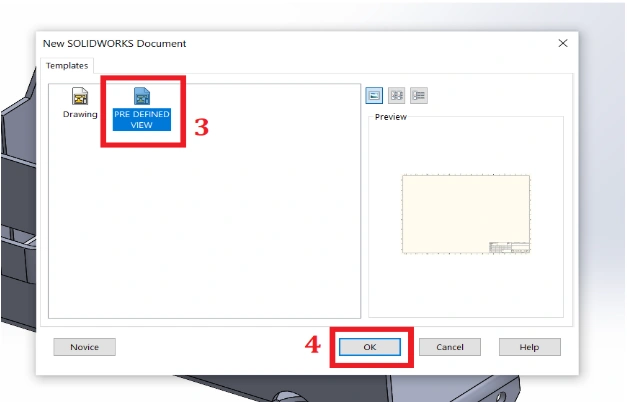
STEP-7: Create a drawing of the model.
➢Open the part > select the drop-down on a new tab. ➢ Choose mark drawing from part. ➢ Pick the created predefined view. ➢Click OK to see the model detailing.
Final Result:
Note: The predefined view template was also used in the task scheduler to increase productivity. Click Here for More Information.
Conclusion:
Using Predefined Views to build templates is an excellent method to automate projected or regular views and make the most of your Solidworks tools. To work smarter rather than harder, try incorporating Predefined views into your workflow.
SolidWorks 3DEXPERIENCE Project Planner empowers teams to streamline project execution through a web-based solution. This guide explores its functionalities, equipping you to harness its potential for collaborative project management.
1. what is project planner?
SolidWorks 3DEXPERIENCE Project Planner simplifies project planning by offering a browser-based solution. Teams can define, share, and complete tasks and deliverables through continuous project planning and execution. This collaborative and secure environment, powered by the 3DEXPERIENCE platform, keeps teams on track and within budget, ultimately accelerating time to market.
2. Who needs a project planner?
3DEXPERIENCE Project Planner empowers teams and organizations to manage complex engineering and product development projects. It proves valuable for various professionals, including:
Engineers and Designers: Plan and manage the development of 3D models, CAD designs, and other engineering-related tasks.
Product Managers: Plan and track new product development, including defining project timelines, assigning tasks, and monitoring progress.
Project Managers: Oversee and coordinate various project aspects, ensuring adherence to schedules and budgets.
Manufacturing and Production Teams: Align the production process with the product design and development schedule.
Collaborative Teams: Facilitate collaboration among team members, including cross-functional teams, suppliers, and partners.
Large Organizations: Manage complex projects involving multiple teams and departments with a unified platform.
3DEXPERIENCE Project Planner is ideal for anyone working on projects involving 3D modeling, CAD design, and engineering, especially when collaboration and task management are crucial.
3. The usage of a project planner?
SolidWorks 3DEXPERIENCE Project Planner offers a range of functionalities to streamline project management:
Project Planning:You can create and define projects within the software,
Task Management: Create and define projects within the software.
Resource Allocation:Create tasks and sub-tasks, assign them to team members.
Gantt Charts:Allocate resources like team members, equipment, and materials to tasks or projects for efficient utilization.
Collaboration:Utilize Gantt charts to visualize project timelines, dependencies, and critical paths.
Document Management:Store and manage project-related documents, CAD files, designs, and other resources within the system for easy access and version control.
Project Tracking:Monitor the progress of your projects and tasks in real-time. Real-time tracking lets you identify tasks on schedule and those at risk of delay, allowing for swift corrective actions.
Risk Management: Proactively identify potential risks and develop mitigation strategies.
Reporting and Analytics: Generate reports to assess project performance, resource allocation, and other key metrics.
Integration: Integrate with other SolidWorks software and tools for a holistic product design and engineering process.
4. Who needs a project planner?
SolidWorks 3DEXPERIENCE Project Planner significantly enhances productivity for teams involved in engineering, design, and product development. Here's how:
Centralized Information: A central platform stores project information, tasks, documents, and communication, eliminating scattered information and saving time.
Streamlined Task Management: Break down projects into tasks, assign responsibilities, and set deadlines for improved efficiency and accountability.
Real-Time Collaboration: Real-time communication and data sharing among team members and external partners lead to faster decision-making and problem-solving.
Visual Project Planning: Understand project structure and dependencies with Gantt charts and visual timelines, enabling efficient resource allocation and work planning.
Resource Optimization: Allocate resources effectively to avoid overloading individuals or underutilizing resources, leading to better resource management and improved productivity.
Reduced Errors: Version control and central document management minimize errors and rework. Teams can access the latest design documents and CAD files, improving quality and reducing correction time.
Proactive Project Monitoring: Real-time project tracking allows for early identification of potential delays or issues. This proactive approach enables teams to take corrective actions swiftly, preventing small problems from becoming major setbacks.
Data-Driven Improvement: By analyzing project performance, resource utilization, and other key metrics data, you can identify bottlenecks and areas for improvement in future projects.
Integration Benefits: Integration with other SolidWorks tools and third-party software streamlines workflows and reduces manual data transfer, enhancing productivity by eliminating redundant tasks.
Risk Mitigation: Identify and manage project risks to avoid costly delays and disruptions.
In summary, SolidWorks 3DEXPERIENCE Project Planner improves productivity by streamlining project management processes, enhancing communication and collaboration, reducing errors, and providing insights into project performance. It helps teams work more efficiently and effectively, ultimately leading to faster project completion, cost savings, and higher-quality outcomes.
5.Is it possible for me to make manual edits to the project? Or Certainly, here's the rewritten version?
Yes, you can make manual edits within your SolidWorks 3DEXPERIENCE Project Planner. The software typically provides user-friendly interfaces for creating, modifying, and updating project details, tasks, timelines, and resources. You can edit project plans, adjust task assignments, update deadlines, and make other changes as needed to keep your project information accurate and up-to-date. These manual edits are an essential part of actively managing your projects and adapting to changing circumstances.
6. it is only for internal purposes or it has any external community can use it?
SolidWorks 3DEXPERIENCE Project Planner empowers you to manage internal projects and collaborate with external partners or communities. The software facilitates communication and collaboration among all project stakeholders, including internal team members, external collaborators, suppliers, customers, and partners.. This flexibility allows for a broader and more inclusive approach to project planning and management, enhancing transparency and coordination across the entire project ecosystem.
7. Is it only for any specific project or we can do anything?
SolidWorks 3DEXPERIENCE Project Planner targets engineering, design, and product development projects. It specifically tailors its features to support tasks and activities commonly found in these fields. While it is highly versatile within this context, it may not be the most suitable tool for managing projects in unrelated fields, such as construction or event planning.
In summary, SolidWorks 3DEXPERIENCE Project Planner is most effective when used for projects in the engineering, design, and product development domains. It may not be as well-suited for managing projects outside of these areas.
Task Scheduler:
Focus:Task Scheduler is primarily focused on managing and automating individual tasks or processes within a project.
Scope: It deals with the execution and scheduling of specific tasks, often related to routine or repetitive activities . Automation:Task Scheduler is commonly used to automate tasks like backups, data imports, script executions, and system maintenance. It's more about automating technical or operational processes.
Granularity: It can manage tasks at a granular level, often focusing on individual actions rather than the overall project.
Project Planner:
Focus: Project Planner is designed for comprehensive project management, from planning and resource allocation to execution and monitoring of the entire project.
Scope: It deals with the entire project lifecycle, including defining project objectives, creating task dependencies, assigning resources, tracking progress, and generating reports.
Project Management: Project Planner is a tool for managing projects of varying complexities, such as product development, construction, event planning, and more. It encompasses all aspects of project management.
Granularity: Project Planner offers a broader perspective and can handle tasks at various levels, from high-level project phases down to detailed task management.
Task Scheduler excels at automating and managing specific, recurring tasks or processes, often technical or operational in nature. In contrast, Project Planner tackles comprehensive project management. It handles the entire project lifecycle and is well-suited for complex projects with diverse tasks and dependencies. The choice between them depends on your specific needs and the scale of the project you are managing.