Route Management in 3DEXPERIENCE simplifies workflows by automating tasks, tracking reviews, and managing approvals for efficient design and release processes.
A route is a set of tasks that a person defines for a group of people. Routes typically contain several tasks. However, it is also possible to create a route that contains a single task. Therefore, it is possible to define routes for different processes, for example, a design review or a release process.
Routes make it possible to define custom processes that are similar to custom PDM
workflows, but with additional functionality.
ROUTE TYPES
1. Approve
The assignee must approve the work that is associated with the task, whether it is a design or a document.
2. Notify only
Whoever is assigned to a task as Notify Only receives a notification about the task.
3. Comment
The task assignee must add a comment to complete the task. This is usually to provide additional insights or information for those who later approve the work that is tied to the sequence of tasks.
Tasks in a route can be either serial or in parallel.
a) Serial Route:
In a serial route, the tasks run in a particular order, which means that Route Task 1 must be completed before Route Task 2 can begin.
The image above gives an example of approval tasks, though the same principle applies to tasks that specify Comment. Tasks that specify Notify Only send a notification to the people assigned to the task and then automatically complete the task and proceed to the next task in the route.
b) Parallel Route:
It is possible to set up parallel tasks in two ways,
i. Any one of the assignees complete the task, the route task moves to next stage.
ii. In all condition, every assignees need to complete the task. Then only the route task moves to next stage.
Why Use a Route?
A route ensures that contributors to the process follow the correct procedures, for example, in the product approval and release process. It is a systematic way of tracking reviews and approvals.
How to use Route?
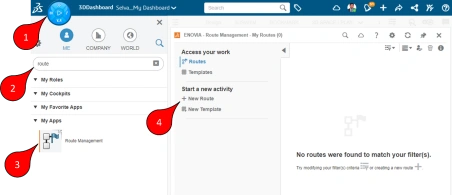
- Launch Route management application in compass and clicks + New Route.

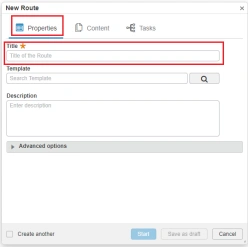
2. In the Properties tab, enter the title of the route task.

3. In content tab, add the document to be reviewed by using drag and drop (or) use + icon.

4. In the task tab, click add task to create the workflow of the route.

5. Once the 1st task has been created use + icon to add series and parallel route task.

After setting up two or more parallel tasks, it is possible to select whether All or Any of the assignees of the task need to approve or comment for the route to progress.
- On the task, double clickthe new task to open the properties pane. In the properties pane, add a title and description, and ensure that the Expected Action option. Then assignee the member to work on the route task.

Once the route task has been set to start. The route process workflow starts with the notification to the user to work on the route task.
Summary
routes provide organizations with a systematic process of performing a series of tasks with automation. In short, routes could be described in the following steps:
- To start a new process, you can create and run a route on demand, which enables you to add or remove route tasks because the route is active.
- When the route runs, notifications about the tasks to complete are sent automatically to those who are assigned to the task. If the assignee is a group, all members of the group receive a notification.
- When the route task completes, the route automatically moves to the next task in the route and sends a notification to the assignees.
- Upon completion, the route – if intended and set up to do so – promotes the connected files to the specified maturity state. For example, Released.
➡️Ready to take your workflow management to the next level? Enhance your skills with our comprehensive SOLIDWORKS Trainings. Whether you’re new to SOLIDWORKS or looking to refine your expertise, our tailored courses will empower you to make the most of 3DEXPERIENCE and SolidWorks tools. Learn how to efficiently manage tasks, streamline processes, and drive your projects to success.
➡️Don’t miss out on the latest breakthroughs in 3D technology and engineering solutions. Subscribe to our newsletter today and stay connected with industry trends, expert advice, and exclusive offers. Join our community of innovators and ensure you’re always a step ahead in your field. Sign up now!
➡️Elevate your design and production capabilities with state-of-the-art 3D scanners and printers. Unlock precision, speed, and creativity in every project. Discover the power of 3D technology and take your work to the next level—explore our range today!
