
This article thoroughly explains how to control document integrity by leveraging cooperation with Microsoft apps in conjunction with the 3DEXPERIENCE app. We’ll learn how to use Microsoft Documents and its accompanying tools and techniques.
Setting up the essentials:
- Open your 3DEXPERIENCE Platform and log in.
- To access the Collaboration for Microsoft, open the compass and choose the Collaborative Industry Innovator position.
- Locate the Microsoft Collaboration app, which ought to be installed on your computer since it is a native app.
Understanding what Collaboration for Microsoft really is:

One easy option to batch upload both old data documents directly into designated bookmarks is through the app’s Create tool. This is an advanced guide:
Uploading Legacy Data Documents Using the Create Tool:
- Open “Collaboration for Microsoft” and select the Create tool, which is usually located in the toolbar or menu.
- Batch Upload Functions: To upload numerous documents at once, use the batch upload option of the Create tool.
- Designate Bookmarks: Choose the precise bookmarks on the website where you wish to upload the files. This guarantees that the uploaded files are immediately added to the appropriate bookmarks.
- Select Files/Folders: From your device, select the needed files or folders, including the two legacy data documents.
- Start Batch Upload: After choosing the files, begin the upload process using the Create tool.
- Verification and Confirmation: Make sure the uploaded files show up in the designated bookmarks. Check to see if adding old data files was successful.
Arrange your previous data!
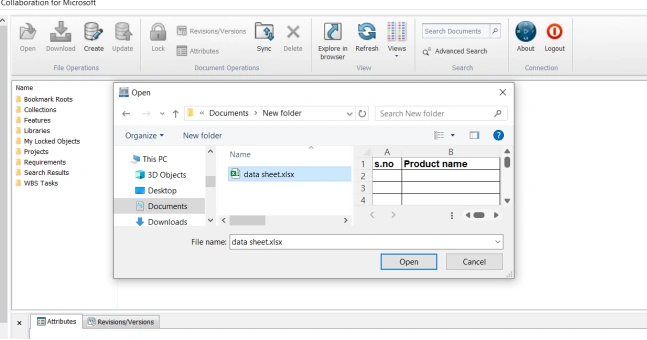
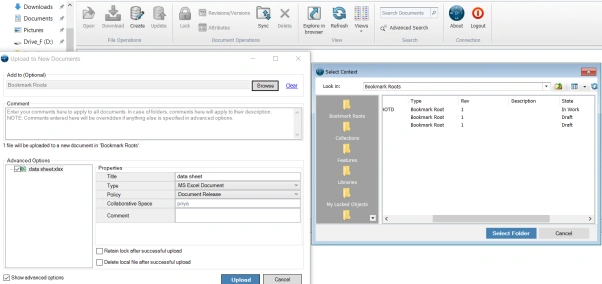
The following is a step-by-step tutorial to help with bulk uploads whether creating or uploading files:
- Make Use of the Create Tool: On the 3DEXPERIENCE Platform, use the Create tool to upload files in bulk.
- Batch Upload for Specified Bookmark: Select which documents, either old or new, to upload to a designated bookmark on the platform.
- Access Bookmark Roots: Go through the platform’s Bookmark Roots directory.
- Select the Respective Bookmark: Choose the precise bookmark that you wish to use for file uploads.
- Enable Lock Retention (Optional): If you want to add more file permission control after uploading files, check the box next to “Retain lock after successful upload.”
- Start the Upload: Save the files to the 3DEXPERIENCE Platform by using the upload feature of the platform.
Validation!

After a user uploads a document successfully, it appears in the platform’s “Bookmarks” area. The “Bookmarks” function as a handy guide or shortcut for quickly accessing and viewing these submitted documents.
Comprehending Version, Revision, and Attributes Control in Microsoft Collaboration
Creating Versions:

Microsoft Office collaboration tools in Word, Excel, and PowerPoint frequently make use of the integrated version control provided by Collaboration for Microsoft
This is a synopsis:
1. Track Changes:
- The version history of documents you work on together on in your 3DEXPERIENCE Platform is automatically preserved.
- You can view & restore earlier iterations of the document. It changes made by various collaborators are tracked.
- This feature maintains a record of who made what adjustments, which aids with version management.
2. Co-Authoring:
- Multiple users can collaborate in real-time on the same document thanks to the support for real-time co-authoring.
- Concurrent collaboration is made possible by the visibility of each user’s changes to others.
3. Version History:
- The ability to roll back to older versions is provided via this feature. It lists earlier versions along with timestamps.
4. Sharing and Permissions:
- Granular control over document sharing and permissions is offered by 3DEXPERIENCE Platform.
Reviewing the Versions:

Through the usage of the Revisions/Versions tool, users are able to see, download, or access particular versions of files along with related information such as ownership and comments. This provides users with comprehensive information on file versions.
Checking File Versions and Status:
1. Accessing Revisions/Versions Tool: Click on the “Revisions/Versions” tool within the platform’s interface.
2. Version Information: Users can obtain information about file versions, such as available versions, locked status, and maturity level, in this tool.
3. File Status Details: Information is exposed, including owner details, versions available, locked status, maturity level, and comments.
4. Open or Download Versions: Users can use this tool to open or download certain versions directly.
Creating Revisions:

Options for Creating Document Revisions:
1. Create Revision Including All Previous Versions and Revisions:
- By selecting this option, a new revision of the document is created that incorporates all previous iterations and revisions.
- It creates a new version that retains and combines the whole revision history.
- When users choose this method, they guarantee that the document’s complete history will be included in the next version.
2. Create Revision Excluding All Previous Versions and Revisions:
- This option generates a new revision that starts afresh without including any previous versions or revisions.
- It creates a clean slate, disregarding the document’s historical versions and revisions
Validating Revisions:
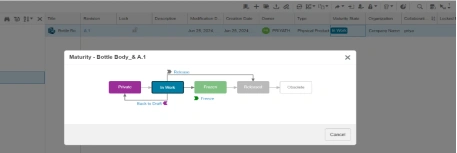
Ensuring the Right Revision in Microsoft Applications:
1. Close Current File:
- Close the currently open file within any Microsoft application.
2. Access “Replace by Revision” Command:
- Use the 3DEXPERIENCE Platform’s “Replace by Revision” command.
- You can replace the current document with the specified revision by using this command.
3. Perform Replacement:
- Execute the “Replace by Revision” command to substitute the current document with the intended revision from the platform.
4. Open Updated Document:
- Reopen the modified document from any Microsoft application after replacing it, as indicated in the reference image below.
Reviewing the Revisions:

By selecting the ‘Include previous files with revision’ option in the Revisions/Versions tool, users can view the entire revision history of a file, encompassing the current revision, all previous versions, and related files. This is a synopsis:
Accessing Revision History with “Include Previous Files” Option:
1. Revisions/Versions Tool: Use the apps interface to access the Revisions/Versions tool.
2. Choosing “Include Previous Files with Revision”: Make sure to select the option that incorporates the most recent version into all prior files.
3. Accessing Revision History: This option allows you to view the file’s entire revision history.
Users have the ability to view, open, and download files from all prior versions in addition to the current one.
Attributes handling within Microsoft Applications:
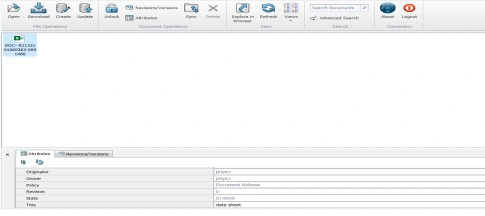
- Metadata and Attributes: Users assign metadata or attributes to Microsoft Office documents kept on the 3DEXPERIENCE platform. For example, attributes include document type, author, creation date, revision, and project ID.
- Custom Attributes: Users specify custom attributes suited to their specific requirements or industry needs. These characteristics offer more background or document information.
- Search and Filtering: Attributes linked to documents enable effective search and filtering on the 3DEXPERIENCE platform. Users can simplify document retrieval and management by searching for documents based on particular criteria.
- Integration with PLM Processes: Within the 3DEXPERIENCE platform, users can connect features related to Microsoft documents with Product Lifecycle Management (PLM) procedures. This integration ensures the alignment of document qualities with broader product development or project goals.
By collaborating with Microsoft apps, the tools and techniques in the 3DEXPERIENCE app work together to maintain document integrity, organize large volumes of data, and adhere to maturity life cycles. As a result, the 3DEXPERIENCE partnership with Microsoft apps not only provides your business with a competitive advantage but also offers seamless data management, thereby enabling unprecedented organizational growth.
