Batch Printing in Draftsight 2025: Step by Step Guide
DraftSight 2025 is a powerful and user-friendly CAD software designed for professional 2D and 3D design, and one of its key features is the ability to print multiple drawings at once using the batch print function. Whether you need to print a series of engineering drawings, blueprints, or architectural plans, batch printing can save you time and increase productivity.
What is Batch Printing?
Batch printing allows you to print multiple files (or drawings) simultaneously without opening each individual file. This feature is particularly helpful when you have numerous documents to print in a consistent format and want to streamline your printing workflow.
Why Use Batch Printing in DraftSight 2025?
- Save Time: Rather than opening each drawing individually and printing them one by one, batch printing allows you to print multiple drawings in one go.
- Consistency: Batch printing ensures that all the drawings are printed with the same settings and scale.
- Efficiency: If you have a series of revisions or updates to print, batch printing ensures no files are missed.
Steps to Batch Print in DraftSight 2025
Follow these steps to batch print your files in DraftSight 2025:
- Prepare Your Drawings
Before initiating the batch print, make sure all the files you want to print are ready and saved in a specific folder. You can print any number of files, so ensure they are properly named and organized.

2. Access the Batch Print Feature
To begin the batch printing process:
- Open DraftSight 2025.
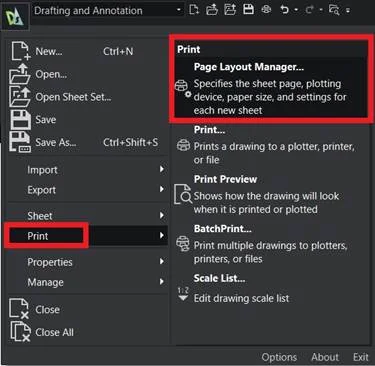
- Navigate to the File menu and select Batch Print.
- Alternatively, you can type BATCHPRINT into the command line to quickly access the batch print dialog.
3. Select the Files for Batch Printing
In the Batch Print dialog:
- Click on Add Files to select the drawings you wish to print. You can choose multiple files from your computer or navigate to the folder where your drawings are stored.
- You can also use Add Folder if you want to batch print all the files in a specific folder.
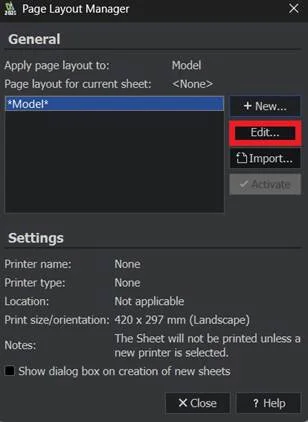
4. Choose Print Settings
Once your files are selected, customize the printing settings:
- Printer Configuration: Select the printer you’ll be using for the batch print.
- Page Size and Scale: Choose the correct page size and scale for all your drawings. Ensure they’re consistent across all files to avoid misprints.
- Sheet Orientation: Decide whether the drawings should be printed in portrait or landscape orientation.
- Plot Style: Select the appropriate plot style (e.g., color, grayscale, monochrome).

5. Choose Output Options
You can also configure output options, such as:
- Save to PDF: If you prefer to create PDFs instead of printing to a physical printer, DraftSight allows you to select a PDF printer driver.
- Output Folder: If you are saving the files in a different location or outputting PDFs, choose a folder where the files will be saved.
- Printing Order: You can specify whether to print files in the order they were added or reverse the order.

6. Start the Batch Print Process
Once all settings are configured, click the Start Plot button. DraftSight will begin the batch printing process and send each drawing to the designated printer or plotter based on your selected settings.
7. Monitor and Complete the Process
The progress of the batch print will be displayed in a status bar. Depending on the number of files and the complexity of the drawings, it may take some time to complete. You can monitor the progress and make adjustments if necessary.
Conclusion:
Batch printing in DraftSight is a powerful feature that can save you valuable time and effort when working with multiple CAD drawings. By setting up your documents and configuring the right print settings, you can easily print a large number of files without having to manage each one separately. Whether you’re printing architectural plans, engineering drawings, or any other technical documents, batch printing helps streamline the process and ensures consistency. Keep these tips in mind to get the most out of this useful tool!